


Routing a Dynamo Wire Inside a Fender
 01-26-13, 01:30 PM
#1
MFA
Thread Starter

Join Date: Apr 2006
Location: Denver
Posts: 1,186
Bikes: 1973 Italvega Nouvo Record; 1965 Hercules; 1982-83 Schwinn Mystery MTB
Mentioned: 0 Post(s)
Tagged: 0 Thread(s)
Quoted: 0 Post(s)
Likes: 0
Liked 0 Times
in
0 Posts
Routing a Dynamo Wire Inside a Fender
In my searching for how to route wires for a dynamo lighting system, I never found a specific thread for running dynamo wires through a fender -- only references. This is how I did it. As always, I hope others will find this useful.
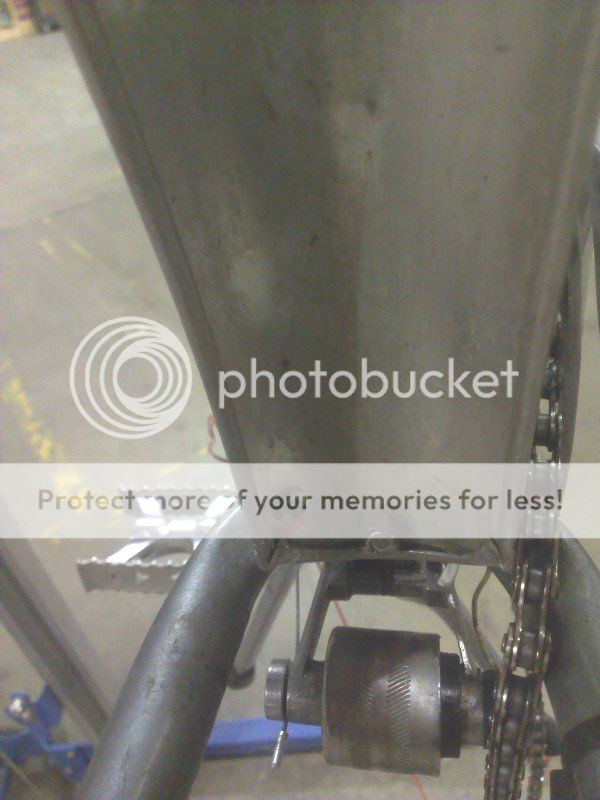
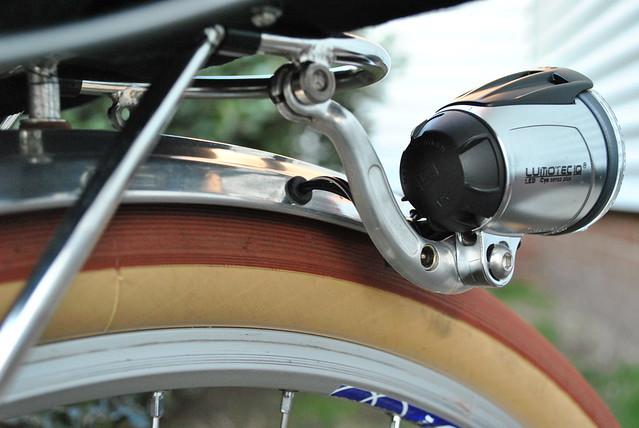
The bike is a very early Schwinn mountain bike frame that I have been building up as a fancy grocery bike. The dynamo/generator is a bottom bracket mounted unit that is essentially a 6v3w bottle generator stuffed inside a yoke mounted drum that rides against the rear tire tread. The rear light is an old fender mounted French PYB Generator light with a Compas Cycles red LED replacement with an incorporated standlight. The aluminum fenders are from Velo Orange.
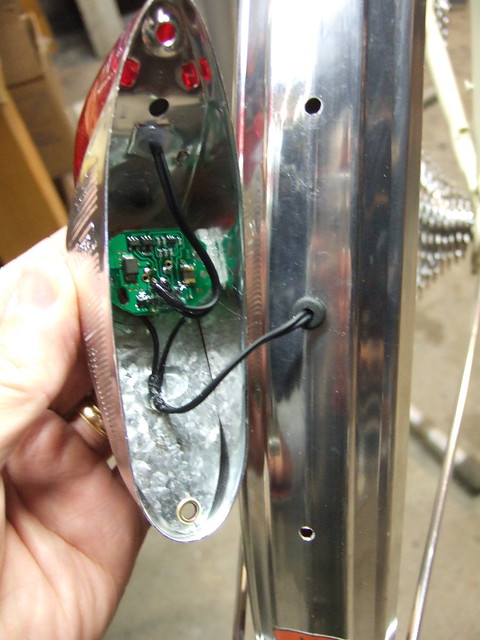
The key to routing the wire through the fender is the rolled edge. In the case of these fenders, this rolled edge creates a tube large enough to pull a length of 20 gauge stranded wire through. Unfortunately, I neglected to take pictures of parts of this process.
Using 20 gauge stranded wire, I stripped the housing off the first 3 inches. This bare copper will protrude out of the seam of the rolled edge, allowing you to pull the rest of the wire through the fender with a pliers. After deciding where the wire was to enter the rolled edge of the fender, I used an awl and a flathead screwdriver to carefully open the seam enough to push the wire into the rolled edge. Using a pliers on the exposed 3" of bare copper, I pulled the wire through the fender to where the light will be mounted. At this spot I opened the seam enough to pull the wire out of the rolled edge.
Pulling the wire should be fairly easy on a new, clean fender. As I discovered late in the game, mine have a few years of dirt and mud built up inside the rolled edge. Before starting, this will need to be cleaned out. A spray bottle of soapy water and a bent paperclip worked quite well to dig out the mud. I suspect, in the end, the soapy water made pulling the wire easier, so it is recommended to spray the inside of new clean fender anyway.
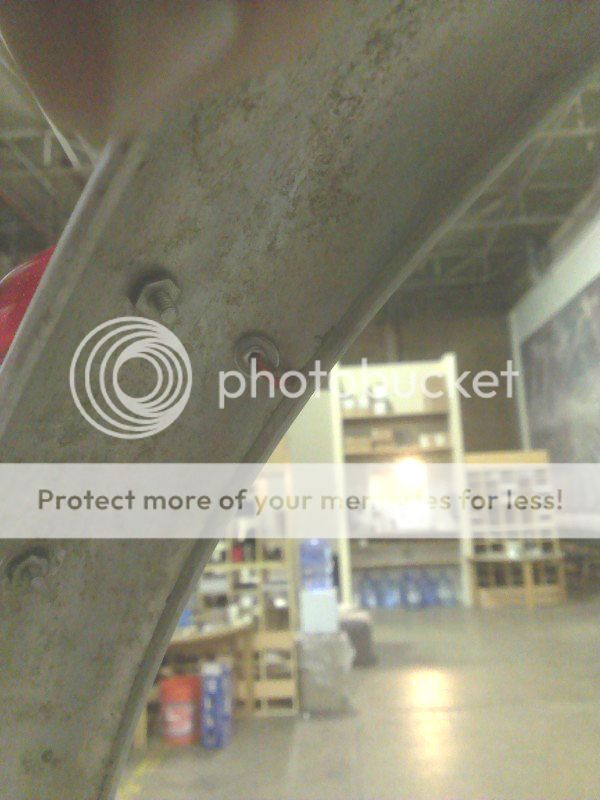
To finish off where the wire enters and exits the fender, I used 1/8" aluminum pop rivets with a reenforcing washer on the inside.

The center pin of the pop rivet can be pushed out by filing away the back side of the rivet and carefully tapping out the pin with a drift punch or an awl. To file away the back of the rivel, I used a carbide grinding bit for a die grinder that was chucked into a drill run at a medium speed and a steady hand.
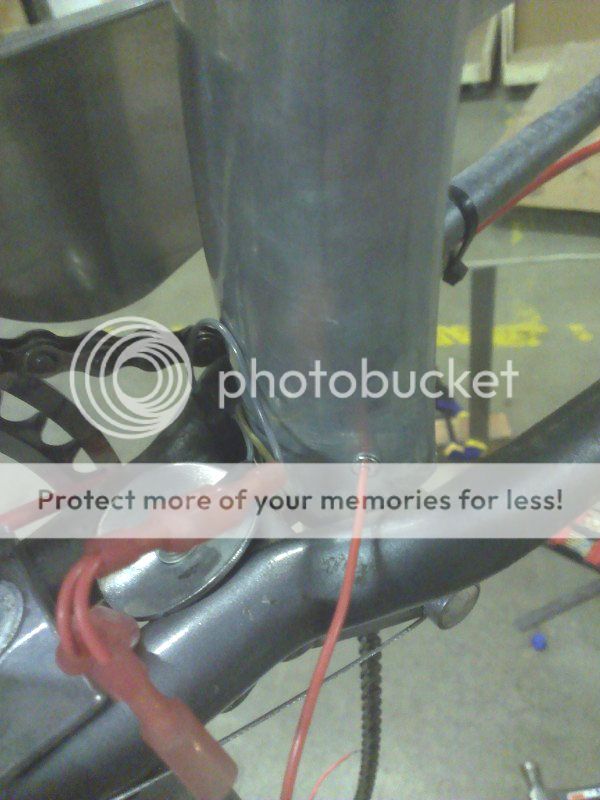
On the rear light, I considered trying to run the wire directly into the light housing. However, due to how close my fender is to the wheel, I was concerned that the extra length of wire might eventually droop into the tire and be worn away.
Eventually I will clean up the mess of wire connectors behind the cranks. My bottom bracket generator did not come with a complete mounting bracket, so I might incorporate a small metal container into whatever I fabricate to replace the fender washer.
The bike is a very early Schwinn mountain bike frame that I have been building up as a fancy grocery bike. The dynamo/generator is a bottom bracket mounted unit that is essentially a 6v3w bottle generator stuffed inside a yoke mounted drum that rides against the rear tire tread. The rear light is an old fender mounted French PYB Generator light with a Compas Cycles red LED replacement with an incorporated standlight. The aluminum fenders are from Velo Orange.
The key to routing the wire through the fender is the rolled edge. In the case of these fenders, this rolled edge creates a tube large enough to pull a length of 20 gauge stranded wire through. Unfortunately, I neglected to take pictures of parts of this process.
Using 20 gauge stranded wire, I stripped the housing off the first 3 inches. This bare copper will protrude out of the seam of the rolled edge, allowing you to pull the rest of the wire through the fender with a pliers. After deciding where the wire was to enter the rolled edge of the fender, I used an awl and a flathead screwdriver to carefully open the seam enough to push the wire into the rolled edge. Using a pliers on the exposed 3" of bare copper, I pulled the wire through the fender to where the light will be mounted. At this spot I opened the seam enough to pull the wire out of the rolled edge.
Pulling the wire should be fairly easy on a new, clean fender. As I discovered late in the game, mine have a few years of dirt and mud built up inside the rolled edge. Before starting, this will need to be cleaned out. A spray bottle of soapy water and a bent paperclip worked quite well to dig out the mud. I suspect, in the end, the soapy water made pulling the wire easier, so it is recommended to spray the inside of new clean fender anyway.
To finish off where the wire enters and exits the fender, I used 1/8" aluminum pop rivets with a reenforcing washer on the inside.
The center pin of the pop rivet can be pushed out by filing away the back side of the rivet and carefully tapping out the pin with a drift punch or an awl. To file away the back of the rivel, I used a carbide grinding bit for a die grinder that was chucked into a drill run at a medium speed and a steady hand.
On the rear light, I considered trying to run the wire directly into the light housing. However, due to how close my fender is to the wheel, I was concerned that the extra length of wire might eventually droop into the tire and be worn away.
Eventually I will clean up the mess of wire connectors behind the cranks. My bottom bracket generator did not come with a complete mounting bracket, so I might incorporate a small metal container into whatever I fabricate to replace the fender washer.
Last edited by jjvw; 01-26-13 at 04:43 PM.
 01-26-13, 01:41 PM
#2

K2ProFlex baby!

Join Date: Feb 2007
Location: My response would have been something along the lines of: "Does your bike have computer controlled suspension? Then shut your piehole, this baby is from the future!"
Posts: 6,133
Bikes: to many to list
Mentioned: 0 Post(s)
Tagged: 0 Thread(s)
Quoted: 16 Post(s)
Liked 56 Times
in
31 Posts
Pretty cool! Thanks for posting!
__________________
You see, their morals, their code...it's a bad joke, dropped at the first sign of trouble. They're only as good as the world allows them to be. I'll show you. When the chips are down, these...These "civilized" people...they'll eat each other. See, I'm not a monster. I'm just ahead of the curve
You see, their morals, their code...it's a bad joke, dropped at the first sign of trouble. They're only as good as the world allows them to be. I'll show you. When the chips are down, these...These "civilized" people...they'll eat each other. See, I'm not a monster. I'm just ahead of the curve
01-26-13, 08:39 PM
#3
Membership Not Required

Join Date: Jan 2005
Location: On the road-USA
Posts: 16,855
Bikes: Giant Excursion, Raleigh Sports, Raleigh R.S.W. Compact, Motobecane? and about 20 more! OMG
Mentioned: 5 Post(s)
Tagged: 0 Thread(s)
Quoted: 70 Post(s)
Likes: 0
Liked 15 Times
in
14 Posts
Nice job, I used a piece of nylon mono filament fish line then pulled the wire through. I have a couple of bikes with the BB generators, they work great most of the time, very wet or muddy conditions will affect the operation. What kind of bulb is in the tail light? If it is a screw base Compass Cycle sells an LED replacement with stand light that works great. I use them on a couple of bikes.
Aaron
Aaron
__________________
Webshots is bailing out, if you find any of my posts with corrupt picture files and want to see them corrected please let me know. :(
ISO: A late 1980's Giant Iguana MTB frameset (or complete bike) 23" Red with yellow graphics.
"Cycling should be a way of life, not a hobby.
RIDE, YOU FOOL, RIDE!"_Nicodemus
"Steel: nearly a thousand years of metallurgical development
Aluminum: barely a hundred
Which one would you rather have under your butt at 30mph?"_krazygluon
01-26-13, 09:50 PM
#4
Senior Member

Very nice writeup! I haven't tried routing wiring through the rolled edge yet, but I'll be tasked with doing this in a few weeks on a client's bike. I wouldn't have thought to try the trick of pulling the bare strands along the outside of the rolled edge. The pop rivets are a neat idea too! 
01-26-13, 11:09 PM
#5
You gonna eat that?

Has anyone routed a wire underneath a plastic fender that doesn't have a rolled edge?
__________________
I stop for people / whose right of way I honor / but not for no one.
 Originally Posted by bragi
  "However, it's never a good idea to overgeneralize."
I stop for people / whose right of way I honor / but not for no one.
"However, it's never a good idea to overgeneralize."
01-26-13, 11:38 PM
#6
is just a real cool dude

Join Date: Aug 2010
Location: The Thumb, MI
Posts: 3,165
Mentioned: 12 Post(s)
Tagged: 0 Thread(s)
Quoted: 32 Post(s)
Likes: 0
Liked 34 Times
in
14 Posts
What about running adhesive flat wire? Essentially a piece of copper ribbon backed with adhesive? My wife's Breezer Uptown infinity has the wiring run inside(not just inside but INSIDE like molded into the fender) of the plastic fender and then just buttons basically connect to the rear light and from the wiring on the frame. It's a really cool setup with no need to run wires inside of the fender. For how much we paid for that thing it better of came with snazzy parts like that.
01-27-13, 12:11 AM
#7
Cottered Crank

Join Date: Aug 2010
Location: Chicago
Posts: 3,401
Bikes: 1954 Raleigh Sports 1974 Raleigh Competition 1969 Raleigh Twenty 1964 Raleigh LTD-3
Mentioned: 0 Post(s)
Tagged: 0 Thread(s)
Quoted: 8 Post(s)
Likes: 0
Liked 11 Times
in
7 Posts
Clean the fender REALLY well, sand it a bit, and clean it with denatured alcohol again to get any oils off of the plastic. Use a few dabs to "tack" it down first, then run a bead down the wire.
Simple.
01-27-13, 12:32 AM
#8
MFA
Thread Starter
Join Date: Apr 2006
Location: Denver
Posts: 1,186
Bikes: 1973 Italvega Nouvo Record; 1965 Hercules; 1982-83 Schwinn Mystery MTB
Mentioned: 0 Post(s)
Tagged: 0 Thread(s)
Quoted: 0 Post(s)
Likes: 0
Liked 0 Times
in
0 Posts
What kind of bulb is in the tail light? If it is a screw base Compass Cycle sells an LED replacement with stand light that works great. I use them on a couple of bikes.
Aaron
Aaron
https://www.compasscycle.com/lighting_led_tail_bulb.html
The standlight is really surprising (to me at least, never had one before). I expected it to stay lit for a minute or two. But after riding and "charging" it for less than 5 minutes around the parking lot, it stayed pretty bright for at least 15 minutes and finally died out after about 40 minutes.
I'm very curious about how well my bb generator will work in the rain. I modified mine to make it lever actuated. See the bike build thread linked in the first post. As part of the modification, I removed the original engagement lever. It turns out this lever acted as a stop which kept the drum from hitting the tire as forcefully as it otherwise could. Now, i think the generator engages the tire harder than it used to. It will be a while before I can confirm this, since it doesn't rain or snow in Denver anymore.
Last edited by jjvw; 01-27-13 at 08:39 AM.
01-27-13, 07:22 AM
#9
Membership Not Required
Join Date: Jan 2005
Location: On the road-USA
Posts: 16,855
Bikes: Giant Excursion, Raleigh Sports, Raleigh R.S.W. Compact, Motobecane? and about 20 more! OMG
Mentioned: 5 Post(s)
Tagged: 0 Thread(s)
Quoted: 70 Post(s)
Likes: 0
Liked 15 Times
in
14 Posts
What about running adhesive flat wire? Essentially a piece of copper ribbon backed with adhesive? My wife's Breezer Uptown infinity has the wiring run inside(not just inside but INSIDE like molded into the fender) of the plastic fender and then just buttons basically connect to the rear light and from the wiring on the frame. It's a really cool setup with no need to run wires inside of the fender. For how much we paid for that thing it better of came with snazzy parts like that.
This is the bulb i have. It is a screw base.
https://www.compasscycle.com/lighting_led_tail_bulb.html
The standlight is really surprising (to me at least, never had one before). I expected it to stay lit for a minute or two. But after riding and "charging" it for less than 5 minutes around the parking lot, it stayed pretty bright for at least 15 minutes and finally died out after about 40 minutes.
I'm very curious about how well my bb generator will work in the rain. I modified mine to make it lever actuated. See the bike build thread linked in the first post. As part of the modification, it removed the original engagement lever. It turns out this lever acted as a stop which kept the drum from hitting the tire as forcefully as it otherwise could. Now, i think the generator engages the tire harder than it used to. It will be a while before I can confirm this, since it doesn't rain or snow in Denver anymore.
Aaron
__________________
Webshots is bailing out, if you find any of my posts with corrupt picture files and want to see them corrected please let me know. :(
ISO: A late 1980's Giant Iguana MTB frameset (or complete bike) 23" Red with yellow graphics.
"Cycling should be a way of life, not a hobby.
RIDE, YOU FOOL, RIDE!"_Nicodemus
"Steel: nearly a thousand years of metallurgical development
Aluminum: barely a hundred
Which one would you rather have under your butt at 30mph?"_krazygluon
01-27-13, 07:54 AM
#10
Senior Member
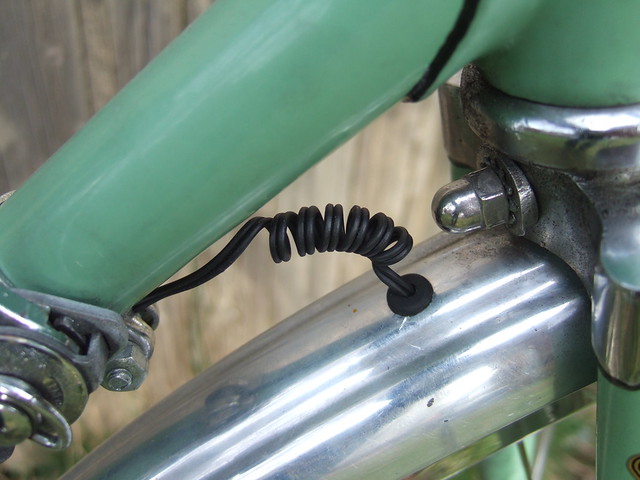
I first tape the wire in place at many points as I "spot" glue the wire at the points between the tape. If I try to glue it all at once, the wire doesn't want to conform to the curve of the fender and creates big gaps between the wire and the fender. After the glue sets, I remove the tape and then encase the entire length of wire with the glue. It becomes permanent, you'll never have the option of undoing it. The glue is tenacious. See attached pics, taken two and over 1000 miles of dirt/gravel roads later:
01-27-13, 08:00 AM
#11
Senior Member
I also like to use rubber grommets wherever the wiring has to pass through metal (although I like the idea of pop-rivets! I will have to try that).
01-28-13, 08:54 PM
#12
You gonna eat that?
01-28-13, 09:42 PM
#13

Senior Member

Reverse thrusters, I think.
__________________
Bikes on Flickr
I prefer email to private messages. You can contact me at justinhughes@me.com
Bikes on Flickr
I prefer email to private messages. You can contact me at justinhughes@me.com
01-28-13, 09:43 PM
#14
Wrench Savant

Has anyone routed a wire underneath a plastic fender that doesn't have a rolled edge?
01-29-13, 05:53 AM
#15
Membership Not Required
Join Date: Jan 2005
Location: On the road-USA
Posts: 16,855
Bikes: Giant Excursion, Raleigh Sports, Raleigh R.S.W. Compact, Motobecane? and about 20 more! OMG
Mentioned: 5 Post(s)
Tagged: 0 Thread(s)
Quoted: 70 Post(s)
Likes: 0
Liked 15 Times
in
14 Posts
If you have SKS fenders, they are plastic with aluminum strips inside (at least the old ones are). I have carefully cooked through the plastic on the underside and soldiered a wire to the aluminum strips. They are VERY thin, so this takes some patience. It looked fantastic and worked for about two years, but I did have some problems with the wire at the non-light end comming disconnected from the fender strip. I totally cooked the fender out of frustration trying to keep re-soldier the wire for good. If you can solve that, it would be cool.
Aaron
__________________
Webshots is bailing out, if you find any of my posts with corrupt picture files and want to see them corrected please let me know. :(
ISO: A late 1980's Giant Iguana MTB frameset (or complete bike) 23" Red with yellow graphics.
"Cycling should be a way of life, not a hobby.
RIDE, YOU FOOL, RIDE!"_Nicodemus
"Steel: nearly a thousand years of metallurgical development
Aluminum: barely a hundred
Which one would you rather have under your butt at 30mph?"_krazygluon
Webshots is bailing out, if you find any of my posts with corrupt picture files and want to see them corrected please let me know. :(
ISO: A late 1980's Giant Iguana MTB frameset (or complete bike) 23" Red with yellow graphics.
"Cycling should be a way of life, not a hobby.
RIDE, YOU FOOL, RIDE!"_Nicodemus
"Steel: nearly a thousand years of metallurgical development
Aluminum: barely a hundred
Which one would you rather have under your butt at 30mph?"_krazygluon
01-29-13, 08:42 AM
#16
Senior Member
01-29-13, 09:53 AM
#17
Junior Member
Join Date: Aug 2012
Location: France (Lille)
Posts: 19
Bikes: 1978 Peugeot PX8M
Mentioned: 0 Post(s)
Tagged: 0 Thread(s)
Quoted: 0 Post(s)
Likes: 0
Liked 0 Times
in
0 Posts
Nice job 
I did the same thing with my Velo-Orange fenders (without the pop rivet, but it's a very good idea)
I did the same thing with my Velo-Orange fenders (without the pop rivet, but it's a very good idea
)
01-29-13, 10:16 AM
#18
MFA
Thread Starter
Join Date: Apr 2006
Location: Denver
Posts: 1,186
Bikes: 1973 Italvega Nouvo Record; 1965 Hercules; 1982-83 Schwinn Mystery MTB
Mentioned: 0 Post(s)
Tagged: 0 Thread(s)
Quoted: 0 Post(s)
Likes: 0
Liked 0 Times
in
0 Posts
Thanks all for your examples of other ways to do this. Keep sharing.
Rubber or plastic grommets are much easier to install. I did the pop rivet purely for aesthetics. I also had them readily available.
Rubber or plastic grommets are much easier to install. I did the pop rivet purely for aesthetics. I also had them readily available.

Thread
Thread Starter
Forum
Replies
Last Post
hilltowner
Electronics, Lighting, & Gadgets
9
07-14-16 05:26 PM
mastakebob
Electronics, Lighting, & Gadgets
14
09-08-14 08:24 PM
Telly
Electronics, Lighting, & Gadgets
10
09-20-11 05:52 PM
