


Bottom bracket help
 08-10-19 | 08:43 PM
#1
Thread Starter
Junior Member
Joined: Aug 2019
Posts: 18
Likes: 2
Bottom bracket help
Hello all.
I am a noob. Please go easy on me.
My bottom bracket on 1999? Specialized Rockhopper was crunchy. So after research, I found out it was a square taper type. I got a Park Tool to remove the crank and expected to see splines (that’s what all videos that I saw) showed.
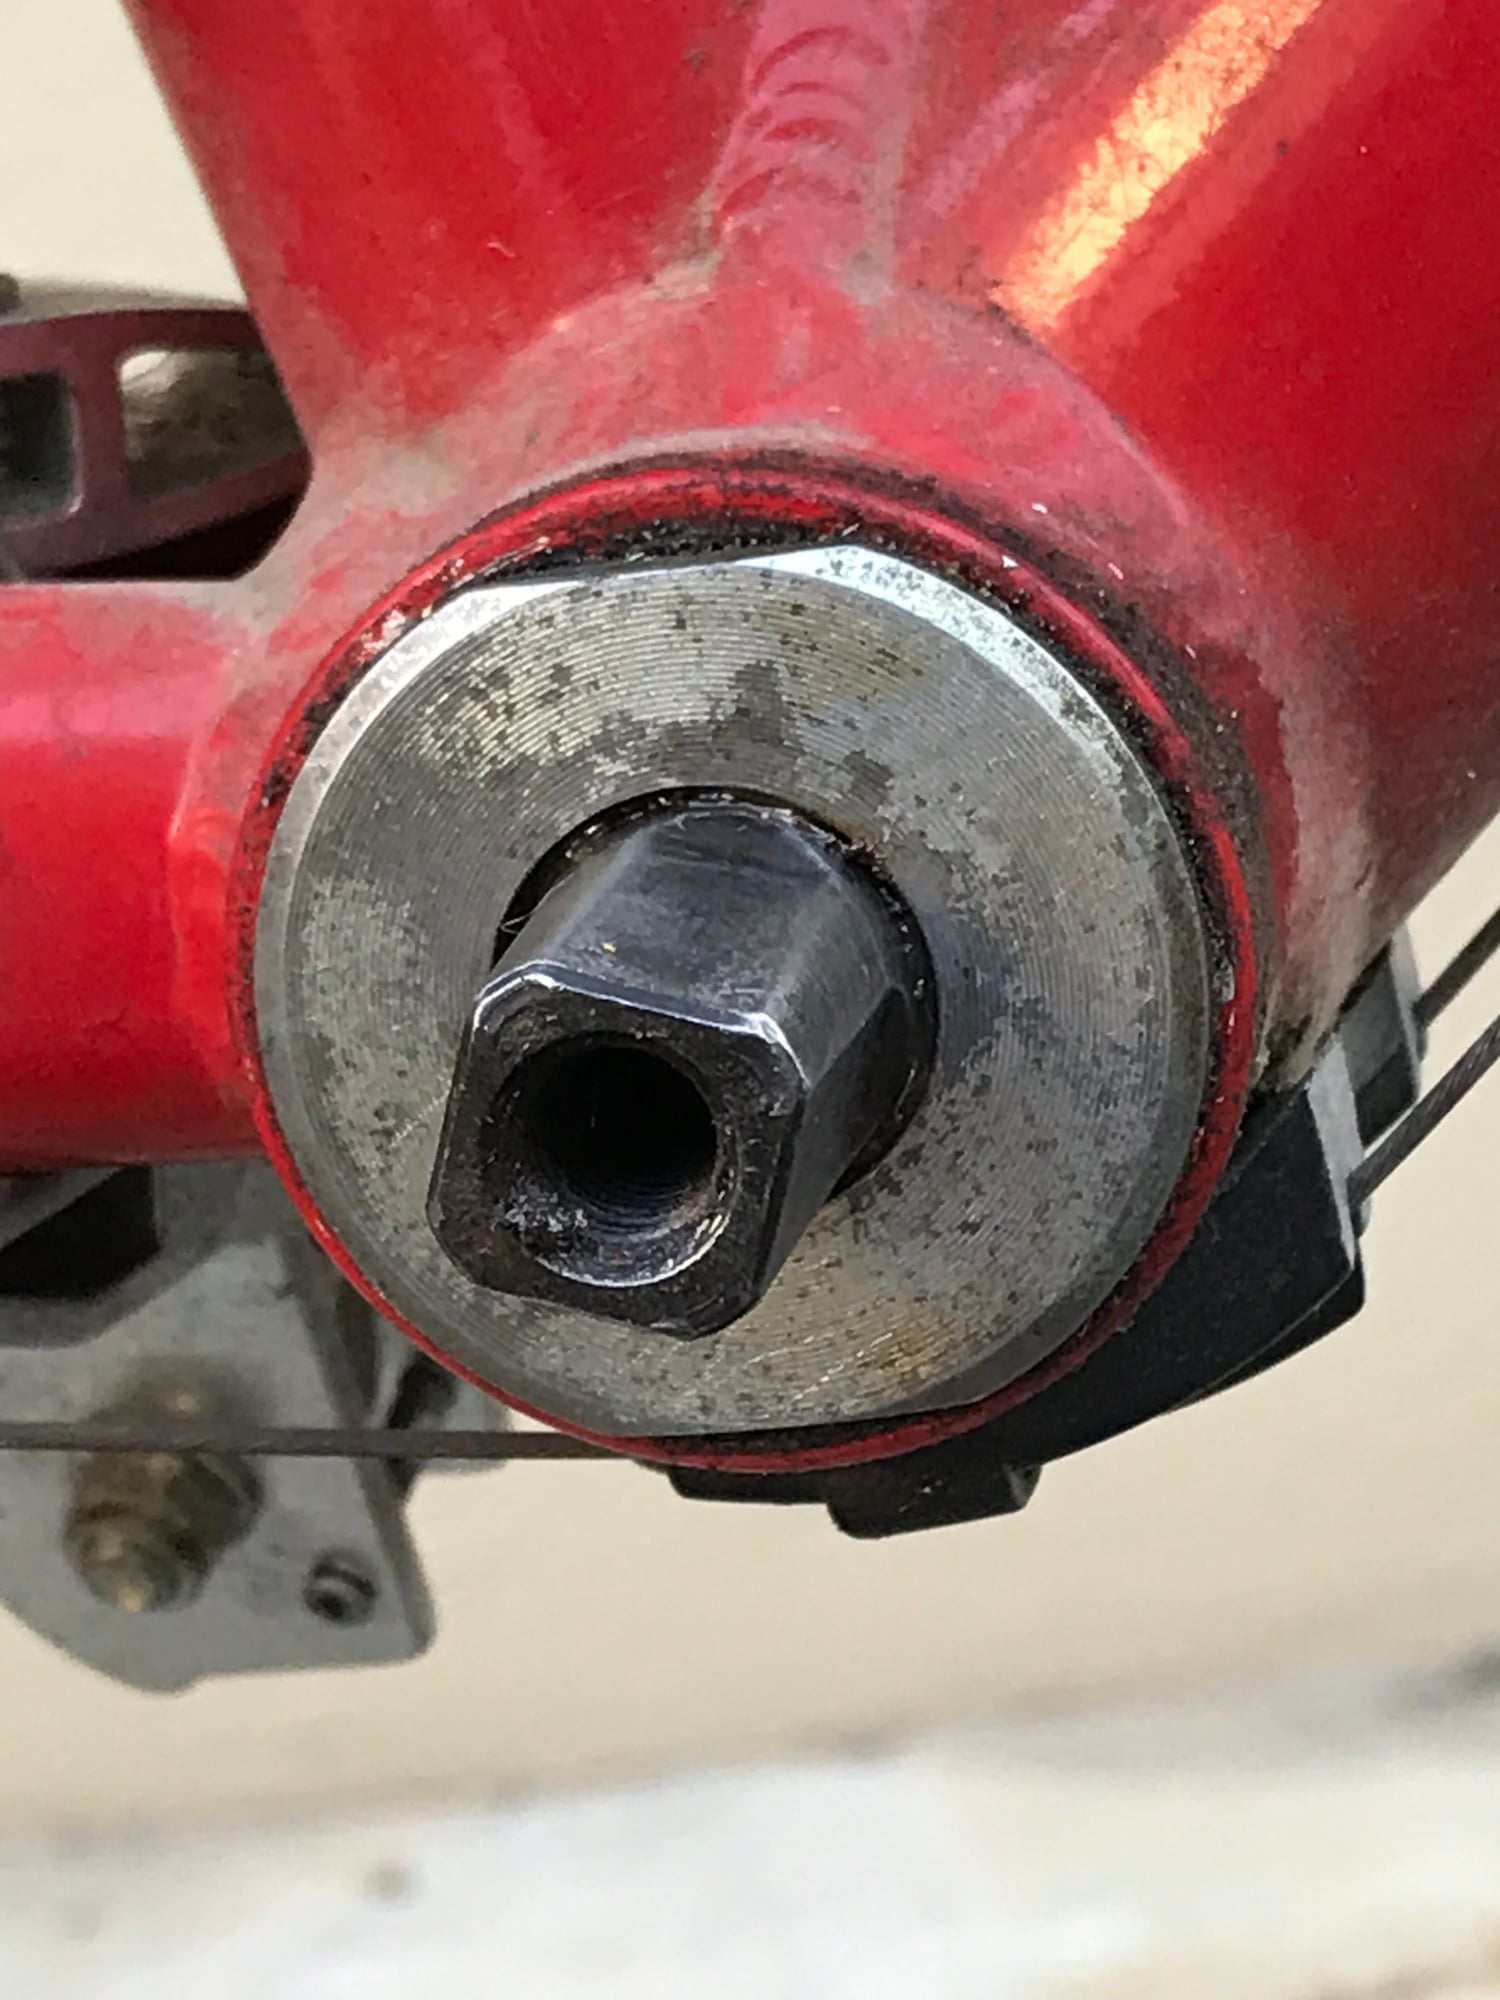
However, there were no splines to be turned. The drive side had what looked like a large silver washer with slight flat edge on opposing sides. The non-drive side had some protrusions but it did not look as if it was meant for any tool to grab on to.
What is this madness? I took beautiful photos to post but I didn’t have enough posts to attach photos. Any input from those who are knowledgeable would be greatly appreciated.
I am a noob. Please go easy on me.
My bottom bracket on 1999? Specialized Rockhopper was crunchy. So after research, I found out it was a square taper type. I got a Park Tool to remove the crank and expected to see splines (that’s what all videos that I saw) showed.
However, there were no splines to be turned. The drive side had what looked like a large silver washer with slight flat edge on opposing sides. The non-drive side had some protrusions but it did not look as if it was meant for any tool to grab on to.
What is this madness? I took beautiful photos to post but I didn’t have enough posts to attach photos. Any input from those who are knowledgeable would be greatly appreciated.
Last edited by jaykoo; 08-10-19 at 09:02 PM. Reason: Typo
 08-10-19 | 09:10 PM
#2

Senior Member

Joined: Sep 2010
Posts: 8,327
Likes: 1,110
From: Roswell, GA
Bikes: '93 Trek 750, '92 Schwinn Crisscross, '93 Mongoose Alta
It sounds like you have the old cup-and-cone type of bottom bracket. Here are a couple of links there are tons more online:
https://www.sheldonbrown.com/tooltips/bbcups.html
https://www.sheldonbrown.com/tooltips/bbadj.html
You can either service the existing BB or remove it and replace it with a cartridge type, which has the splines you were expecting. There are tips on removing the old one in the linked article, but it might be most efficient to have a shop do the work (or go to a co-op) rather than buy tools that you will only use once, if you decide to install the cartridge type. I have successfully removed the cup and cone type with a large adjustable wrench for the drive side and a hammer and punch for the non-drive side but it can be difficult work with improvised tools.
08-10-19 | 09:19 PM
#3
Senior Member

Joined: Feb 2012
Posts: 3,030
Likes: 1,064
From: Golden, CO and Tucson, AZ
Bikes: 2012 Specialized Elite Disc, 1983 Trek 520
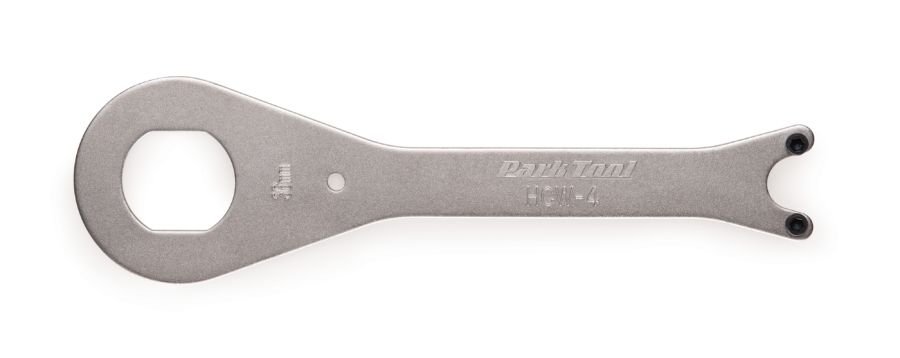
You have a three piece bottom bracket. You'll need Park Tools HCW-4 or similar to remove the fixed cup, and HCW-5 for the lock ring on the adjustable cup, and a suitable tool (a large crescent wrench often works) depending on the configuration of the adjustable cup. The pins on HCW-4 will fit some.
Look in Sheldon Brown's site for more tools and tips. Pay attention to the left-hand threading on the fixed cup, and you may need penetrating oil, heat, and/or mallet impact on wrench to free it.
Note that it's not always strictly necessary to remove the fixed cup. If you can clean it from the adjustable side, and inspect it well enough, you can just leave it.
 08-11-19 | 01:11 AM
#7

Really Old Senior Member

Joined: Feb 2007
Posts: 14,637
Likes: 1,884
From: Mid Willamette Valley, Orygun
Bikes: 87 RockHopper,2008 Specialized Globe. Both upgraded to 9 speeds. 2019 Giant Explore E+3
08-12-19 | 10:38 PM
#8
Thread Starter
Junior Member
Joined: Aug 2019
Posts: 18
Likes: 2
I’m finally able to post photos. So, this is what my bottom bracket looks like. I’m beginning to think that I can’t do this job without buy more tools and that I’m better off taking it to a shop. My question is this: if I take to a shop can they take out the whole thing and replace it with a Shimano drop-in bottom bracket? Also, for curiosity, how does the shop remove the non-drive side?

Non-drive side
Drive side
Non-drive side
Drive side
08-12-19 | 10:55 PM
#9

Insane Bicycle Mechanic


Joined: Mar 2008
Posts: 10,156
Likes: 1,122
From: other Vancouver
I�m finally able to post photos. So, this is what my bottom bracket looks like. I�m beginning to think that I can�t do this job without buy more tools and that I�m better off taking it to a shop. My question is this: if I take to a shop can they take out the whole thing and replace it with a Shimano drop-in bottom bracket? Also, for curiosity, how does the shop remove the non-drive side?
For the right (fixed) side, you use this or a similar tool:
Park HCW-4
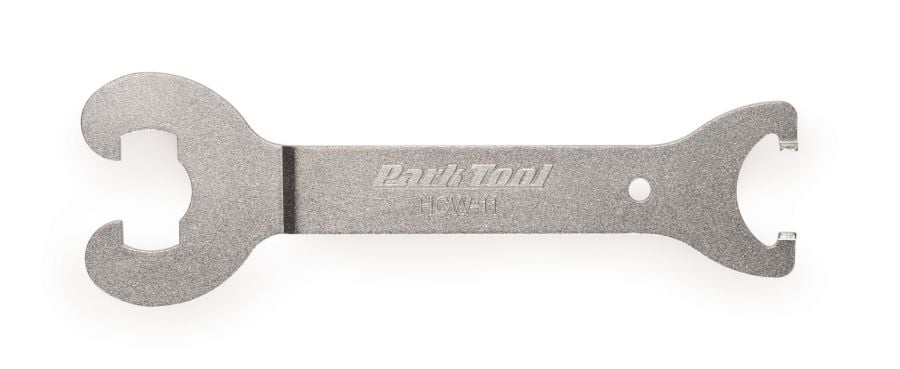
For the left (adjusting) side, you use a big adjustable wrench or this tool:
__________________
Jeff Wills
Comcast nuked my web page. It will return soon..
Jeff Wills
Comcast nuked my web page. It will return soon..
08-13-19 | 03:22 AM
#12

Senior Member
Joined: Nov 2015
Posts: 1,328
Likes: 525
From: Dublin, Ireland
Bikes: Bianchi Ti Megatube; Colnago Competition; Planet-X EC-130E; Klein Pulse; Amp Research B4; Litespeed Catalyst; Trek Y11
A tenner for labor, or 20 if it's difficult? The BB itself (Shimano UN55, probably?) shouldn't be too expensive, another 20-30 bucks, so should be around 50-ish all in.
08-13-19 | 08:20 AM
#13
SE Wis

Joined: Apr 2005
Posts: 11,549
Likes: 4,329
From: Milwaukee, WI
Bikes: '68 Raleigh Sprite, '02 Raleigh C500, '84 Raleigh Gran Prix, '91 Trek 400, 2013 Novara Randonee, 1990 Trek 970
Big adjustable wrench, stack of washers, and a bolt that fits the spindle threads. Use the bolt and washers to hold the wrench on without slipping and give it a wack with a hammer.
08-13-19 | 09:21 AM
#14
Thread Starter
Junior Member
Joined: Aug 2019
Posts: 18
Likes: 2
08-13-19 | 09:23 AM
#15
Thread Starter
Junior Member
Joined: Aug 2019
Posts: 18
Likes: 2
This is just brilliant. I'm constantly amazed by other people's ingenuity. Too bad that in my case, a big wrench (which I don't have) and a stack of washers (which I also don't have) will cost me just as much.
08-13-19 | 01:54 PM
#16
Full Member
Joined: Nov 2017
Posts: 390
Likes: 81
From: Switzerland
Bikes: 1957 Alpa Special, 1963 Condor Delta, 1967 Tigra Sprint, 1977 Oltenia, 1987 Mondia, 1965 Staco de luxe, 1969 Amberg
I�m pretty sure they would. Don�t know the cost, i do that myself. It�s not difficult by the way.
08-13-19 | 07:59 PM
#17
Senior Member
Joined: Feb 2012
Posts: 3,030
Likes: 1,064
From: Golden, CO and Tucson, AZ
Bikes: 2012 Specialized Elite Disc, 1983 Trek 520
Pardon me, but your photos or terminology are backwards, or I'm confused. Your photo labelled "non drive side" sure looks like the drive side. I see chain stays and kickstand to the left or rear, and down tube to the front or right. The gears traditionally go on this side. And that's a photo of a traditional fixed cup which goes on the drive side.
The upper photo shows a traditional adjustable cup, without a lock ring or space for one. I wonder about that. You may want to measure the BB shell width in mm. It may be an oversized 73 mm shell, and you may need a new cartridge bottom bracket to fit it. A spindle may not work.
The upper photo shows a traditional adjustable cup, without a lock ring or space for one. I wonder about that. You may want to measure the BB shell width in mm. It may be an oversized 73 mm shell, and you may need a new cartridge bottom bracket to fit it. A spindle may not work.
08-13-19 | 08:59 PM
#18
Thread Starter
Junior Member
Joined: Aug 2019
Posts: 18
Likes: 2
[QUOTE=andrewclaus;21074413]Pardon me, but your photos or terminology are backwards, or I'm confused. Your photo labelled "non drive side" sure looks like the drive side. I see chain stays and kickstand to the left or rear, and down tube to the front or right. The gears traditionally go on this side. And that's a photo of a traditional fixed cup which goes on the drive side.
The bottom photo is the drive side. I think the placement of the labels for the photos is misleading.
The bottom photo is the drive side. I think the placement of the labels for the photos is misleading.
08-13-19 | 09:01 PM
#19
Thread Starter
Junior Member
Joined: Aug 2019
Posts: 18
Likes: 2
Pardon me, but your photos or terminology are backwards, or I'm confused. Your photo labelled "non drive side" sure looks like the drive side. I see chain stays and kickstand to the left or rear, and down tube to the front or right. The gears traditionally go on this side. And that's a photo of a traditional fixed cup which goes on the drive side.
The upper photo shows a traditional adjustable cup, without a lock ring or space for one. I wonder about that. You may want to measure the BB shell width in mm. It may be an oversized 73 mm shell, and you may need a new cartridge bottom bracket to fit it. A spindle may not work.
The upper photo shows a traditional adjustable cup, without a lock ring or space for one. I wonder about that. You may want to measure the BB shell width in mm. It may be an oversized 73 mm shell, and you may need a new cartridge bottom bracket to fit it. A spindle may not work.
Thanks
08-14-19 | 06:12 AM
#20
Senior Member
Joined: Feb 2012
Posts: 3,030
Likes: 1,064
From: Golden, CO and Tucson, AZ
Bikes: 2012 Specialized Elite Disc, 1983 Trek 520
There should be a lock rink with external notches on the NDS adjustable cup. Around 40 seconds into this video shows what it should look like. Since there's obviously no room for such a lock ring, I deduce either your spindle is too short or somehow worn down (both unlikely) or the shell is too long (more likely).
08-14-19 | 11:32 AM
#21
Thread Starter
Junior Member
Joined: Aug 2019
Posts: 18
Likes: 2
I now see your labeling is correct and I was confused.
There should be a lock rink with external notches on the NDS adjustable cup. Around 40 seconds into this video shows what it should look like. Since there's obviously no room for such a lock ring, I deduce either your spindle is too short or somehow worn down (both unlikely) or the shell is too long (more likely).
There should be a lock rink with external notches on the NDS adjustable cup. Around 40 seconds into this video shows what it should look like. Since there's obviously no room for such a lock ring, I deduce either your spindle is too short or somehow worn down (both unlikely) or the shell is too long (more likely).
08-14-19 | 01:33 PM
#22
Thread Starter
Junior Member
Joined: Aug 2019
Posts: 18
Likes: 2
I need to move to wherever you are! I just visited my local shop. They wanted $35 for the labor and $40 for the drop-in cartridge bottom bracket. $75 plus tax!!!
08-14-19 | 02:15 PM
#23
Senior Member
Joined: Nov 2015
Posts: 1,328
Likes: 525
From: Dublin, Ireland
Bikes: Bianchi Ti Megatube; Colnago Competition; Planet-X EC-130E; Klein Pulse; Amp Research B4; Litespeed Catalyst; Trek Y11
The whole job shouldn't take more than an hour of labor: taking it out should be 10mins or less; putting in a new one should be less than 30mins. Unless it's an absolute pig or stuck or something weird... maybe they're just quoting for the worst-case scenario.
I took a stripped down frame to my LBS just to get the Shimano cup BB out, because I didn't want to buy the tool for it, and they didn't even charge me - because it took literally 2 mins to do. Then again, they know I'll come back in to buy cables and housings and seatpost binder bolts and stuff like that.
I'm actually quite happy to pay more for good service, people deserve to be paid for their work. So if you like your LBS, then it's worth it, they'll look after you in the future.

