


Basic Tools-C-Spanner-Is this a better way to go?
 04-07-19 | 04:34 PM
#1
Thread Starter
Senior Member
Joined: Nov 2015
Posts: 1,707
Likes: 201
From: Lacey, WA
Bikes: Stevenson Custom, Stevenson Custom Tandem, Nishiki Professional
Basic Tools-C-Spanner-Is this a better way to go?
I have two C-Spanner wrenches to loosen the locking ring on the bottom bracket for vintage bottom brackets. One, Park Tool HCW-5 has a single pin to go into the gaps cut in the lock ring at one of its ends with the other end there are three pins, while the second a Campagnolo tool has five pins to fit into the gaps of the lock ring. So many lock rings look like they have been chewed by a hungry dog, with rounded out gaps or partially broken corners from a C-Spanner twisting out of perfect engagement under pressure and damaging the lock ring, thus my evolution from a single tooth spanner to the five tooth Campagnolo spanner, but then I came across these C-Spanners.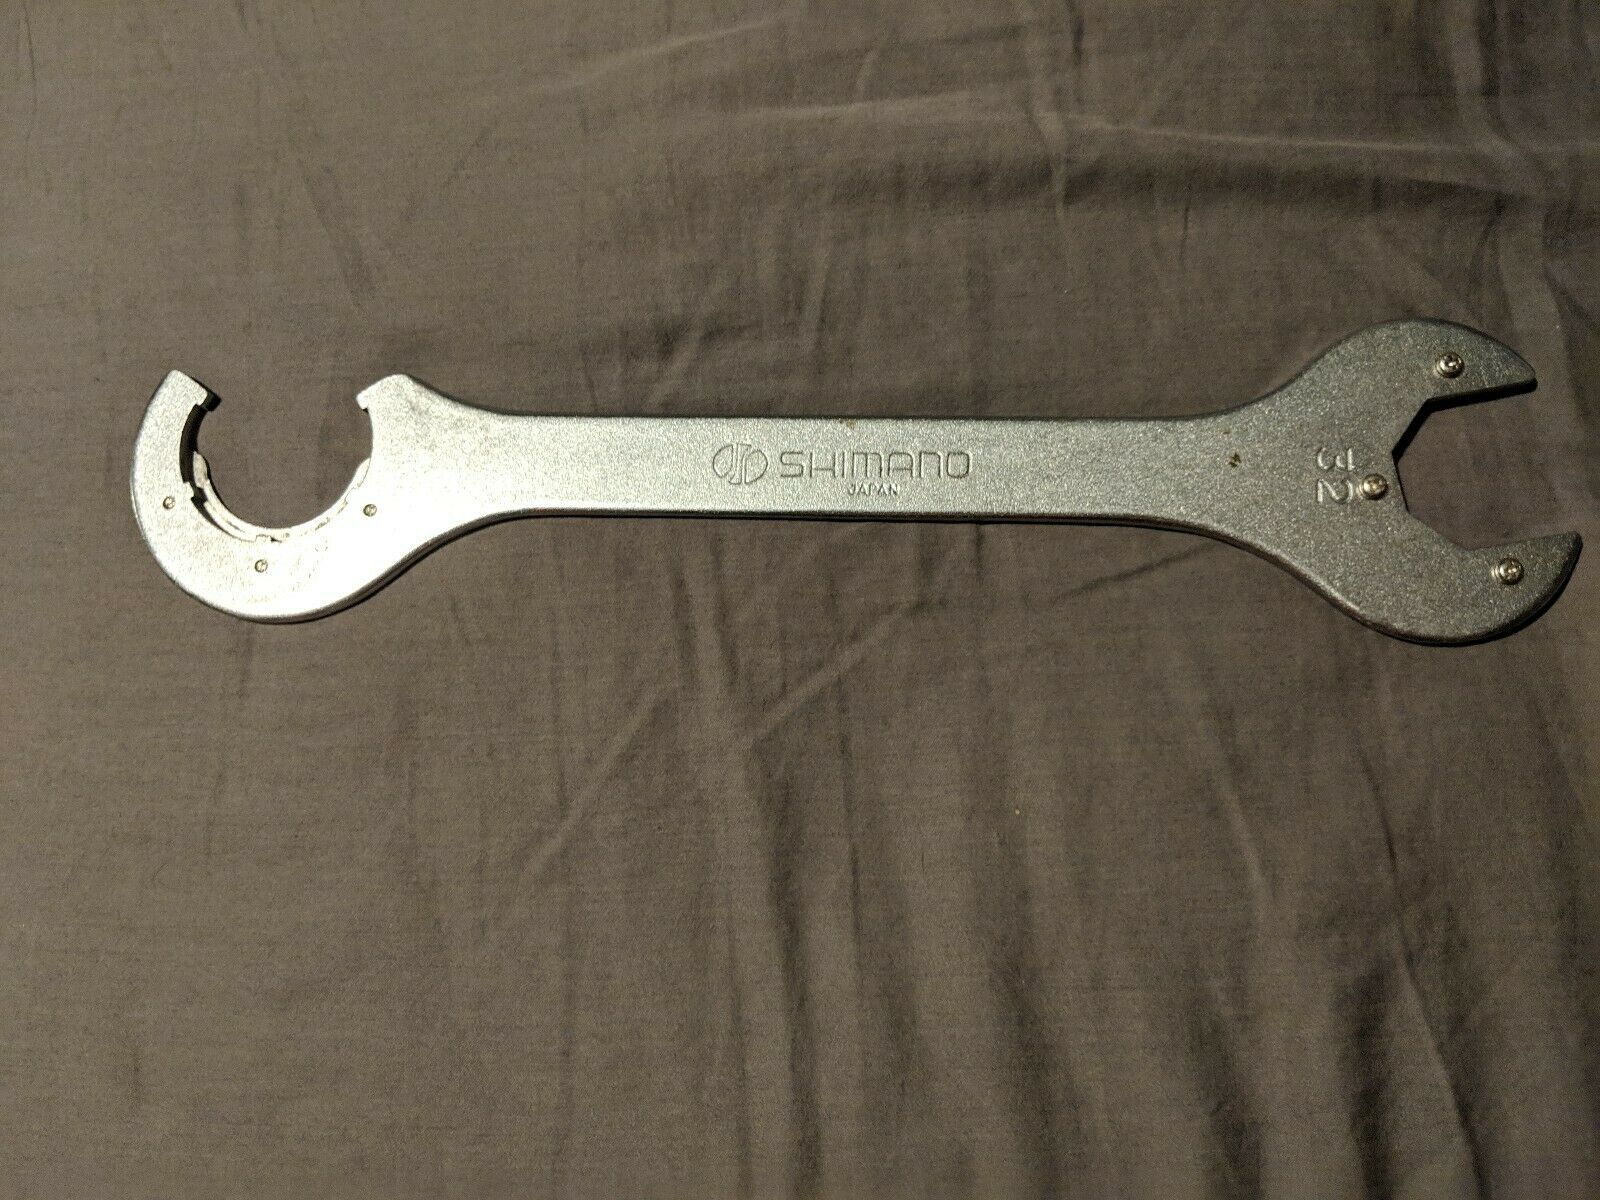
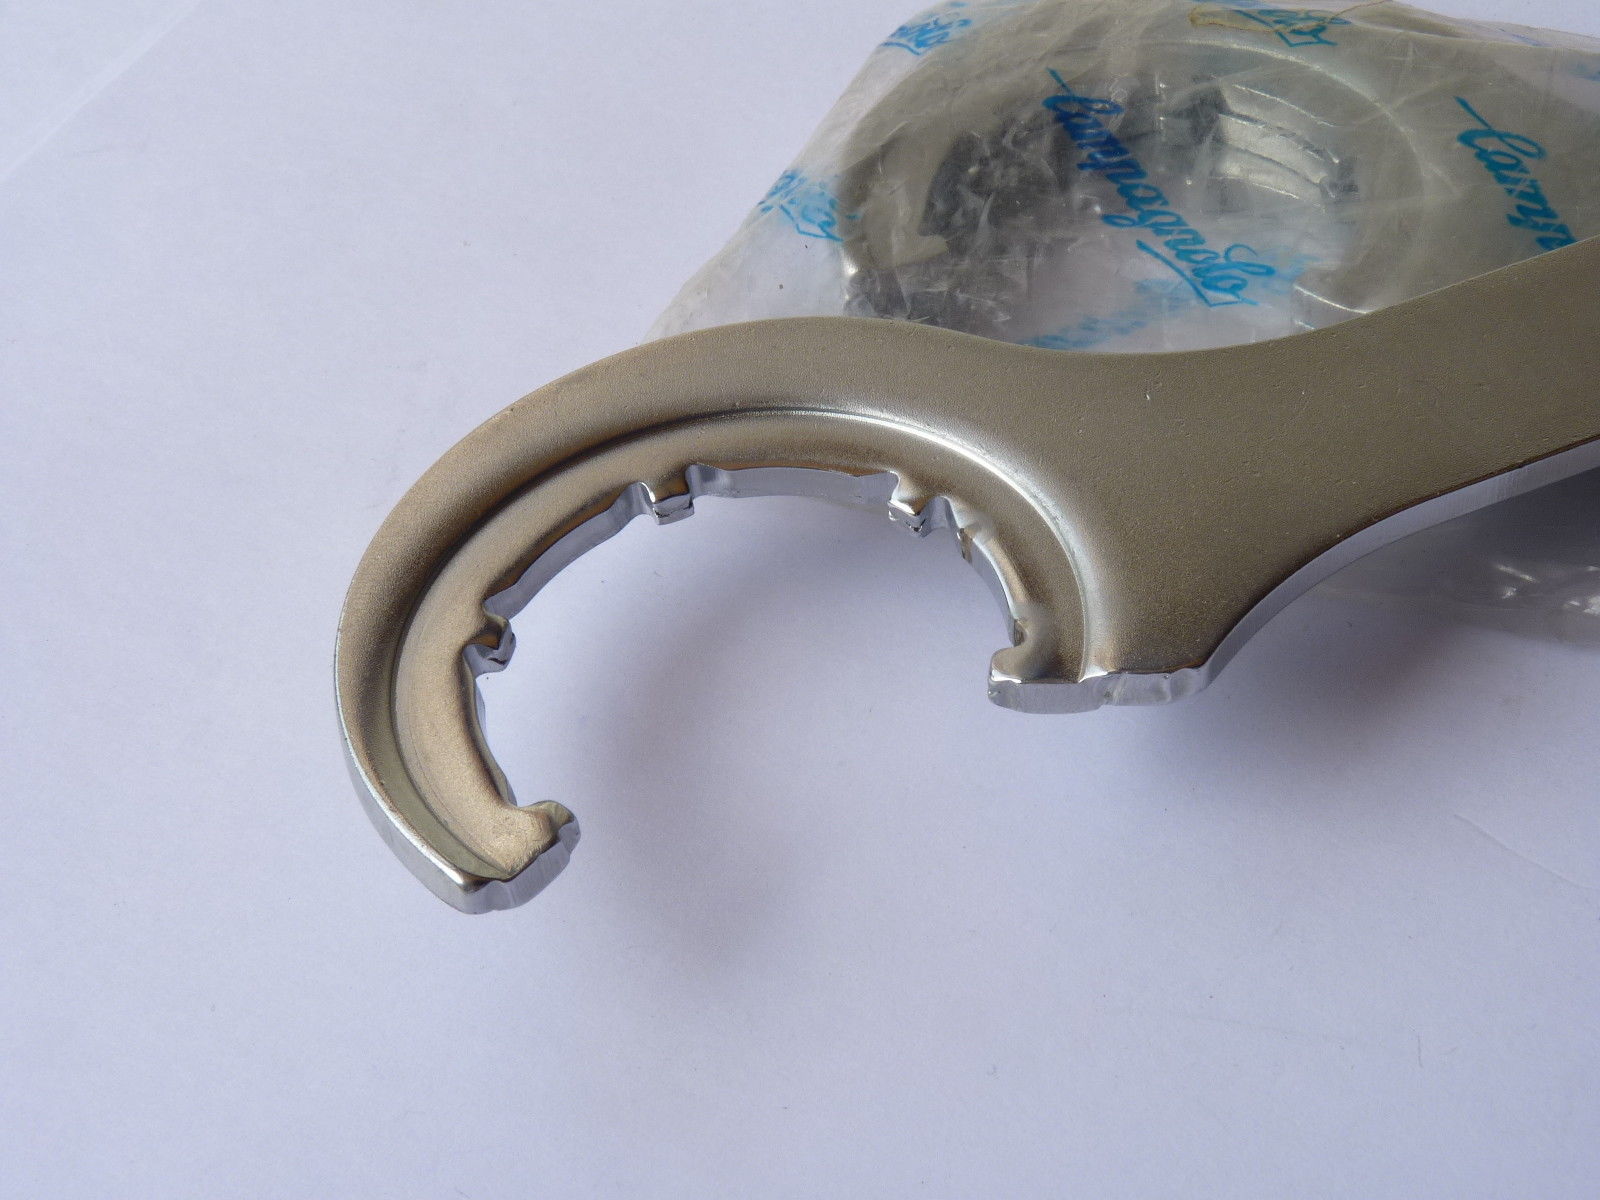
As you can see one has a plate added (Shimano) while the other has an indent stamped into it (Campagnolo). These would seem to be a great improvement, allowing multiple engagement of the lock ring by 5 teeth, while allowing you to press the teeth tight into engagement against the plate/stamped indent so that they do not slip out/off under pressure, eliminating damage to the adjustment ring gaps.
Has anyone used such C-Spanners?
Do they work? Are my presumptions on how they should work better true given your experience?
Again my thanks for your thoughts and advice.
 04-07-19 | 05:41 PM
#2
Senior Member


Joined: Oct 2015
Posts: 16,095
Likes: 9,459
From: PDX
Bikes: Merz x 5 + Specialized Merz Allez x 2, Strawberry/Newlands/DiNucci/Ti x3, Gordon, Fuso/Moulton x2, Bornstein, Paisley,1958-74 Paramounts x3, 3rensho, 74 Moto TC, 73-78 Raleigh Pro's x5, Marinoni x2, 1960 Cinelli SC, 1980 Bianchi SC, PX-10 X 2
I have two C-Spanner wrenches to loosen the locking ring on the bottom bracket for vintage bottom brackets. One, Park Tool HCW-5 has a single pin to go into the gaps cut in the lock ring at one of its ends with the other end there are three pins, while the second a Campagnolo tool has five pins to fit into the gaps of the lock ring. So many lock rings look like they have been chewed by a hungry dog, with rounded out gaps or partially broken corners from a C-Spanner twisting out of perfect engagement under pressure and damaging the lock ring, thus my evolution from a single tooth spanner to the five tooth Campagnolo spanner, but then I came across these C-Spanners.
As you can see one has a plate added (Shimano) while the other has an indent stamped into it (Campagnolo). These would seem to be a great improvement, allowing multiple engagement of the lock ring by 5 teeth, while allowing you to press the teeth tight into engagement against the plate/stamped indent so that they do not slip out/off under pressure, eliminating damage to the adjustment ring gaps.
Has anyone used such C-Spanners?
Do they work? Are my presumptions on how they should work better true given your experience?
Again my thanks for your thoughts and advice.
The tasks often don't lend themselves to impatience, compound this with spartan tools, hard to come by finesse, lack of a proper stand and many other idiosyncrasies, cobbling and butchery can soon follow.
It is easy to stand back at the outset and say "how hard can it be?", only to find out the answer is "very" after it is too late.
I am a lifelong mechanic/technician, fomoco and ASE Senior Master certified for 30 years, Drag race motorcycles, fixed many things at the track and on the road and still always try to check myself when I work on most things, it's easier to take the time to think it through and get it right before something goes wrong, still not always easy to do, I've screwed up plenty.
So it still comes down to comfort and skill level for the task and resources on hand at the time.
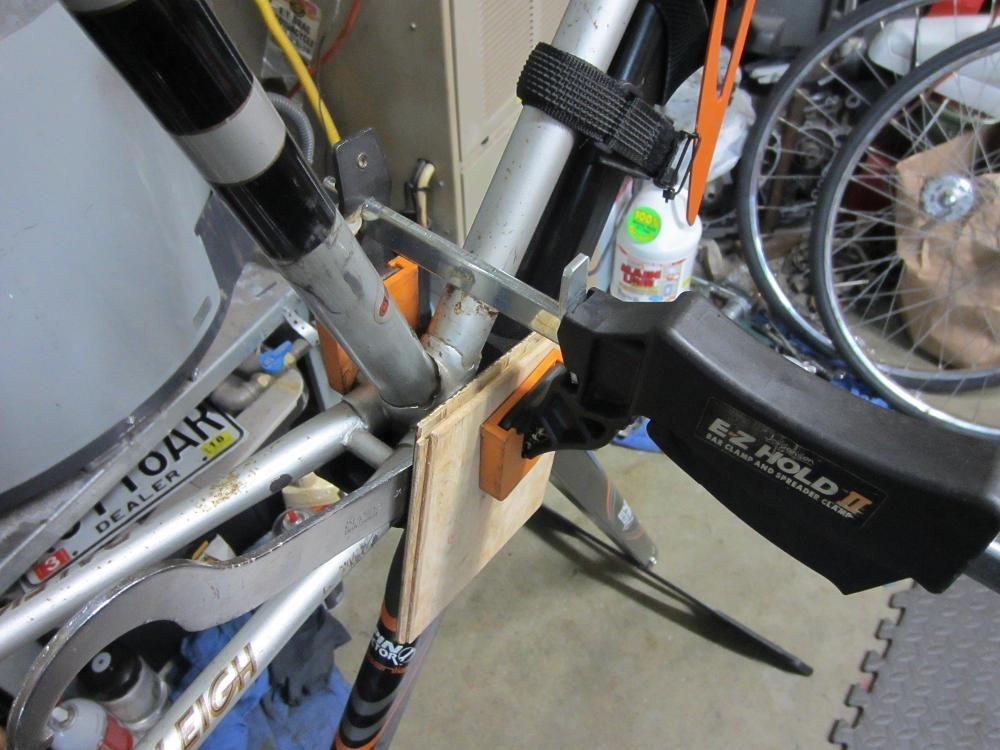
My answer to your question is a Sugino BB tool, the hook end engages the notch and with the correct pressure, compresses and holds the lockring securely like a vise, it has never failed me in 45 years.

 04-07-19 | 06:49 PM
#3
Thread Starter
Senior Member
Joined: Nov 2015
Posts: 1,707
Likes: 201
From: Lacey, WA
Bikes: Stevenson Custom, Stevenson Custom Tandem, Nishiki Professional
Merziac am I tracking right from your pictures:
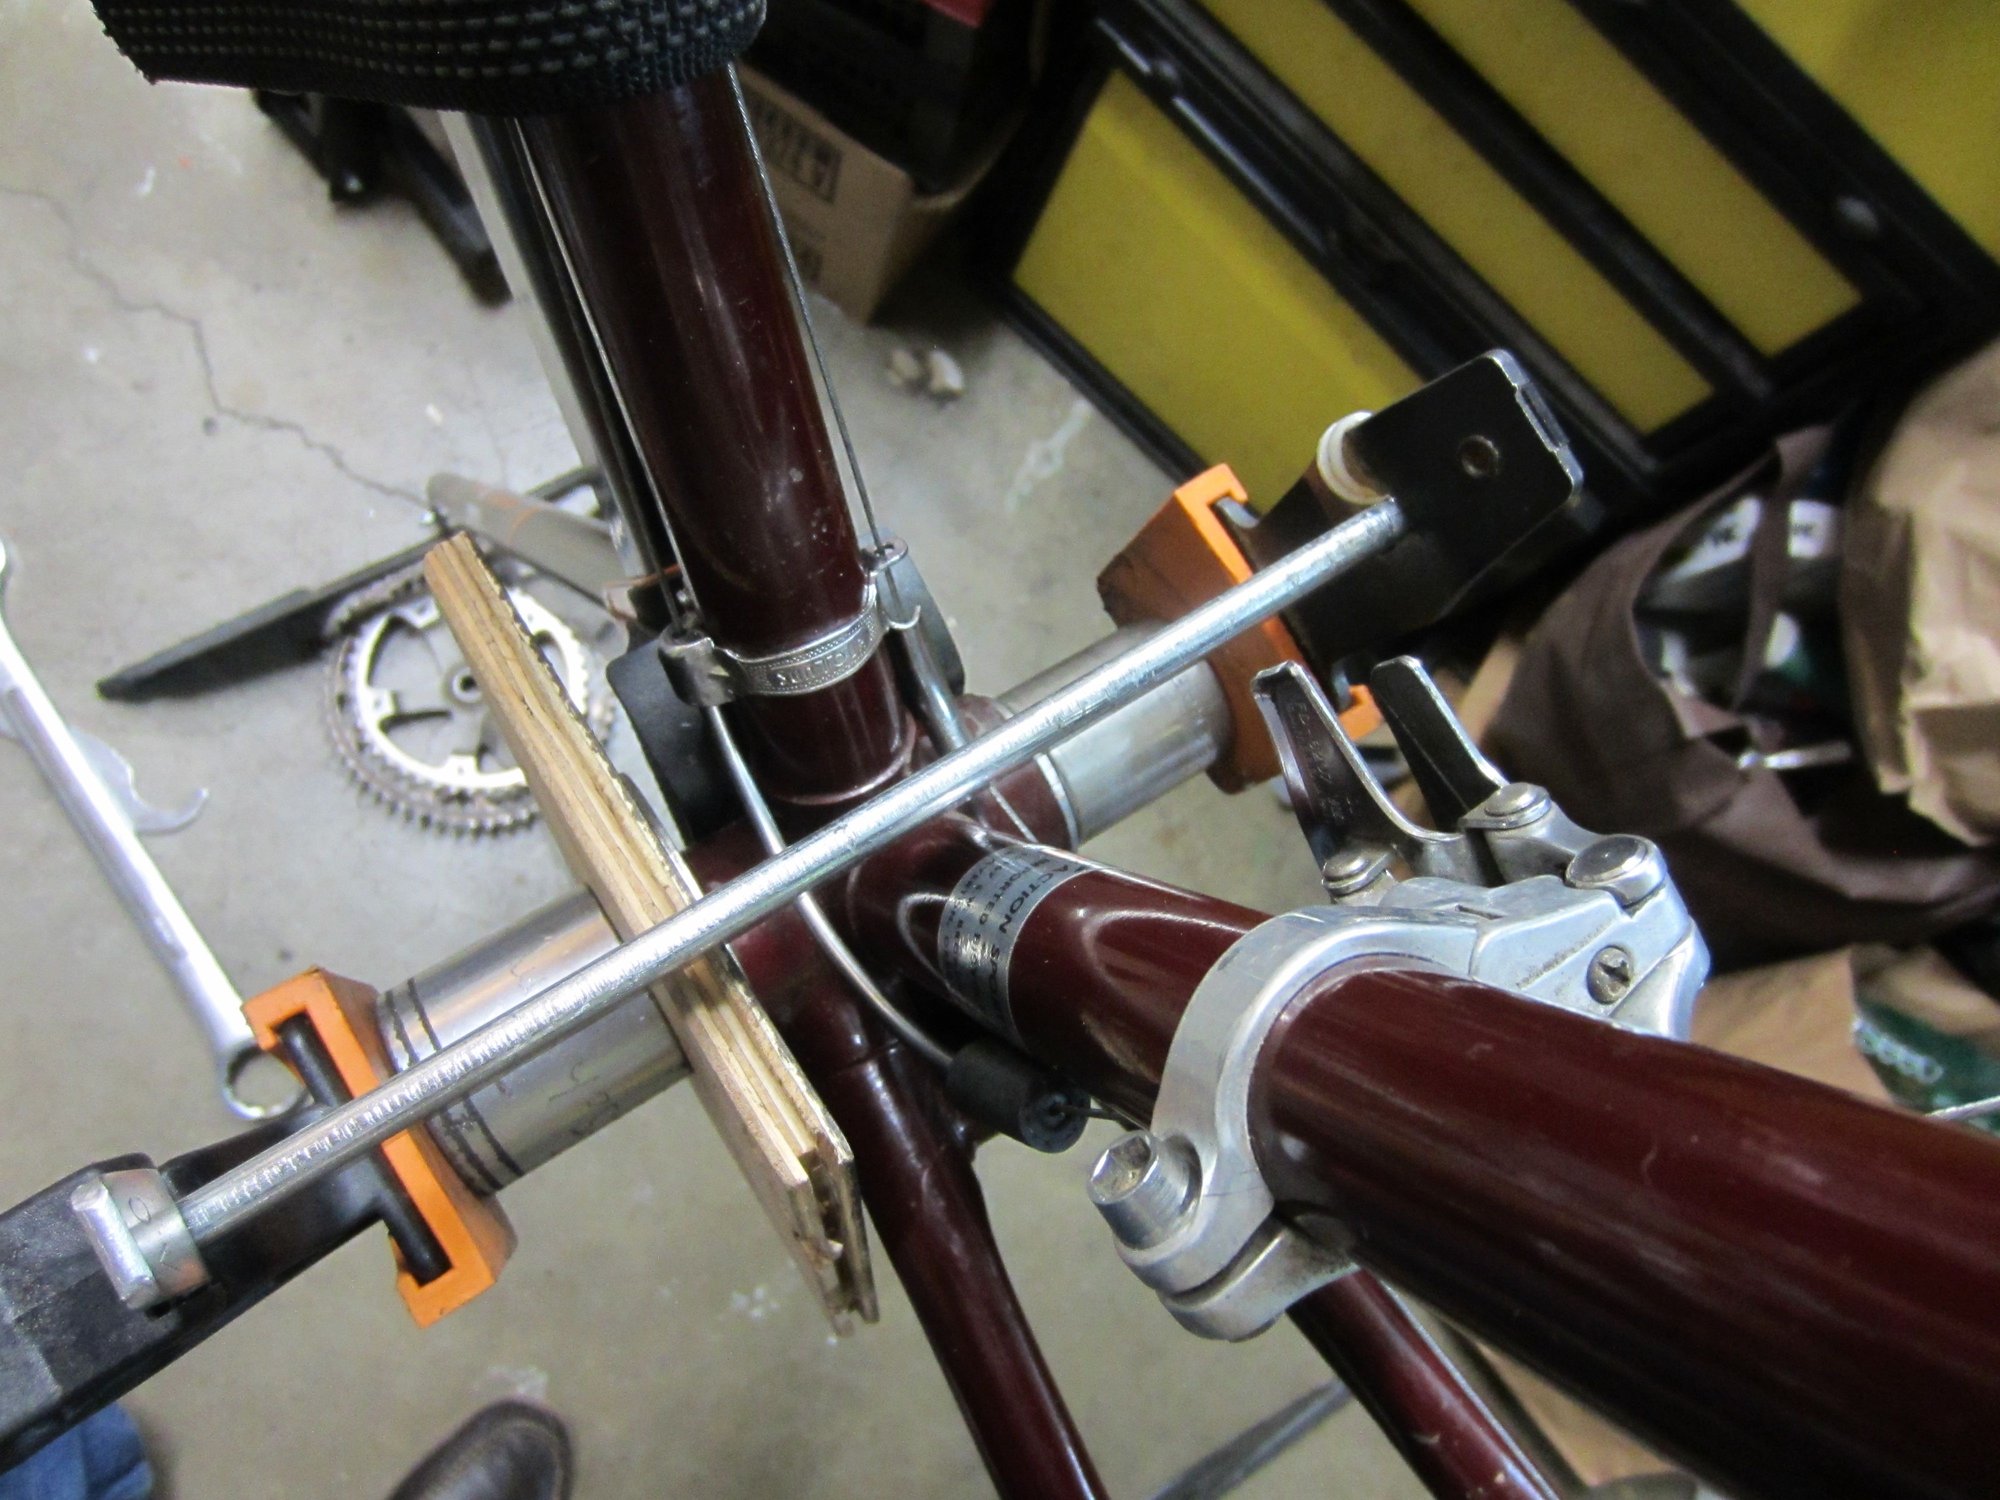
Use the Sugino to hook into the locking ring notch.
Then use the adjustable clamp to clamp the Sugino tool tight into the against the bottom bracket.
So that when you have to apply torque through the Sugino hook tool if you wobble while doing so it doesn't allow the hook to escape from the locking ring notch rounding or chipping a corner off?
Not clear on the square board (?) is that to expand the grip of the adjustable clamp?
Did it get it right, as that would really help to keep the hook in the notch no matter how the handle wobbles so they are engaged fully rather than slipping loose and rounding or chipping off a corner of the locking ring.
04-07-19 | 07:37 PM
#4
Senior Member
Joined: Oct 2015
Posts: 16,095
Likes: 9,459
From: PDX
Bikes: Merz x 5 + Specialized Merz Allez x 2, Strawberry/Newlands/DiNucci/Ti x3, Gordon, Fuso/Moulton x2, Bornstein, Paisley,1958-74 Paramounts x3, 3rensho, 74 Moto TC, 73-78 Raleigh Pro's x5, Marinoni x2, 1960 Cinelli SC, 1980 Bianchi SC, PX-10 X 2
Merziac am I tracking right from your pictures:
Use the Sugino to hook into the locking ring notch.
Then use the adjustable clamp to clamp the Sugino tool tight into the against the bottom bracket.
So that when you have to apply torque through the Sugino hook tool if you wobble while doing so it doesn't allow the hook to escape from the locking ring notch rounding or chipping a corner off?
Not clear on the square board (?) is that to expand the grip of the adjustable clamp?
Did it get it right, as that would really help to keep the hook in the notch no matter how the handle wobbles so they are engaged fully rather than slipping loose and rounding or chipping off a corner of the locking ring.
You're absolutely right about the wobble, once you trap the wrench, you can really lean on it without worry, you still want to keep the force in line so it works well and minimizes any chance of trouble.


Last edited by merziac; 04-08-19 at 09:04 AM.
 04-07-19 | 08:43 PM
#6

www.theheadbadge.com


Joined: Sep 2005
Posts: 29,010
Likes: 5,501
From: Southern Florida
Bikes: https://www.theheadbadge.com
At least it seems the Sugino tool has an engagement tab with a sensible hooking angle.
Park has one model that combines the lockring tool with a 32mm wrench end - the HCW-12 - and it's up there as one of Park's worst tools. It isn't radiussed enough to cradle most quality lockrings so that the tab engages properly. Chewed up tabs and busted knuckles are the result. Plus, you rarely need the 32mm wrench end when you're buggering about with BB lockrings...
-Kurt
__________________


Last edited by cudak888; 04-07-19 at 08:50 PM.
04-07-19 | 08:54 PM
#7
Senior Member
Joined: Oct 2015
Posts: 16,095
Likes: 9,459
From: PDX
Bikes: Merz x 5 + Specialized Merz Allez x 2, Strawberry/Newlands/DiNucci/Ti x3, Gordon, Fuso/Moulton x2, Bornstein, Paisley,1958-74 Paramounts x3, 3rensho, 74 Moto TC, 73-78 Raleigh Pro's x5, Marinoni x2, 1960 Cinelli SC, 1980 Bianchi SC, PX-10 X 2
At least it seems the Sugino tool has an engagement tab with a sensible hooking angle.
Park has one model that combines the lockring tool with the fixed bottom bracket cup removal flats - and it's up there as one of Park's worst tools. It isn't radiussed enough to cradle most quality lockrings so that the tab engages properly. Chewed up tabs and busted knuckles are the result. Thanks for giving me the idea to find one of these Suginos...
-Kurt
They are worth their weight in gold as far as I'm concerned, mine is 45 years old and has never failed me, still going strong.
04-07-19 | 08:58 PM
#8
Senior Member
Joined: Oct 2015
Posts: 16,095
Likes: 9,459
From: PDX
Bikes: Merz x 5 + Specialized Merz Allez x 2, Strawberry/Newlands/DiNucci/Ti x3, Gordon, Fuso/Moulton x2, Bornstein, Paisley,1958-74 Paramounts x3, 3rensho, 74 Moto TC, 73-78 Raleigh Pro's x5, Marinoni x2, 1960 Cinelli SC, 1980 Bianchi SC, PX-10 X 2
It has never failed me, damaged any tools, cups or frames, ever, period.
 04-07-19 | 09:43 PM
#9

Old fart
Joined: Nov 2004
Posts: 26,345
Likes: 5,251
From: Appleton WI
Bikes: Several, mostly not name brands.
For lockrings with an even number of notches, I prefer a lockring pliers like the VAR-16:

Or, you can make your own from a slip-jaw pliers:
https://www.instructables.com/id/DIY-Lockring-Pliers/
Or, you can make your own from a slip-jaw pliers:
https://www.instructables.com/id/DIY-Lockring-Pliers/
04-08-19 | 08:30 AM
#10
Thread Starter
Senior Member
Joined: Nov 2015
Posts: 1,707
Likes: 201
From: Lacey, WA
Bikes: Stevenson Custom, Stevenson Custom Tandem, Nishiki Professional
Merziac thanks for a great tutorial that solves the problem on getting the adjustment ring off/on without damage, I'll be assembling the tools you use and keeping your posted pictures for reference.
On the removal of the fixed cup on the other side I've decided to go with the Stein Tool remover. I like you like the idea of getting both cups out to service and check everything in the bottom bracket before re-assembly and this tool looks to be both well made, reasonably priced and simple to use.
Again thanks for you advice.
04-08-19 | 10:48 AM
#11
Senior Member
Joined: Jan 2004
Posts: 6,169
Likes: 1,797
From: Madison, WI USA
Hmmm, is it just me, or is the plate on the Shimano tool on the wrong side, for removal? You'd want to engage the tool with the surface facing the camera toward you, but with the lettering upside down, right? So the other end of the tool is facing forward, and you'd be pushing down on it? So shouldn't that plate be on the surface facing the camera? I suppose the plate would be appropriate for using the tool when tightening the lock ring, but that's not when you need it.
04-08-19 | 11:26 AM
#12
Senior Member
Joined: Oct 2015
Posts: 16,095
Likes: 9,459
From: PDX
Bikes: Merz x 5 + Specialized Merz Allez x 2, Strawberry/Newlands/DiNucci/Ti x3, Gordon, Fuso/Moulton x2, Bornstein, Paisley,1958-74 Paramounts x3, 3rensho, 74 Moto TC, 73-78 Raleigh Pro's x5, Marinoni x2, 1960 Cinelli SC, 1980 Bianchi SC, PX-10 X 2
Hmmm, is it just me, or is the plate on the Shimano tool on the wrong side, for removal? You'd want to engage the tool with the surface facing the camera toward you, but with the lettering upside down, right? So the other end of the tool is facing forward, and you'd be pushing down on it? So shouldn't that plate be on the surface facing the camera? I suppose the plate would be appropriate for using the tool when tightening the lock ring, but that's not when you need it.
 04-08-19 | 11:27 AM
#13
Senior Member
Joined: Oct 2015
Posts: 16,095
Likes: 9,459
From: PDX
Bikes: Merz x 5 + Specialized Merz Allez x 2, Strawberry/Newlands/DiNucci/Ti x3, Gordon, Fuso/Moulton x2, Bornstein, Paisley,1958-74 Paramounts x3, 3rensho, 74 Moto TC, 73-78 Raleigh Pro's x5, Marinoni x2, 1960 Cinelli SC, 1980 Bianchi SC, PX-10 X 2
Merziac thanks for a great tutorial that solves the problem on getting the adjustment ring off/on without damage, I'll be assembling the tools you use and keeping your posted pictures for reference.
On the removal of the fixed cup on the other side I've decided to go with the Stein Tool remover. I like you like the idea of getting both cups out to service and check everything in the bottom bracket before re-assembly and this tool looks to be both well made, reasonably priced and simple to use.
Again thanks for you advice.
On the removal of the fixed cup on the other side I've decided to go with the Stein Tool remover. I like you like the idea of getting both cups out to service and check everything in the bottom bracket before re-assembly and this tool looks to be both well made, reasonably priced and simple to use.
Again thanks for you advice.
04-08-19 | 12:19 PM
#14
Senior Member
Joined: Jan 2004
Posts: 6,169
Likes: 1,797
From: Madison, WI USA
04-08-19 | 01:42 PM
#15
Senior Member
Joined: Oct 2015
Posts: 16,095
Likes: 9,459
From: PDX
Bikes: Merz x 5 + Specialized Merz Allez x 2, Strawberry/Newlands/DiNucci/Ti x3, Gordon, Fuso/Moulton x2, Bornstein, Paisley,1958-74 Paramounts x3, 3rensho, 74 Moto TC, 73-78 Raleigh Pro's x5, Marinoni x2, 1960 Cinelli SC, 1980 Bianchi SC, PX-10 X 2

Thread
Thread Starter
Forum
Replies
Last Post
Reeses
Bicycle Mechanics
8
06-29-12 07:06 PM
