


First wheel build...first problem?
 06-01-20 | 07:25 AM
#26

time to take it apart
 06-01-20 | 08:47 AM
#27
Senior Member
Joined: Oct 2015
Posts: 6,280
Likes: 612
From: Los Angeles
Bikes: 78 Masi Criterium, 68 PX10, 2016 Mercian King of Mercia, Rivendell Clem Smith Jr
Yeah, now that I'm looking at it in the morning instead of late night

 , some of the spokes do look like they are in the wrong holes. On third look however it think it's an optical illusion because it's difficult to tell which spokes are on which side because of the angle of the photo. Check everything again.
The way I do it is to install all the inside pulling spokes on both sides, twist the hub. At this point install the opposing spokes first on one side, then the other. It's pretty easy this way to get everything in the right place. This method is also adaptable if you want to put pulling spokes outside, use a different cross #, adjust for the offset of holes on the rim, etc.
I see some wacky ways of describing wheel building out there. Going by numbers is kind of like following GPS instead of a map; and never actually knowing where you are until you (hopefully) get there.
Last edited by Salamandrine; 06-01-20 at 08:54 AM.
06-01-20 | 09:16 AM
#28

Senior Member


Joined: Jan 2015
Posts: 5,795
Likes: 3,366
From: Los Angeles
Bikes: 82 Medici, 85 Ironman, 2011 Richard Sachs
When this has happened to me, I start over.
https://www.wheelpro.co.uk/wheelbuilding/book.php
(I think Roger Musson is the king of diy wheelbuilding.)
https://www.wheelpro.co.uk/wheelbuilding/book.php
(I think Roger Musson is the king of diy wheelbuilding.)
__________________
I don't do: disks, tubeless, e-shifting, or bead head nymphs. But I do hate all e-bikes.
I don't do: disks, tubeless, e-shifting, or bead head nymphs. But I do hate all e-bikes.
06-01-20 | 11:53 AM
#29

Senior Member

Joined: Sep 2005
Posts: 3,487
Likes: 1,552
From: Oakland, CA
Bikes: '82 Univega Competizione, '72 Motobecane Grand Record, '83 Mercian KOM Touring, '85 Univega Alpina Uno, '76 Eisentraut Limited
67tony , I'm pretty sure I had the same problem on post 12 of this thread, and I solved it on post 17. Your spokes are out of sync by one hole, I think. I'm not an experienced wheel builder, so it could be some other cause, by my symptom was the same.
Struggling with (my first) wheelbuild - Normandy + Super Champion
Struggling with (my first) wheelbuild - Normandy + Super Champion
06-01-20 | 12:22 PM
#30
Senior Member
Joined: Oct 2015
Posts: 6,280
Likes: 612
From: Los Angeles
Bikes: 78 Masi Criterium, 68 PX10, 2016 Mercian King of Mercia, Rivendell Clem Smith Jr
67tony , I'm pretty sure I had the same problem on post 12 of this thread, and I solved it on post 17. Your spokes are out of sync by one hole, I think. I'm not an experienced wheel builder, so it could be some other cause, by my symptom was the same.
Let's verify sync. RE first photograph. It looks like the first pulling spoke on the facing side (call this the right side) is going to the second rim hole clockwise from the valve hole. Presumably that is the hole offset to the right side. That is fine. In this is the case then the opposite flange pulling spoke should go in the hole 1/2 a space to the left, or counter-clockwise. If you offset it 1/2 space the other way, you get the problem you have.
06-01-20 | 12:51 PM
#31
Senior Member
Joined: Oct 2015
Posts: 6,280
Likes: 612
From: Los Angeles
Bikes: 78 Masi Criterium, 68 PX10, 2016 Mercian King of Mercia, Rivendell Clem Smith Jr
How about this?
The bottom green circle indicates where the opposite side pulling spoke should start. (not visible). If it's offset in the other direction (clockwise) it is wrong.
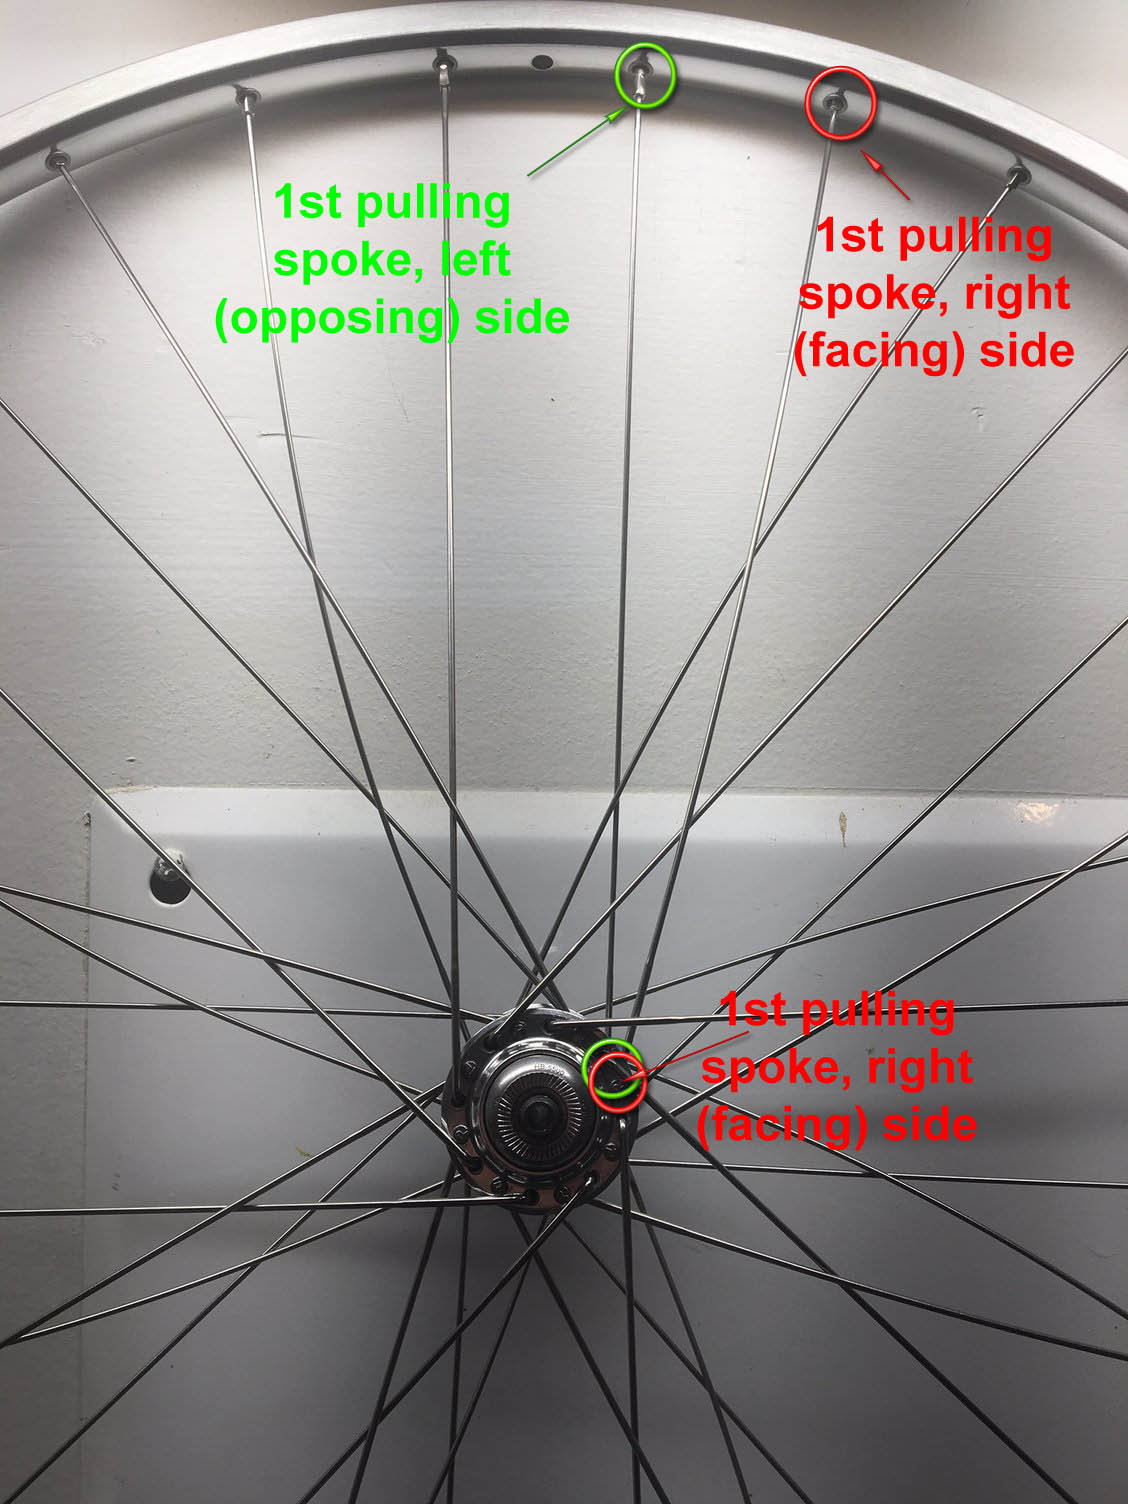
The bottom green circle indicates where the opposite side pulling spoke should start. (not visible). If it's offset in the other direction (clockwise) it is wrong.
06-01-20 | 01:23 PM
#32

Senior Member
Joined: May 2013
Posts: 2,036
Likes: 549
From: Pacific Northwest
Bikes: �87 Marinoni SLX Sports Tourer, �79 Miyata 912 by Gugificazione
When this has happened to me, I start over.
https://www.wheelpro.co.uk/wheelbuilding/book.php
(I think Roger Musson is the king of diy wheelbuilding.)
https://www.wheelpro.co.uk/wheelbuilding/book.php
(I think Roger Musson is the king of diy wheelbuilding.)
FWIW, I’ve also added notes for wheels when I want to switch rear pulling spokes from outside the flange (his approach) to inside the flange (Sheldon’s preferred arrangement). I see benefits with both, and haven’t had problems with either one.
Looking at the photo above, pretty sure the spokes on the near-side flange are off one hole CCW. Two adjacent spokes at the rim should come from two adjacent holes on opposite flanges, offset so their distance to the rim is the same. These seem to be reversed. Pretty sure Salamandrine is saying the same thing.
Last edited by Dfrost; 06-01-20 at 01:47 PM.
06-01-20 | 01:53 PM
#33
framebuilder

Joined: Dec 2009
Posts: 1,788
Likes: 2,710
From: Niles, Michigan
Putting green and red circles on the rim and hub holes is really helpful in explaining where spokes are supposed to belong. For those of you watching/reading at home while eating popcorn trying to follow how to lace a wheel, holes are not usually centered on a rim but are rather offset so that a spoke going to a certain rim hole has to come from a flange on that side. To confuse matters manufacturers are not consistent on which way the offsets are compared to the location of the valve hole. For some rim makers, the spoke pattern Salamandrine showed would be correct.
 06-01-20 | 02:15 PM
#34
Senior Member
Joined: Oct 2015
Posts: 6,280
Likes: 612
From: Los Angeles
Bikes: 78 Masi Criterium, 68 PX10, 2016 Mercian King of Mercia, Rivendell Clem Smith Jr
Because this is a 32 hole Sun rim, the rim hole in the picture that is just to the right of the valve hole (you put a green circle around it) is offset from the rim's center so it is supposed to have a spoke that comes from the hub flange that is closest to the camera. If I understand the position of your colored circles correctly on the hub, you are suggesting that the spoke that goes into the green circled rim hole comes from the flange on the far side of the hub from the camera. In fact it needs to come from the flange nearest the camera. The spoke that goes to the rim hole 2nd to the right of the valve hole (you circled it in red) has to come from the flange on the far side. If the OP was to look directly down at his hub (like it is presently oriented in his picture), the spoke for the rim hole circled in red would originate from a hub hole on the far flange that is just a bit clockwise (or behind) where the 1st spoke is located.
Anyhow, no matter the offset on these rims, If the spoke with the green circle is the one closest to the camera, then it still should be inserted in the flange 1/2 a space clockwise from the red spoke, but on the flange closest to the camera.
The basic rule when the nipple end of a spoke is just to the right of its opposing spoke on the rim, the head end should also be just 1/2 space to the right in the hub flange. And vice versa. IOW the nipple and the head should be offset in the same direction.
06-01-20 | 02:17 PM
#35
Senior Member
Joined: Oct 2014
Posts: 14,164
Likes: 5,295
From: Portland, OR
Bikes: (2) ti TiCycles, 2007 w/ triple and 2011 fixed, 1979 Peter Mooney, ~1983 Trek 420 now fixed and ~1973 Raleigh Carlton Competition gravel grinder
I didn't read most of the post so this is probably already said. I'm virtually certain you missed the correct starting hole on one side by one. This means all the spokes are shifted forward on one side by one hole at the hub.
Sight down the hub. Corresponding spokes left and right should leave the hub from adjacent holes and hit the rim with a hole between them. (The forward of the two spokes leaving the hub must meet the rim forward of the other.)
The hub holes are staggered a 1/2 hole so it is a little hard to see which is the forward of the two but it can be done. Or tag the tight spokes on each side (one such spoke will do) and likewise a loose one on each side. Now you can see which side needs to be shifted a hole. (I'll come back in another lifetime and tell you the easy way to do that. Until then, it's unscrew each one on that side and move the spoke,
  )
)
Ben
Sight down the hub. Corresponding spokes left and right should leave the hub from adjacent holes and hit the rim with a hole between them. (The forward of the two spokes leaving the hub must meet the rim forward of the other.)
The hub holes are staggered a 1/2 hole so it is a little hard to see which is the forward of the two but it can be done. Or tag the tight spokes on each side (one such spoke will do) and likewise a loose one on each side. Now you can see which side needs to be shifted a hole. (I'll come back in another lifetime and tell you the easy way to do that.
Until then, it's unscrew each one on that side and move the spoke, )Ben
06-01-20 | 02:50 PM
#36
Senior Member
Joined: Jan 2008
Posts: 15,103
Likes: 4,737
From: Beaverton, OR
Bikes: Yes

The darker lines show intersecting spokes. The lighter line of each color shows where those spokes should intersect, based on finding the mid-point between their heads and drawing a radial line out.
__________________
My Bikes
My Bikes
06-01-20 | 04:09 PM
#37

Thread Starter
Senior Member
Joined: Feb 2012
Posts: 1,390
Likes: 207
From: Williamsburg, VA Sebastian, FL
Bikes: 1987 Centurion Ironman Master, 1992 Koga Miyata Exerciser, 1992 Schwinn Crosscut
BINGO...PICTURES!!!
Pictures? Nay, illustrations is the far better term.
Thanks so much...being a teacher for 30 years I know well how many are visual as opposed to verbal learners.
Thus, below, is what I believe to be a well-laced 3-cross front wheel.
All nipples are at the same depth, and all spokes have similar tension. Next I start drawing it in, and putting it on my Bike Hand YC-512N. Apparently I've got my pulling (leading?) spokes exposed on the outside of the hub, but of course do not know the pros or cons of that.
Last edited by 67tony; 06-01-20 at 04:22 PM.
06-01-20 | 04:19 PM
#38
Thread Starter
Senior Member
Joined: Feb 2012
Posts: 1,390
Likes: 207
From: Williamsburg, VA Sebastian, FL
Bikes: 1987 Centurion Ironman Master, 1992 Koga Miyata Exerciser, 1992 Schwinn Crosscut
Here's a pic frome the same angle as SurferRosa's.
Spokes are not tensioned yet...

Spokes are not tensioned yet...
06-01-20 | 04:39 PM
#39
framebuilder
Joined: Dec 2009
Posts: 1,788
Likes: 2,710
From: Niles, Michigan
The most helpful picture would be almost straight down but with just enough side angle so one can just see the spoke holes on both flanges and you are able to see clearly which spoke from one flange is in front or behind the other.
06-01-20 | 05:48 PM
#40

Senior Member
Joined: Nov 2010
Posts: 15,315
Likes: 903
From: Tixkokob, Yucat�n, M�xico
Bikes: 79 Trek 930, 80 Trek 414, 84 Schwinn Letour Luxe (coupled), 92 Schwinn Paramount PDG 5
When this has happened to me, I start over.
https://www.wheelpro.co.uk/wheelbuilding/book.php
(I think Roger Musson is the king of diy wheelbuilding.)
https://www.wheelpro.co.uk/wheelbuilding/book.php
(I think Roger Musson is the king of diy wheelbuilding.)
That's not to say I never had to unlace and start over. I built some wheels lately, after a several years absence, and had to lace the rear four times to get it correct. Of course part of the problem was mis-labeled spokes.
I will also say that, after ten years with the plans, I finally built his truing stand. What a timesaver!!! I had been using an old frameset.
Last edited by seedsbelize; 06-01-20 at 05:54 PM.
06-01-20 | 06:22 PM
#41
framebuilder
Joined: Dec 2009
Posts: 1,788
Likes: 2,710
From: Niles, Michigan
This description of spoke placement is just so you can be able to lace a wheel correctly. There are several other ways it can be done. My description isn't about the details or philosophy involved in building a wheel. It is easy to get into the weeds with all the variations and opinions. This way has worked for me building hundreds of wheels over many years.
When you start all over again, I suggest/recommend that you place the valve hole at the 6 o�clock position. Thread your 1st spoke in the 1st hole to the right (or counterclockwise) of the valve hole (when you are looking down at the rim laying on a table). The spoke can be in any hub hole that is on the right (or up) side (the one that would be closest to the camera). By starting the spoke from the outside of the hub, the spoke body will end up on the inside - which if course puts the head on the outside of the hub flange. Finish putting in the other 7 spokes that belong in that sequence. That would be every other spoke hole on that side of the hub and every 4th hole on the rim.
The next group of 8 spokes (because you have 32 holes) will be just behind the 1st group. This is because of the way Sun rim holes are offset. They will be almost parallel to each other. This is where you have to be careful and where you probably messed up before. When you flip the hub/rim over (for easy access to the holes on the other side of the hub) the next rim hole you will fill will now be the 2nd hole to the left of the valve hole (going clockwise). Locate which hub hole you will next fill by looking straight down at the hub. The holes on the bottom flange are offset so they are between the holes on your top flange. Find the hole that is just behind (or to your left going clockwise) of your original 1st spoke hole. This is where you will start your next group of 8 spokes. Again the spoke body is on the inside and the spoke head on the outside. When you are finished with that group of 8, twist the hub so the spokes go away from the valve hole. You have twisted it the wrong way if you have spokes cross over the valve hole.
It almost doesn't matter which of the next free 16 hub hole choices you next put in a spoke for the next group of 8 spokes as long as your pattern is correct. The spoke will enter on the inside the hub and exit on the outside. Cross over 2 spokes and under the 3rd spoke. Make sure that you place the spoke in the hole in the rim that is 2 spaces away from the other spoke (one space in-between) from the same side. It is easy to make a mistake here and put it either 1 or 3 holes away. Where the 4th set of 8 spokes go on the other flange is obvious.
The exceptions to general rules can make descriptions more difficult and wordy. When trying to explain the exceptions, everything becomes confusing. For example most rims including yours offset their holes from centerline so spokes more directly point to one flange side or the other. Usually if you look down at the valve hole with your head on the inside of the rim, you will see that the 1st hole to the right of the valve hole is offset a bit towards you. However some rim makers reverse which holes are offset and that can change your spoking sequence from a general standard.
06-01-20 | 06:37 PM
#42
Thread Starter
Senior Member
Joined: Feb 2012
Posts: 1,390
Likes: 207
From: Williamsburg, VA Sebastian, FL
Bikes: 1987 Centurion Ironman Master, 1992 Koga Miyata Exerciser, 1992 Schwinn Crosscut
I had a 50/50 chance of doing this right, and of course did not.
This miscue, coupled with the (slight) preference for running the trailing spokes inside the flange, necessitates me starting over yet again. But...that just gives me a bit more practice!
Doug, thanks a ton for your plainly-worded description.
If I read things often enough, and in a variety of terminologies, it's starting to make sense.
06-01-20 | 08:01 PM
#43
Senior Member
Joined: Oct 2015
Posts: 6,280
Likes: 612
From: Los Angeles
Bikes: 78 Masi Criterium, 68 PX10, 2016 Mercian King of Mercia, Rivendell Clem Smith Jr
Yep. In my experience, the side to which the holes are offset is a roughly 50/50 proposition. Maybe however it's become more standardized in the last couple decades. I notice all of my newer rims have the same orientation. I've been building wheels for longer than I care to admit.
I just pulled a 36H M13II rim out of my closet to check. In fact, yes, it's the 1st hole, but only if you start with the valve at 6 o'clock. If you start building with the valve hole in 12 midnight as in the OP's first photo, the second hole to the right is where you would start. Perhaps your way is easier for a beginner to grasp. I still prefer to start with the 'pulling' spokes and the valve at the top. All the spokes end up in the same place in the end no matter how you get there -- assuming you are building the same pattern.
Irregardless of all that, I'm going with the crowd here. The most likely problem is that the opposite side spokes were all inserted one hole counter clockwise from where the should have been inserted in the flange.
06-01-20 | 08:09 PM
#44
Senior Member
Joined: Sep 2012
Posts: 3,699
Likes: 581
From: Toronto, ON, Canada
DAMMIT!
I had a 50/50 chance of doing this right, and of course did not.
This miscue, coupled with the (slight) preference for running the trailing spokes inside the flange, necessitates me starting over yet again. But...that just gives me a bit more practice!
Doug, thanks a ton for your plainly-worded description.
If I read things often enough, and in a variety of terminologies, it's starting to make sense.
06-01-20 | 08:14 PM
#45
Senior Member
Joined: Sep 2012
Posts: 3,699
Likes: 581
From: Toronto, ON, Canada
You may have also had the issue where the sheldon instructions work well for the key spoke being in the right hole if the holes are not offset from center. There is one sentence that explains that the next spoke set needs to be moved slightly if the spokes are in the offset of center hole. That got me once.
Also you should be able to see the hub label through the valve hole.
Also you should be able to see the hub label through the valve hole.
06-01-20 | 08:33 PM
#46
Thread Starter
Senior Member
Joined: Feb 2012
Posts: 1,390
Likes: 207
From: Williamsburg, VA Sebastian, FL
Bikes: 1987 Centurion Ironman Master, 1992 Koga Miyata Exerciser, 1992 Schwinn Crosscut
Well, it's amazing how re-lacing several times hones that skill.
I think I've finally got it perfect, lacing-wise, with the trailing spokes inside the flange and the rim label read from the drive side.
Truing it up, likely, will be another whole challenge, I'm sure.
Thanks again to all who have contributed to my learning!
(This, by the way, is quite a slick little tool.)
Last edited by 67tony; 06-01-20 at 08:37 PM.
06-01-20 | 08:55 PM
#47
Senior Member
Joined: Oct 2015
Posts: 6,280
Likes: 612
From: Los Angeles
Bikes: 78 Masi Criterium, 68 PX10, 2016 Mercian King of Mercia, Rivendell Clem Smith Jr
I went and looked at Sheldon's instructions to see what you guys are talking about and get hip to the new terminology. Key spoke = first spoke. Trailing spoke = pulling spoke. He only describes one pattern of lacing, but it's the semi traditional nor cal way and my preference too.
The problem people seem to have is with this passage:The key spoke will be next to the valve hole in the rim, or one hole away.
As viewed from the right (sprocket) side of the hub, the key spoke will run counterclockwise, and it will go to either the hole just to the right of the valve hole (as illustrated) or the second hole to the right, depending on how the rim is drilled. The aim is to make the four spokes closest to the valve hole all angle away from the valve, giving easier access to the valve for inflation.
There are two ways a rim might be configured, not one. He doesn't make this super clear, and only one way is illustrated. The Key spoke that you start with is the hole that is offset to the side of the rim nearest you. If your key spoke is the second hole, the third step will look like this:
06-01-20 | 09:02 PM
#48
Senior Member
Joined: Oct 2015
Posts: 6,280
Likes: 612
From: Los Angeles
Bikes: 78 Masi Criterium, 68 PX10, 2016 Mercian King of Mercia, Rivendell Clem Smith Jr
I'm more OCD than most about many aspects of bicycle mechanics, but the whole label through the valve hole thing is kind of a joke. If I care enough think about it, I'll make it face the wrong way on purpose. Reading the rim label from the drive side though, that's another story. I get the heebee jeebees if that isn't done correctly.... 

So congrats and glad you figured it out. When you get used to it, it isn't any harder than tying your shoes.
So congrats and glad you figured it out. When you get used to it, it isn't any harder than tying your shoes.
06-02-20 | 10:38 AM
#49
Senior Member
Joined: Nov 2010
Posts: 15,315
Likes: 903
From: Tixkokob, Yucat�n, M�xico
Bikes: 79 Trek 930, 80 Trek 414, 84 Schwinn Letour Luxe (coupled), 92 Schwinn Paramount PDG 5
This description of spoke placement is just so you can be able to lace a wheel correctly. There are several other ways it can be done. My description isn't about the details or philosophy involved in building a wheel. It is easy to get into the weeds with all the variations and opinions. This way has worked for me building hundreds of wheels over many years.
When you start all over again, I suggest/recommend that you place the valve hole at the 6 o�clock position. Thread your 1st spoke in the 1st hole to the right (or counterclockwise) of the valve hole (when you are looking down at the rim laying on a table). The spoke can be in any hub hole that is on the right (or up) side (the one that would be closest to the camera). By starting the spoke from the outside of the hub, the spoke body will end up on the inside - which if course puts the head on the outside of the hub flange. Finish putting in the other 7 spokes that belong in that sequence. That would be every other spoke hole on that side of the hub and every 4th hole on the rim.
The next group of 8 spokes (because you have 32 holes) will be just behind the 1st group. This is because of the way Sun rim holes are offset. They will be almost parallel to each other. This is where you have to be careful and where you probably messed up before. When you flip the hub/rim over (for easy access to the holes on the other side of the hub) the next rim hole you will fill will now be the 2nd hole to the left of the valve hole (going clockwise). Locate which hub hole you will next fill by looking straight down at the hub. The holes on the bottom flange are offset so they are between the holes on your top flange. Find the hole that is just behind (or to your left going clockwise) of your original 1st spoke hole. This is where you will start your next group of 8 spokes. Again the spoke body is on the inside and the spoke head on the outside. When you are finished with that group of 8, twist the hub so the spokes go away from the valve hole. You have twisted it the wrong way if you have spokes cross over the valve hole.
It almost doesn't matter which of the next free 16 hub hole choices you next put in a spoke for the next group of 8 spokes as long as your pattern is correct. The spoke will enter on the inside the hub and exit on the outside. Cross over 2 spokes and under the 3rd spoke. Make sure that you place the spoke in the hole in the rim that is 2 spaces away from the other spoke (one space in-between) from the same side. It is easy to make a mistake here and put it either 1 or 3 holes away. Where the 4th set of 8 spokes go on the other flange is obvious.
The exceptions to general rules can make descriptions more difficult and wordy. When trying to explain the exceptions, everything becomes confusing. For example most rims including yours offset their holes from centerline so spokes more directly point to one flange side or the other. Usually if you look down at the valve hole with your head on the inside of the rim, you will see that the 1st hole to the right of the valve hole is offset a bit towards you. However some rim makers reverse which holes are offset and that can change your spoking sequence from a general standard.
When you start all over again, I suggest/recommend that you place the valve hole at the 6 o�clock position. Thread your 1st spoke in the 1st hole to the right (or counterclockwise) of the valve hole (when you are looking down at the rim laying on a table). The spoke can be in any hub hole that is on the right (or up) side (the one that would be closest to the camera). By starting the spoke from the outside of the hub, the spoke body will end up on the inside - which if course puts the head on the outside of the hub flange. Finish putting in the other 7 spokes that belong in that sequence. That would be every other spoke hole on that side of the hub and every 4th hole on the rim.
The next group of 8 spokes (because you have 32 holes) will be just behind the 1st group. This is because of the way Sun rim holes are offset. They will be almost parallel to each other. This is where you have to be careful and where you probably messed up before. When you flip the hub/rim over (for easy access to the holes on the other side of the hub) the next rim hole you will fill will now be the 2nd hole to the left of the valve hole (going clockwise). Locate which hub hole you will next fill by looking straight down at the hub. The holes on the bottom flange are offset so they are between the holes on your top flange. Find the hole that is just behind (or to your left going clockwise) of your original 1st spoke hole. This is where you will start your next group of 8 spokes. Again the spoke body is on the inside and the spoke head on the outside. When you are finished with that group of 8, twist the hub so the spokes go away from the valve hole. You have twisted it the wrong way if you have spokes cross over the valve hole.
It almost doesn't matter which of the next free 16 hub hole choices you next put in a spoke for the next group of 8 spokes as long as your pattern is correct. The spoke will enter on the inside the hub and exit on the outside. Cross over 2 spokes and under the 3rd spoke. Make sure that you place the spoke in the hole in the rim that is 2 spaces away from the other spoke (one space in-between) from the same side. It is easy to make a mistake here and put it either 1 or 3 holes away. Where the 4th set of 8 spokes go on the other flange is obvious.
The exceptions to general rules can make descriptions more difficult and wordy. When trying to explain the exceptions, everything becomes confusing. For example most rims including yours offset their holes from centerline so spokes more directly point to one flange side or the other. Usually if you look down at the valve hole with your head on the inside of the rim, you will see that the 1st hole to the right of the valve hole is offset a bit towards you. However some rim makers reverse which holes are offset and that can change your spoking sequence from a general standard.
I also never bothered with all the extra terminology. Pulling spokes, trailing spokes, etc. Why confuse myself? I just wanted to build wheels.
Last edited by seedsbelize; 06-02-20 at 10:42 AM.
06-02-20 | 07:26 PM
#50
Thread Starter
Senior Member
Joined: Feb 2012
Posts: 1,390
Likes: 207
From: Williamsburg, VA Sebastian, FL
Bikes: 1987 Centurion Ironman Master, 1992 Koga Miyata Exerciser, 1992 Schwinn Crosscut
Allright, one more thing and then I'll stop bothering you guys.
The wheel is (finally) laced correctly, and drawing it up slowly went well...it is both round and true. But, in doing so, I notice that a few spokes seem tauter than others, and a few seem looser than others. This is ever so slight, but noticable to my touch. Is this normal? Will the difference lesson as I tighten?
Speaking of tightening, I figure I've got more to do, but without a tension meter I'm just guessing. For instance, pushing at a spoke's midpoint, I get a deflection of about 4 mm right now. Should they deflect about 2 mm with modest pressure, or less? Is there any kind of rule of thumb, or do I just get it close to what my other three bike's wheels feel like?
I've tried strumming a spoke and listening, but that's obviously a skill reserved for the pros!
Thanks again for all the help, it really is invaluable to a beginner.
Last edited by 67tony; 06-02-20 at 07:32 PM.