


Re-Simplex-ing a PX10?
 06-01-12 | 05:03 PM
#26

www.theheadbadge.com


Joined: Sep 2005
Posts: 29,015
Likes: 5,515
From: Southern Florida
Bikes: https://www.theheadbadge.com
Pretty much correct. Just looked at my SLJ and the spring end is 180 degrees opposite the position in suncake's photo. Use an allen wrench to put tension on the spring and install the washer. Mine uses the minus hole. That puts the tab on the correct side of the derailleur and provides the needed tension.
-Kurt
__________________


 06-01-12 | 05:17 PM
#27


What washer? There's no washer. Be careful about using a wrench on the pivot bolt. That's the end of it you see in the picture above. If you apply too much torque, it will spin in the plate with the tab and you'll have no spring tension. It doesn't take much. I learned that the hard way. There's really no need to use a wrench at all. Just tighten the bolt from the backside. The pivot bolt won't turn because the tab stops it.
The pivot bolt is actually a nut in this application because the threads are female.
The pivot bolt is actually a nut in this application because the threads are female.
06-01-12 | 06:19 PM
#28

If I own it, I ride it
Joined: Nov 2005
Posts: 5,685
Likes: 820
From: Cardinal Country
Bikes: Lejeune(14), Raleigh, Raysport, Jan De Reus, Gazelle, Masi, B. Carr�(4), Springfield, Greg Lemond, Andre Bertin, Schwinn Paramount
What washer? There's no washer. Be careful about using a wrench on the pivot bolt. That's the end of it you see in the picture above. If you apply too much torque, it will spin in the plate with the tab and you'll have no spring tension. It doesn't take much. I learned that the hard way. There's really no need to use a wrench at all. Just tighten the bolt from the backside. The pivot bolt won't turn because the tab stops it.
The pivot bolt is actually a nut in this application because the threads are female.
The pivot bolt is actually a nut in this application because the threads are female.
06-01-12 | 06:22 PM
#29
Senior Member
Joined: Jul 2009
Posts: 11,128
Likes: 39
Bikes: 1986 Alan Record Carbonio, 1985 Vitus Plus Carbone 7, 1984 Peugeot PSV, 1972 Line Seeker, 1986(est.) Medici Aerodynamic (Project), 1985(est.) Peugeot PY10FC
You are correct, that is not a washer. Pardon me for using incorrect terminology. I have corrected the original post. However in this case, as the plate in not installed on the pivot bolt, you will need to use an allen wrench in order to pretension the spring to install the plate on the pivot bolt in the correct position. Note there are flats on the pivot bolt and in the mounting hole of the plate so that it won't just spin. You may have to tap or press the plate on the pivot bolt. Once that is done, it can be mounted, making sure the tab is on the front side of the hanger, and the retaining bolt can be installed. If done correctly the derailleur will swing toward the back of the bike. The picture I shared earlier shows the correct orientation of the plate.
Chombi
06-01-12 | 08:25 PM
#30
Thread Starter
Member
Joined: Mar 2011
Posts: 207
Likes: 0
From: Seattle
Bikes: '71 Peugeot PX10
I'm trying to rotate the spring end clockwise 180 degrees using an allen key on the other side, then place the tabbed-washer-whatever (A) in to place (as shown in CV-6's pic above).
The problem is, once I get to about the 45 degrees, the keyed-spring-plate-whatever (B) seems to have a rounded out hole, so when I rotate the hanger bold (C), the spring doesn't turn with. I don't think this was originally the case--I think the center hole in B has been rounded off!

The problem is, once I get to about the 45 degrees, the keyed-spring-plate-whatever (B) seems to have a rounded out hole, so when I rotate the hanger bold (C), the spring doesn't turn with. I don't think this was originally the case--I think the center hole in B has been rounded off!
06-01-12 | 09:02 PM
#31
www.theheadbadge.com
Joined: Sep 2005
Posts: 29,015
Likes: 5,515
From: Southern Florida
Bikes: https://www.theheadbadge.com
Suncake, if you can't get it to work, send it back. Remind me how much I charged you for the lot via PM so I can refund you on it.
Seems to explain why some Simplex RD's loose their springiness - that one part getting rounded out.
-Kurt
Seems to explain why some Simplex RD's loose their springiness - that one part getting rounded out.
-Kurt
__________________
06-01-12 | 09:35 PM
#32
Thread Starter
Member
Joined: Mar 2011
Posts: 207
Likes: 0
From: Seattle
Bikes: '71 Peugeot PX10
So to confirm: Part B should have a flattened cutout a la Part A?
I haven't given up hope yet. If I can somehow rotate the spring 180 degrees and get Part A pressed onto Part C (with B sandwiched in the middle), it shouldn't matter whether B is rounded out or not, no?
How to do that though...time to get creative.
I haven't given up hope yet. If I can somehow rotate the spring 180 degrees and get Part A pressed onto Part C (with B sandwiched in the middle), it shouldn't matter whether B is rounded out or not, no?
How to do that though...time to get creative.
06-01-12 | 09:54 PM
#33
If I own it, I ride it
Joined: Nov 2005
Posts: 5,685
Likes: 820
From: Cardinal Country
Bikes: Lejeune(14), Raleigh, Raysport, Jan De Reus, Gazelle, Masi, B. Carr�(4), Springfield, Greg Lemond, Andre Bertin, Schwinn Paramount
So to confirm: Part B should have a flattened cutout a la Part A?
I haven't given up hope yet. If I can somehow rotate the spring 180 degrees and get Part A pressed onto Part C (with B sandwiched in the middle), it shouldn't matter whether B is rounded out or not, no?
How to do that though...time to get creative.
I haven't given up hope yet. If I can somehow rotate the spring 180 degrees and get Part A pressed onto Part C (with B sandwiched in the middle), it shouldn't matter whether B is rounded out or not, no?
How to do that though...time to get creative.
06-02-12 | 05:59 AM
#35


Here's an exploded parts diagram from Robert Broderick's velo-pages.com Gallery (see the bottom part, the SLJ):

It doesn't seem likely to me that the "cup" piece B would be keyed; looks like it's just there to contain the wound spring.
My bet is that to install and tension the spring, you put your part A (3563L) into place on the back side of the derailer, put those on the edge of a table top or some other flat surface to hold them together, install the cup B (3561) and the spring (3885) from the outer side (through the holes in parts A + B), wind the spring up from the exterior and hold its free end into the slot in the edge of the casting (more easily seen in the bottom section of the exploded view) using a flat, thin implement, and then install the pivot bolt, keying it into part A. But I've never taken one apart yet.
06-02-12 | 06:13 AM
#36
www.theheadbadge.com
Joined: Sep 2005
Posts: 29,015
Likes: 5,515
From: Southern Florida
Bikes: https://www.theheadbadge.com
My bet is that to install and tension the spring, you put your part A (3563L) into place on the back side of the derailer, put those on the edge of a table top or some other flat surface to hold them together, install the cup B (3561) and the spring (3885) from the outer side (through the holes in parts A + B), wind the spring up from the exterior and hold its free end into the slot in the edge of the casting (more easily seen in the bottom section of the exploded view) using a flat, thin implement, and then install the pivot bolt, keying it into part A. But I've never taken one apart yet.
Don't get creative; you're probably right about 3561 - and if that is the case, I'd like to buy the RD back. It'll give you an opportunity to put your funds towards an intact one.
In the meantime, I'll probably be able to roustle up a junker SLJ down here for that part and fix it.
-Kurt
__________________
Last edited by cudak888; 06-02-12 at 06:20 AM.
06-02-12 | 07:15 AM
#37

Senior Member
Joined: Sep 2008
Posts: 1,350
Likes: 4
From: Collegeville, PA
Bikes: Ruckelshaus Randonneur, Specialized Allez (early 90's, steel), Ruckelshaus Path Bomber currently being built
Is it possible that you have to "tension" the spring (by rotating it, via allen key on the other side of the mounting bolt) in order to get it into the other hole?
06-02-12 | 07:26 AM
#38
www.theheadbadge.com
Joined: Sep 2005
Posts: 29,015
Likes: 5,515
From: Southern Florida
Bikes: https://www.theheadbadge.com
-Kurt
__________________
06-02-12 | 07:45 AM
#39
Kurt has it figured out. It's a weakness in the design of these derailers
I had to take back an SX610 that I sold when this happened to it, even though I knew that it wasn't in that condition when I shipped it. I ended up converting it to use with a claw by changing the pivot bolt and eliminating #3563L. It's on my Jeunet now.

I had to take back an SX610 that I sold when this happened to it, even though I knew that it wasn't in that condition when I shipped it. I ended up converting it to use with a claw by changing the pivot bolt and eliminating #3563L. It's on my Jeunet now.

 06-02-12 | 08:00 AM
#41
www.theheadbadge.com
Joined: Sep 2005
Posts: 29,015
Likes: 5,515
From: Southern Florida
Bikes: https://www.theheadbadge.com
Grand Bois - do you know if the SX610 and SX410 use the same sleeve as on the SLJ's? If so, I might be able to send the OP a replacement.
-Kurt
-Kurt
__________________
06-02-12 | 08:15 AM
#42
I have an SX610 in my hand right now and I can say for certain that the SX610 part won't work due to the angle of the dangle of the drop parallelogram design.
When I had the same problem, I contemplated silver soldering the parts. I never got around to trying it.
By "sleeve", you don't mean #3561 do you? That's what I would call a sleeve and it has nothing to do with the problem.
When I had the same problem, I contemplated silver soldering the parts. I never got around to trying it.
By "sleeve", you don't mean #3561 do you? That's what I would call a sleeve and it has nothing to do with the problem.
Last edited by Grand Bois; 06-02-12 at 08:19 AM.
06-02-12 | 08:19 AM
#43
www.theheadbadge.com
Joined: Sep 2005
Posts: 29,015
Likes: 5,515
From: Southern Florida
Bikes: https://www.theheadbadge.com
06-02-12 | 09:13 AM
#44
If I own it, I ride it
Joined: Nov 2005
Posts: 5,685
Likes: 820
From: Cardinal Country
Bikes: Lejeune(14), Raleigh, Raysport, Jan De Reus, Gazelle, Masi, B. Carr�(4), Springfield, Greg Lemond, Andre Bertin, Schwinn Paramount
Work has called, so I am out of this for now. Hopefully Kurt can follow up on his SLJ.
On another note...after seeing the exploded drawing, I am thinking I had the procedure all wrong.
On another note...after seeing the exploded drawing, I am thinking I had the procedure all wrong.
06-02-12 | 09:55 AM
#45
www.theheadbadge.com
Joined: Sep 2005
Posts: 29,015
Likes: 5,515
From: Southern Florida
Bikes: https://www.theheadbadge.com
06-02-12 | 10:09 AM
#46
www.theheadbadge.com
Joined: Sep 2005
Posts: 29,015
Likes: 5,515
From: Southern Florida
Bikes: https://www.theheadbadge.com
The derailer. Note 3563L's position while the RD is under tension from the chain.
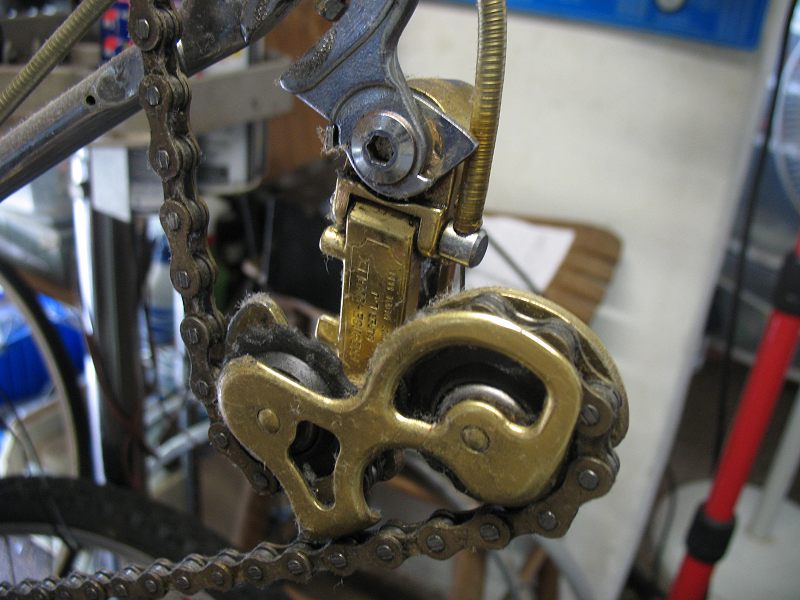
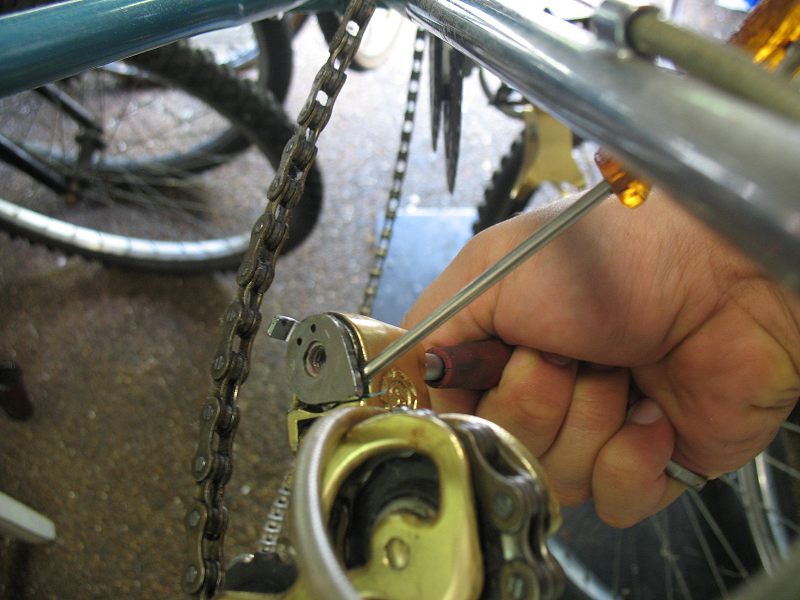
Careful persuasion removes 3563L from the top nut. It is imperative for safety (and to keep 3563L from flying into your face) to turn 3876 clockwise so that 3563L's tab is not resting against the derailer body. This is assuming an RD that is working correctly, unlike Suncake's SLJ:
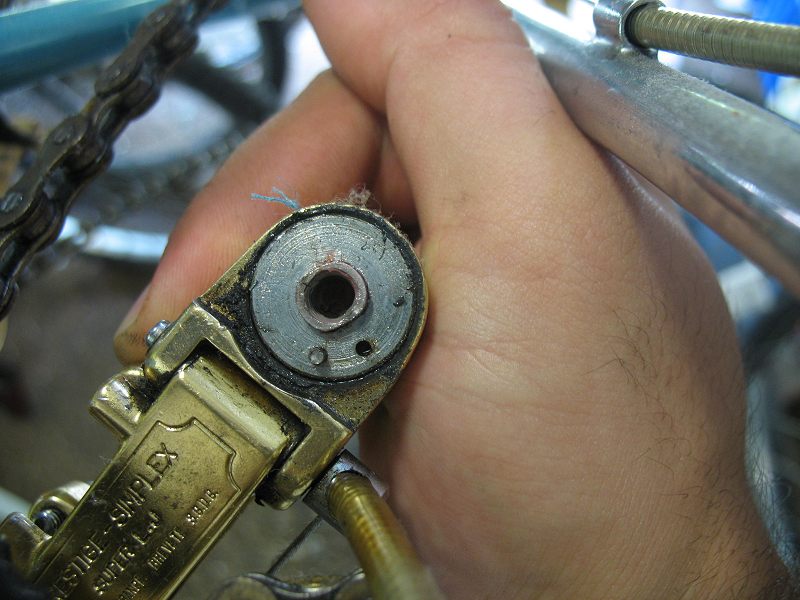
As Suncake suspected, 3561 is supposed to have flats on either side, allowing the user to install 3563L by turning 3876 clockwise, thereby tensioning the spring.
If none of this makes sense, this video should make it crystal clear:
Suncake, please PM me, and I'll refund the cost of the parts plus the shipping back to me. Please keep the FD. I'd offer you a replacement 3561, but I'm not sure I can pull a spare SLJ out of nowhere . According to Robert's pages, it appears as if the part was common only to the LJ 1000, LJ 2000, and SLJ 5000/5001.
That said, is there a possibility that someone stuck a #3562 in place of a 3561 on Suncake's RD?
-Kurt
Careful persuasion removes 3563L from the top nut. It is imperative for safety (and to keep 3563L from flying into your face) to turn 3876 clockwise so that 3563L's tab is not resting against the derailer body. This is assuming an RD that is working correctly, unlike Suncake's SLJ:
As Suncake suspected, 3561 is supposed to have flats on either side, allowing the user to install 3563L by turning 3876 clockwise, thereby tensioning the spring.
If none of this makes sense, this video should make it crystal clear:
Suncake, please PM me, and I'll refund the cost of the parts plus the shipping back to me. Please keep the FD. I'd offer you a replacement 3561, but I'm not sure I can pull a spare SLJ out of nowhere
. According to Robert's pages, it appears as if the part was common only to the LJ 1000, LJ 2000, and SLJ 5000/5001.That said, is there a possibility that someone stuck a #3562 in place of a 3561 on Suncake's RD?
-Kurt
__________________
Last edited by cudak888; 06-02-12 at 10:24 AM.
06-02-12 | 10:25 AM
#47
I don't know (without trying it) why the method I suggested wouldn't work: put the dropout side of the pivot (3563L, 3561, pivot body, together with the spring (3885), wind the spring up from the outside, hold the wound end of the spring in the slot at the edge of the pivot hole deftly with a blade, and insert the pivot bolt, engaging the keyhole in 3563L and trapping the end of the spring in the slot at the same time. Then 3561 is just a sleeve, and its keyhole isn't used.
06-02-12 | 10:28 AM
#48
www.theheadbadge.com
Joined: Sep 2005
Posts: 29,015
Likes: 5,515
From: Southern Florida
Bikes: https://www.theheadbadge.com
I don't know (without trying it) why the method I suggested wouldn't work: put the dropout side of the pivot (3563L, 3561, pivot body, together with the spring (3885), wind the spring up from the outside, hold the wound end of the spring in the slot at the edge of the pivot hole deftly with a blade, and insert the pivot bolt, engaging the keyhole in 3563L and trapping the end of the spring in the slot at the same time. Then 3561 is just a sleeve, and its keyhole isn't used.
EDIT: Might have found a donor. Going to the LBS now.
-Kurt
__________________
Last edited by cudak888; 06-02-12 at 10:34 AM.
06-02-12 | 11:39 AM
#50
Thread Starter
Member
Joined: Mar 2011
Posts: 207
Likes: 0
From: Seattle
Bikes: '71 Peugeot PX10
I don't know (without trying it) why the method I suggested wouldn't work: put the dropout side of the pivot (3563L, 3561, pivot body, together with the spring (3885), wind the spring up from the outside, hold the wound end of the spring in the slot at the edge of the pivot hole deftly with a blade, and insert the pivot bolt, engaging the keyhole in 3563L and trapping the end of the spring in the slot at the same time. Then 3561 is just a sleeve, and its keyhole isn't used.
As far as the method you explained, I'm not 100% I completely understand it, particularly what you mean by "wind the spring from the outside." As Kurt pointed out, tensioning this to 180 degrees is quite a bit of torque (enough to, say, strip a slotted aluminum bit
 ). In theory, if one could rotate the spring 180 degrees and get the tabbed washer (3563L) in place, you'd be fine...but I think the term "deft hands" would be an understatement.
I should note that 3563L cannot be rotated to the proper position if inserted in the untensioned state b/c of interference from the raised parts of the derailer body.
Last edited by suncake; 06-02-12 at 11:41 AM. Reason: too many smileys :)