


Removing Freewheel with hosed up tool interface - thoughts?
 09-19-12 | 08:40 AM
#1

Thread Starter
Senior Member


Joined: Jul 2006
Posts: 11,512
Likes: 4,929
From: San Jose (Willow Glen) Ca
Bikes: Kirk Custom JK Special, 86 De Rosa Pro, '84 Team Miyata,(dura ace old school) 80?? SR Semi-Pro 600 Arabesque
Removing Freewheel with hosed up tool interface - thoughts?
My saga of of fun with my "free" Torpado continues.
I have a regina freewheel (circa 1983/84) that I need to take off. I was by a LBS and the wheel was in the trunk so I figured I would save time and for once not buy a new tool and have them take the free wheel off.
The took one look and said no go. Somewhere in the past some on mangled the the freewheel. where there should be nice square holes there are now nice mangled ramps.
Of course I tried my self and goofed it up more.
How can I get this thing off without using the extractor? My thoughts are 1) try to create new square edges for an extractor, or 2) take the cogs off (sure to be another bit of fun) and get a grep on the freewheel body somehow or 3) fill it with epoxy and use a chain whip to unscrew the bugger.
bright ideas apprecciated
__________________
Life is too short not to ride the best bike you have, as much as you can.
Life is too short not to ride the best bike you have, as much as you can.
 09-19-12 | 08:56 AM
#2

Oh Snap, not again...
Joined: Mar 2010
Posts: 606
Likes: 0
From: Cardiff, Ca
I believe there is a time for certain things to go from being C&V to trash. It sounds as if the freewheel has ventured into this realm and probably the wheel as well. An early 80's rear wheel, is it that special?
09-19-12 | 09:04 AM
#3


Remove axle.
Dremel or die grind new notches at 90� to the originals. "cut-off" wheels work well for the edges.
Work slowly to have nice tight notches for tool to engage to, be sure to go deep enough, do not worry about nicking the bearing lock ring.
Reinstall axle with bearings.
install freewheel tool with skewer to hold it firmly in the notches.
Bench vise or 14" cresent wrench.
Back off skewer just a bit after it breaks free.
Continue this until resistance is gone.
Repack hub.
Consider selling the freewheel remains to me as I need a replacement larger cog as one is cupped in my inventory.
09-19-12 | 09:05 AM
#4
Senior Member

Joined: Sep 2011
Posts: 3,372
Likes: 598
From: Baltimore MD
Bikes: '72 Motobecane Grand Record, '72 Gitane tandem, '72 Raleigh Super Course, '73 Raleigh Gran Sport, '73 Colnago Super, '76 Fiorelli Coppi, '78 Raleigh SBDU Team Pro, '78 Trek 930, '81 Holdsworth Special 650B, '86 Masi GC, ’94 Bridgestone RB-T
Sheldon says (and it does work):
Once the notches are damaged, or to remove and discard an old freewheel for which you have no tool, you must disassemble the freewheel and clamp the core into a vise -- left side of the wheel up -- then unscrew the wheel counterclockwise."
https://sheldonbrown.com/freewheels.html#remove
Once the notches are damaged, or to remove and discard an old freewheel for which you have no tool, you must disassemble the freewheel and clamp the core into a vise -- left side of the wheel up -- then unscrew the wheel counterclockwise."
https://sheldonbrown.com/freewheels.html#remove
__________________
The man who dies with the most toys�is dead. - Rootboy
The man who dies with the most toys�is dead. - Rootboy
09-19-12 | 09:16 AM
#5
Senior Member
Joined: Aug 2012
Posts: 551
Likes: 11
From: York, PA
Bikes: '72 Peugeot PX-10; '74 Raleigh International; '87 Specialized RockHopper; '88 Specialized StumpJumper; '02 Cannondale Scalpel
You can dip your forefinger in the freewheel oriface with enough fresh grease for the bearings, and repack the bearings like that.
Of course, you are still stuck with that old freewheel.
Of course, you are still stuck with that old freewheel.
09-19-12 | 09:17 AM
#6
Thread Starter
Senior Member
Joined: Jul 2006
Posts: 11,512
Likes: 4,929
From: San Jose (Willow Glen) Ca
Bikes: Kirk Custom JK Special, 86 De Rosa Pro, '84 Team Miyata,(dura ace old school) 80?? SR Semi-Pro 600 Arabesque
Campy Tipo hub with ambrosia rim...not special, collectable but totally usable and part of a complete bike. Once of I will get a new freewheel.
__________________
Life is too short not to ride the best bike you have, as much as you can.
Life is too short not to ride the best bike you have, as much as you can.
09-19-12 | 09:37 AM
#7

Senior Member

Joined: Oct 2005
Posts: 4,456
Likes: 194
From: Eugene, OR
Bikes: Lynskey Meraki 12 speed Di2 Ultegra and canyon Grizl AL 7
Regina freewheels were notorious for having the removal tabs fail. You will need to do as Sheldon says, use a pin tool to remove the bearing race then use a pipe wrench or a vise to grasp the body and remove. Taking the cogs off will do no good, as the ratcheting mechanism will still be in place. Most people just trashed the wheel at that point because its was not worth the effort or expense.
09-19-12 | 10:05 AM
#9

multimodal commuter
Joined: Nov 2006
Posts: 19,810
Likes: 597
From: NJ, NYC, LI
Bikes: 1940s Fothergill, 1959 Allegro Special, 1963? Claud Butler Olympic Sprint, Lambert 'Clubman', 1974 Fuji "the Ace", 1976 Holdsworth 650b conversion rando bike, 1983 Trek 720 tourer, 1984 Counterpoint Opus II, 1993 Basso Gap, 2010 Downtube 8h, and...
09-19-12 | 10:14 AM
#10

Senior Member
Joined: Mar 2010
Posts: 6,970
Likes: 59
From: Catskills/Brooklyn, NY
Bikes: See sig
09-19-12 | 10:28 AM
#11

Senior Member
Joined: Aug 2009
Posts: 7,726
Likes: 4,191
From: Berkeley, CA
Bikes: 72 Cilo Pacer, 72 Gitane GT, 72 Peugeot PX10, 73 Speedwell Ti,l, 75 Peugeot PR-10L, 80 Colnago Super, 81 Zinn, 85 ALAN Cross, 85 De Rosa Pro, 86 Look 753, 86 Look KG86, 89 Parkpre Team, 90 Parkpre Team MTB, 90 Merlin
+1 to repechage. I see no harm in trying to create a new flat for the removal tool. Probably couldn't hurt to squirt some penetrating oil onto the threads from the back as well. If that fails, you can always then move on dismantling the FW.
By the way, what type of freewheel tool are you using? If it's one of the older, non-splined Regina freewheels, you might get a better purchase on the faces using one of these FW tools with a lip.

(Btw, I am going to be in San Jose tomorrow, and could let you borrow mine if necessary. PM me if interested.)
By the way, what type of freewheel tool are you using? If it's one of the older, non-splined Regina freewheels, you might get a better purchase on the faces using one of these FW tools with a lip.
(Btw, I am going to be in San Jose tomorrow, and could let you borrow mine if necessary. PM me if interested.)
__________________
-Randy
'72 Cilo Pacer (x2) � '72 Peugeot PX10 � �72 Gitane Gran Tourisme � '73 Speedwell Ti � '74 Motobecane Grand Jubile � '74 Peugeot UE-8 � �80 Colnago Super � �81 Univega Super Special � �82 Zinn � �84ish Mystery Custom � '85 A.L.A.N Cyclocross � '85 De Rosa Pro � '86 Look Equipe 753 � '86 Look KG86 � '89 Parkpre Team Road � '90 Parkpre Team MTB � '90 Merlin Ti
Avatar photo courtesy of jeffveloart.com, contact: contact: jeffnil8 (at) gmail.com.
09-19-12 | 10:30 AM
#12

Freewheel Medic

Joined: Oct 2005
Posts: 13,578
Likes: 3,329
From: An Island on the Coast of GA!
Bikes: Snazzy* Schwinns, Classy Cannondales & a Super Pro Aero Lotus (* Ed.)
Below you will see Frank the Welder's '82 Regina Corsa, which I'm guessing looks very similar to Squirtdad's Regina.
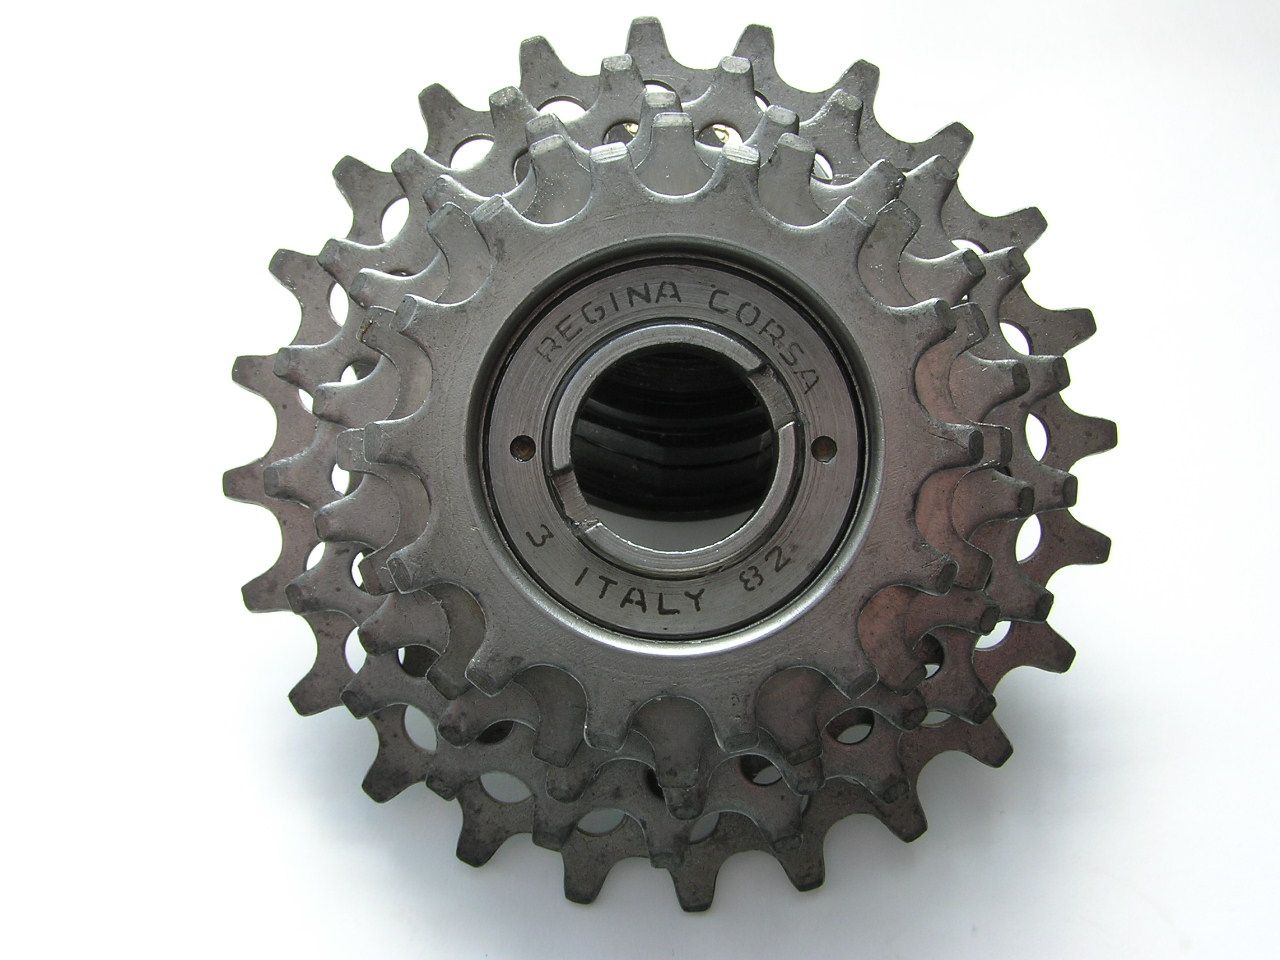
Do you see the two holes in the retaining ring at 3 & 9 o'clock? Find a punch which fits in those holes and a hammer. Grab a container which can fit over the freewheel to the spokes.
With the wheel in your lap, lean it against the wall or your bench so that it sits at about 60 or so degrees. Place the punch in the 3 o'clock hole in the retaining ring and begin striking down towards the floor. The ring has reversed threads. Eventually the ring will loosen. If it doesn't, soak the threads in penetrating oil and leave over night.
As the ring unthreads, move the wheel into a more horizontal position, and when the ring comes off, place the container over the freewheel, flip the wheel 180 degrees while holding the container tight againts the spokes. All the bearings, pawls and outer body will fall into the container.
You should now see the inner body attached to the hub. It should look something like this:

Using a big pipe wrench or a vise you should be able to unthread the inner body from the hub. This will most likely destroy the inner body.
But the pawls, the springs, the cogs, the retaining ring, spacers, possibly the bearings, and the outer body should all be saved. If you can't use them, I'll be glad to keep them for spare parts for future repairs. I'll be glad to pay the postage or send you another freewheel in trade.
Take a look at this picture. As you can see, the pawls and springs are critical, and as far as I know, there is no source to buy new ones.

Do you see the two holes in the retaining ring at 3 & 9 o'clock? Find a punch which fits in those holes and a hammer. Grab a container which can fit over the freewheel to the spokes.
With the wheel in your lap, lean it against the wall or your bench so that it sits at about 60 or so degrees. Place the punch in the 3 o'clock hole in the retaining ring and begin striking down towards the floor. The ring has reversed threads. Eventually the ring will loosen. If it doesn't, soak the threads in penetrating oil and leave over night.
As the ring unthreads, move the wheel into a more horizontal position, and when the ring comes off, place the container over the freewheel, flip the wheel 180 degrees while holding the container tight againts the spokes. All the bearings, pawls and outer body will fall into the container.
You should now see the inner body attached to the hub. It should look something like this:
Using a big pipe wrench or a vise you should be able to unthread the inner body from the hub. This will most likely destroy the inner body.
But the pawls, the springs, the cogs, the retaining ring, spacers, possibly the bearings, and the outer body should all be saved. If you can't use them, I'll be glad to keep them for spare parts for future repairs. I'll be glad to pay the postage or send you another freewheel in trade.
Take a look at this picture. As you can see, the pawls and springs are critical, and as far as I know, there is no source to buy new ones.
__________________
Bob
Enjoying the GA coast all year long!
Thanks for visiting my website: www.freewheelspa.com
Bob
Enjoying the GA coast all year long!
Thanks for visiting my website: www.freewheelspa.com
09-19-12 | 10:33 AM
#13

Senior Member
Joined: Jan 2008
Posts: 2,421
Likes: 22
From: Aurora, IL
Bikes: '73 Raleigh RRA, 1986 Trek 500 commuter
Might be in the same boat with a Campy Record wheelset w/Suntour Winner Pro. Tried to remove using a 2-prong remover and broke one of the ridges on the freewheel. Soaking in penetrating oil currently, and will have a go with a 4-prong remover (once I get one). Would like to save the freewheel if possible, but need to get it off and definitely save the wheels/hubs over the freewheel.
09-19-12 | 10:40 AM
#14
Senior Member
Joined: Jul 2009
Posts: 11,128
Likes: 39
Bikes: 1986 Alan Record Carbonio, 1985 Vitus Plus Carbone 7, 1984 Peugeot PSV, 1972 Line Seeker, 1986(est.) Medici Aerodynamic (Project), 1985(est.) Peugeot PY10FC
This is not an aluminum bodied FW by any chance??
If grinding new notches on and trying again with a FW remover does not work, just tear down the FW till all you have is the bare FW inner core left on the wheel hub (remove pawls and spings too.) clean off all the grease and oil off it and go at it with a large pipe wrench. You can even aplly a bit of heat on it to to help crack it off the hub threads. Be aware that using a pipe wrench might mean the end for the FW, but at least you will have it off the hub.....
Chombi
Oops, just noticed that Pastor Bob had pretty much gave the same exact tip two posts before me....
Last edited by Chombi; 09-19-12 at 10:45 AM.
09-19-12 | 10:49 AM
#15

MIKE is my name!
Joined: Mar 2012
Posts: 2,846
Likes: 21
From: finland,baltimore
Bikes: hans lutz, , puch mistral ultima,2x Austro Daimler Smoked chrome Ultima,Austro Daimler Mixte,Austro Daimler 531 mixte, flying arrow,F Moser,
I took the axle out- put a metal file in the vice and used it as the tool- the pointy end in the hub- worked 2 times for me.

 09-19-12 | 11:24 AM
#17
Senior Member
Joined: Jan 2011
Posts: 295
Likes: 0
From: Armenia, Colombia
Bikes: 1961 Raleigh Sports

 09-19-12 | 11:56 AM
#21
Senior Member
Joined: Jul 2009
Posts: 11,128
Likes: 39
Bikes: 1986 Alan Record Carbonio, 1985 Vitus Plus Carbone 7, 1984 Peugeot PSV, 1972 Line Seeker, 1986(est.) Medici Aerodynamic (Project), 1985(est.) Peugeot PY10FC
Although they seen like they can, most band wrenches cannot grip the hub hard enough to unscrew it off a freewheel. I've done a lot of wrenching on all sorts of machines through the years an FWs had taken about the most force/effort to remove than anything I could remember.
Chombi
Chombi
09-19-12 | 12:36 PM
#22
Senior Member
Joined: Apr 2011
Posts: 2,347
Likes: 21
Bikes: Fillet-brazed Schwinns

When using an impact gun with the wheel in a horizontal position I haven't had to set the wheel in a vise or use a skewer or any other device except the weight of the gun to hold the remover down. One or two bursts of the gun and the freewheel comes right off without any damage to the notches or splines. While I haven't done it yet, I'm fairly positive that using an impact gun I could easily take the freewheel off of a hub where the spokes were cut (with no rim for leverage).
Am I the only one who uses an impact gun for removing freewheels? It just works so well...
*By "hex end" I mean one that would be compatible with a socket. While most removal tools have this, some older ones do not. For example, when removing the Schwinn Model F2/F3 freewheels I would use this tool and not this one. While both fit the same freewheel splines, the latter would be incompatible with the socket in my impact gun and thus useless to me.
09-19-12 | 12:40 PM
#23
Senior Member
Joined: Sep 2011
Posts: 3,372
Likes: 598
From: Baltimore MD
Bikes: '72 Motobecane Grand Record, '72 Gitane tandem, '72 Raleigh Super Course, '73 Raleigh Gran Sport, '73 Colnago Super, '76 Fiorelli Coppi, '78 Raleigh SBDU Team Pro, '78 Trek 930, '81 Holdsworth Special 650B, '86 Masi GC, ’94 Bridgestone RB-T
Re-lace the wheel. Seriously, I've done this. No need for a full build, just 1/2 the spokes on each flange should do the trick.
__________________
The man who dies with the most toys�is dead. - Rootboy
The man who dies with the most toys�is dead. - Rootboy
09-19-12 | 12:48 PM
#24
Senior Member
Joined: Aug 2009
Posts: 7,726
Likes: 4,191
From: Berkeley, CA
Bikes: 72 Cilo Pacer, 72 Gitane GT, 72 Peugeot PX10, 73 Speedwell Ti,l, 75 Peugeot PR-10L, 80 Colnago Super, 81 Zinn, 85 ALAN Cross, 85 De Rosa Pro, 86 Look 753, 86 Look KG86, 89 Parkpre Team, 90 Parkpre Team MTB, 90 Merlin
^But how would you get the spokes into the drive-side hub holes with the FW in the way?
__________________
-Randy
'72 Cilo Pacer (x2) � '72 Peugeot PX10 � �72 Gitane Gran Tourisme � '73 Speedwell Ti � '74 Motobecane Grand Jubile � '74 Peugeot UE-8 � �80 Colnago Super � �81 Univega Super Special � �82 Zinn � �84ish Mystery Custom � '85 A.L.A.N Cyclocross � '85 De Rosa Pro � '86 Look Equipe 753 � '86 Look KG86 � '89 Parkpre Team Road � '90 Parkpre Team MTB � '90 Merlin Ti
Avatar photo courtesy of jeffveloart.com, contact: contact: jeffnil8 (at) gmail.com.
09-19-12 | 12:52 PM
#25
Senior Member
Joined: Jan 2011
Posts: 295
Likes: 0
From: Armenia, Colombia
Bikes: 1961 Raleigh Sports
As far as lacing the drive side, you could try grinding down the heads of those spokes so that they resemble emergency spokes.
https://www.jimlangley.net/wrench/espoketool.html
https://www.jimlangley.net/wrench/espoketool.html