


Poor Man's Fixed Cup Tool
 02-17-13 | 09:41 PM
#1

Thread Starter
Senior Member


Joined: May 2012
Posts: 5,047
Likes: 4,897
From: Point Reyes Station, California
Bikes: Indeed!
Poor Man's Fixed Cup Tool
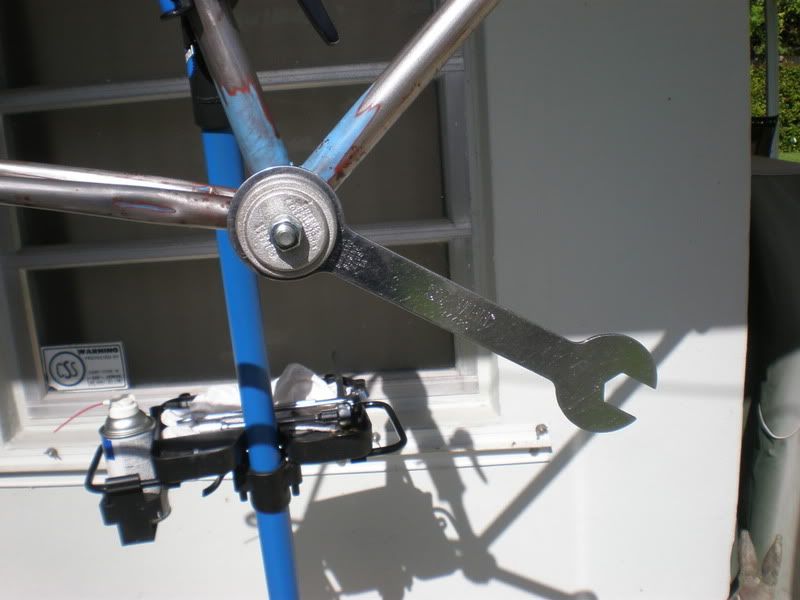
C&V bikes can have some pretty stuck fixed cups! Funny what 30 years of rust and neglect can do. The bike shop where I worked in the seventies had a great VAR tool for removing those super-stuck fixed cups. It clamped on to the cup nice and tight through the bottom bracket. I never met a cup it couldn't remove. But that tool and it's various imitators are all pretty expensive. Nowadays, without all the fancy shop tools, all I have is my trusty old fixed cup spanner that I've had since the seventies. It's a fine tool, but pretty darn thin, and the flats on the cups themselves are also quite thin. Any of you who have tried to remove a particularly tight fixed cup with one of these can testify to the fact that the spanner easily flies off the cup under force. If you escape this particular process without a couple of bloody knuckles you count yourself lucky. There must be some way to lock the wrench to the cup...
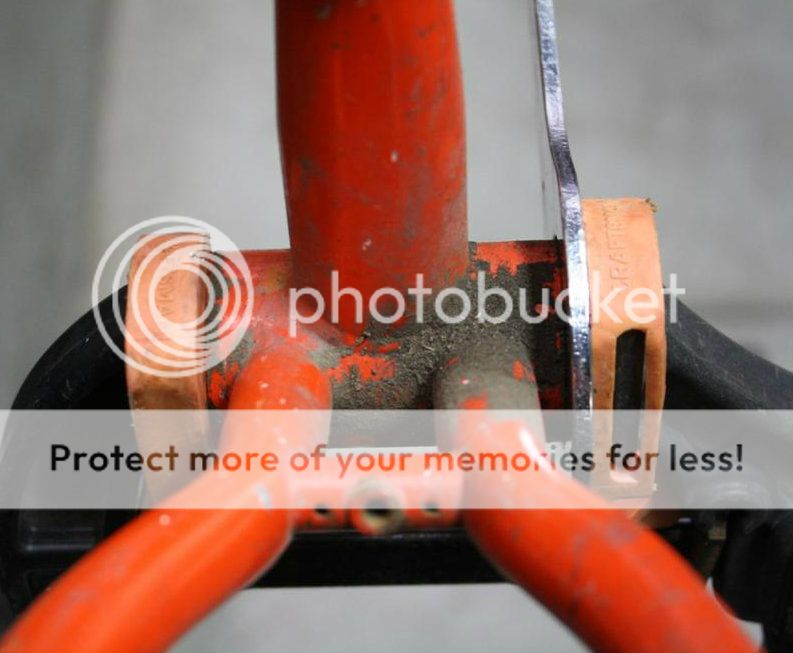
Here's my solution. A tip of the hat to Michael Angelo who posted something very similar to this a few months ago. Hopefully my pictures will make the operation of this kind of tool obvious.


The square washers, bolt, and nut hold the spanner tight on the flats of the cup so it can't fly off. Sometimes a few determined taps with a hammer on the arm of the spanner are required to get things started. Remember English fixed cups and some Swiss fixed cups are left-hand thread.

The parts (with the exception of the spanner) are all available at your local builder's hardware store or lumber yard.
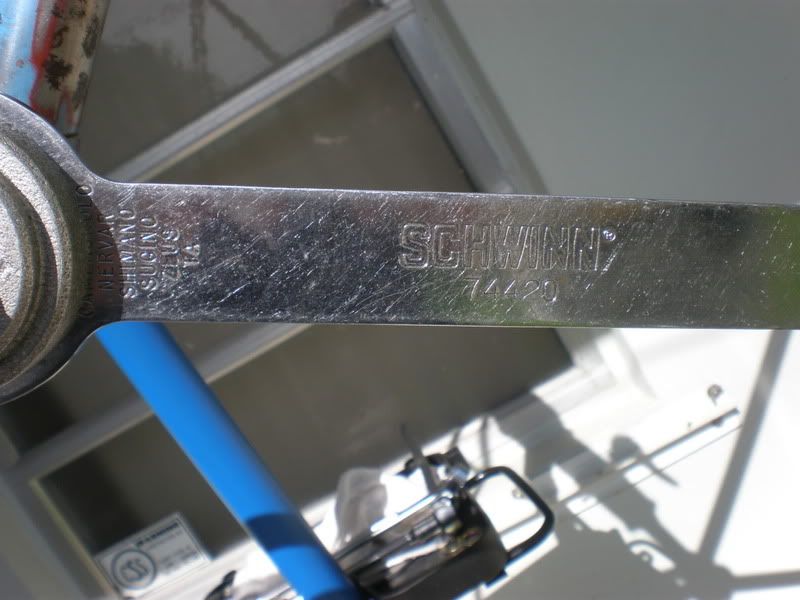
1 fixed cup spanner (no it doesn't have to be a Campagnolo which are ridiculously overpriced nowdays.)
1 machine bolt 1/2" by 4" or 5".
1 nut for aforementioned bolt.
2 square foundation bolt washers with 1/2" holes.
1 1/2" round washer. The round washer isn't really necessary, just makes the nut a little easier to turn.
Brent
Here's my solution. A tip of the hat to Michael Angelo who posted something very similar to this a few months ago. Hopefully my pictures will make the operation of this kind of tool obvious.
The square washers, bolt, and nut hold the spanner tight on the flats of the cup so it can't fly off. Sometimes a few determined taps with a hammer on the arm of the spanner are required to get things started. Remember English fixed cups and some Swiss fixed cups are left-hand thread.
The parts (with the exception of the spanner) are all available at your local builder's hardware store or lumber yard.
1 fixed cup spanner (no it doesn't have to be a Campagnolo which are ridiculously overpriced nowdays.)
1 machine bolt 1/2" by 4" or 5".
1 nut for aforementioned bolt.
2 square foundation bolt washers with 1/2" holes.
1 1/2" round washer. The round washer isn't really necessary, just makes the nut a little easier to turn.
Brent
 02-17-13 | 09:57 PM
#3
Senior Member
Joined: Mar 2008
Posts: 1,683
Likes: 13
From: Kansai
That is pretty cool. I've used the Sheldon tool, almost all the time it is ok. Actually, it has never failed to loosen the fixed cup, but once or twice, because of how the washers seat on the inside along with the necessity for really tightening it down for a heavily stuck cup, I've damaged a fixed cup or two. Not many, and it is hard, but it does happen.
This setup should obviate that risk.
This setup should obviate that risk.
02-17-13 | 11:34 PM
#4
Banned
Joined: Nov 2011
Posts: 206
Likes: 3
From: Jacksonville Florida
I wouldn't call that a poor man's fixed cup tool because you already have the tool otherwise- I'd call it the "square shank" of fixed cup tools-
which sounds even more obscene
and which compares it to a screwdriver with a square shank to fit a wrench on for "extra stuck"
a poor man's fixed cup tool has always been a 12 inch crescent wrench
unless the man is mentally poor, and then it may be some vice grips and a hammer.
which sounds even more obscene
and which compares it to a screwdriver with a square shank to fit a wrench on for "extra stuck"
a poor man's fixed cup tool has always been a 12 inch crescent wrench
unless the man is mentally poor, and then it may be some vice grips and a hammer.
02-18-13 | 05:01 AM
#5
Senior Member

Joined: May 2010
Posts: 3,904
Likes: 36
From: Hurricane Alley , Florida
Bikes: Treks (USA), Schwinn Paramount, Schwinn letour,Raleigh Team Professional, Gazelle GoldLine Racing, 2 Super Mondias, Carlton Professional.
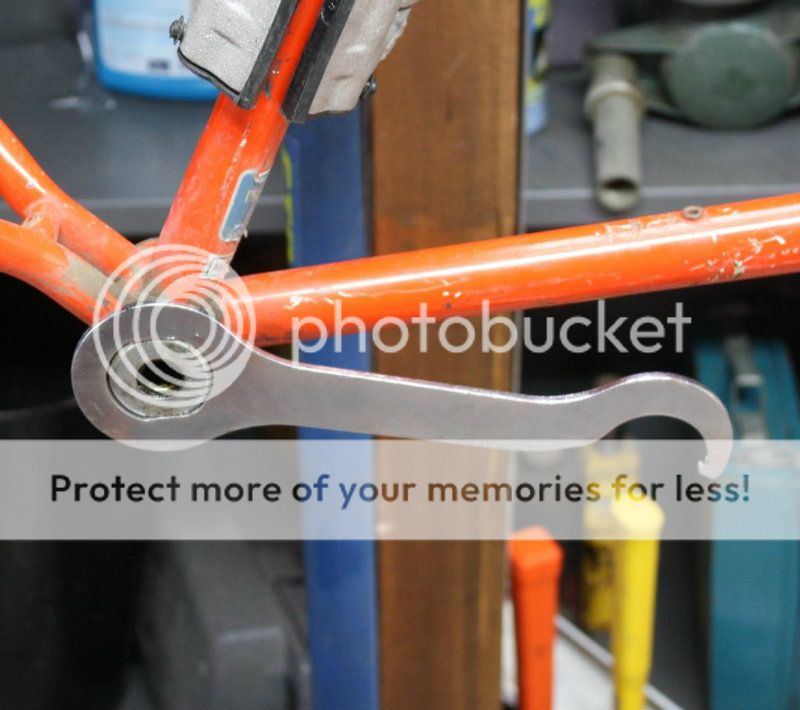
Good idea, I made a tool similar to that. I used a shorter bolt and nut assy. using a big aluminum disc for tool support.
This frame Had a stuck BB cup that three people tried to remove. It took me less than five minutes to remove the cup.
This frame Had a stuck BB cup that three people tried to remove. It took me less than five minutes to remove the cup.
02-18-13 | 06:28 AM
#6


Vello Kombi, baby

Joined: Dec 2002
Posts: 5,188
Likes: 16
From: Je suis ici
Bikes: 1973 Eisentraut; 1970s Richard Sachs; 1978 Alfio Bonnano; 1967 Peugeot PX10
I've got a Var 30 tool, bought cheap off the bay years ago (under 30$ IIRC). Once in a long while I'll run into a fixed cup that it doesn't work on and have resorted to the Sheldon method. This method appears to be a variation on the Sheldon method, and a good one... I'll stick it in the back of my mind for the rare occasion the Var 30 doesn't work. Thanks!
__________________
"It's always darkest right before it goes completely black"
Waste your money! Buy my comic book!
"It's always darkest right before it goes completely black"
Waste your money! Buy my comic book!
02-18-13 | 06:58 AM
#7

Bianchi Goddess
Joined: Apr 2009
Posts: 28,888
Likes: 4,132
From: Shady Pines Retirement Fort Wayne, In
Bikes: Too many to list here check my signature.
There is a reason they are called "fixed cups". I made a cheap Stein type tool years ago from a 2" PVC pipe cap but I finally broke down and bought a real one. Having the stein tool is nice since I grease and put the bearings and axle in and tighen it in one shot.
__________________
�One morning you wake up, the girl is gone, the bikes are gone, all that's left behind is a pair of old tires and a tube of tubular glue, all squeezed out"
Sugar "Kane" Kowalczyk
�One morning you wake up, the girl is gone, the bikes are gone, all that's left behind is a pair of old tires and a tube of tubular glue, all squeezed out"
Sugar "Kane" Kowalczyk
02-18-13 | 12:07 PM
#8

Senior Member
Joined: Mar 2012
Posts: 1,104
Likes: 48
From: santa barbara CA
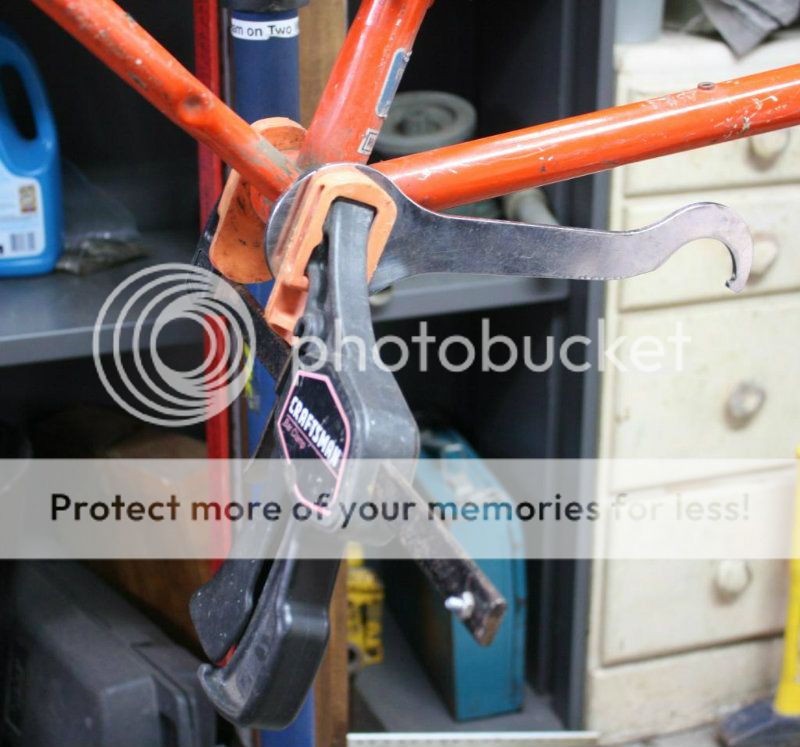
Obrentharris, nice tool for about $2 I'd guess, also nice pics of it in action. Posted this a while ago, quick to use. FWIW, I generally start fixed cup removal with a hammer strike to the tool, the impact starts the rotation easier than trying to start by pulling/pushing with my hand. If you have one of these "quick clamp" style c clamps thats all you need.
Last edited by calstar; 02-20-13 at 12:36 PM.

 02-18-13 | 02:17 PM
#10
Jack of all trades
Joined: Nov 2011
Posts: 2,003
Likes: 2
From: Spokane, WA
Bikes: Schwinn Peloton Ventana El Saltamontes Spec Stumpjumper Conversion Gravel
Calstar: that's a great idea! All you need is a dead blow mallet. I'll scour the used tool places to get one myself.
02-18-13 | 04:57 PM
#12
Senior Member
Joined: Nov 2009
Posts: 456
Likes: 2
Bikes: C 93 Colnago Early 70's Colnago Sport Mid 80's I think East German National Team Bike "77" Gios Super Record Early "90's" Contini GOIDESIGN Early 90's Contini Reynolds 501 oval tube tourer 70's J van Staeyen Flemish Club bike
I bought this from one of the big English sites. I think it was W iggle. $40 delivered not cheap but really heavy duty. Ed
02-18-13 | 05:34 PM
#13
Senior Member
Joined: Sep 2007
Posts: 505
Likes: 145
From: seoul korea
Bikes: 3Rensho SuperRecord Export, Bridgestones MB1 RB1 XO2, Colnago Super, Medici GranTurismo, Schwinn Paramount, Olmo Competition, Raleigh Portage, Miyata 1000, Stumpjumper, Lotus Competition, Nishiki Maxima, Panasonic DX6000, Zeus Criterium
i use threaded rod / nuts / big washers from the homemade headset press i already have. setup similar to the OPs version. i like it internally clamped since i often take the bike out of the work stand and rest the bottom bracket on the floor and use my foot / leg power to slowly turn the fixed cup.
i've overhauled a few dozen 30 year old bikes and been able to get all of the fixed cups out so far. liquid wrench 24 hours before removal often helps.
a good tip is to tighten the nuts slightly past finger tight and then the fixed cup tool won't slip and mar the frame. nuts can be easily snugged and removed with a big adjustable wrench.
Last edited by brooklyn_bike; 02-18-13 at 05:44 PM.
02-18-13 | 06:14 PM
#14
Senior Member
Joined: Mar 2012
Posts: 1,104
Likes: 48
From: santa barbara CA
 02-18-13 | 07:34 PM
#15

Senior Member
Joined: Jun 2009
Posts: 1,610
Likes: 336
From: Plano, IL.
IMHO the Zog's wrench is a must have tool. It has a longer handle for better leverage and I have had good results time after time with it.
This one is called a thinwrench..........but appears to be the same as a Zog's
https://www.thinwrench.info/31-fixed-cup-wrench.html
This one is called a thinwrench..........but appears to be the same as a Zog's
https://www.thinwrench.info/31-fixed-cup-wrench.html
__________________
Be where your feet are.......Lisa Bluder
Be where your feet are.......Lisa Bluder
02-18-13 | 08:56 PM
#16
Senior Member
Joined: Apr 2012
Posts: 208
Likes: 2
IMHO the Zog's wrench is a must have tool. It has a longer handle for better leverage and I have had good results time after time with it.
This one is called a thinwrench..........but appears to be the same as a Zog's
https://www.thinwrench.info/31-fixed-cup-wrench.html
This one is called a thinwrench..........but appears to be the same as a Zog's
https://www.thinwrench.info/31-fixed-cup-wrench.html
02-19-13 | 01:18 AM
#17
Senior Member
Joined: Feb 2004
Posts: 7,176
Likes: 56
From: Clev Oh
Bikes: Specialized, Schwinn
That is pretty cool. I've used the Sheldon tool, almost all the time it is ok. Actually, it has never failed to loosen the fixed cup, but once or twice, because of how the washers seat on the inside along with the necessity for really tightening it down for a heavily stuck cup, I've damaged a fixed cup or two. Not many, and it is hard, but it does happen.
This setup should obviate that risk.
This setup should obviate that risk.
02-19-13 | 11:01 AM
#19
Senior Member
Joined: May 2011
Posts: 1,288
Likes: 0
From: N Central Illinois
Bikes: 12 Bianchi Oltre VDCM,11 Bianchi Cavaria, 13 Bianchi Cavaria,12 Bianchi infinito, couple vintage Bianchi's and a 1980 alan super record
I wish I would have seen this before I bloodied myself up. A question on the same line. How about the other side where a hook type wrench is used? It seems it is even worse to slip off and even damage the lock ring grooves.
Last edited by triumph.1; 02-19-13 at 11:05 AM.
02-19-13 | 12:46 PM
#20
Jack of all trades
Joined: Nov 2011
Posts: 2,003
Likes: 2
From: Spokane, WA
Bikes: Schwinn Peloton Ventana El Saltamontes Spec Stumpjumper Conversion Gravel
There are so many types of these lock rings that you'd need a dozen wrenches! I just make do with one side or the other of the hook wrench. It's a pain, but, what are you going to do otherwise? I'm just glad there's a tool that works somewhat...
02-19-13 | 05:55 PM
#21
Senior Member
Joined: Nov 2009
Posts: 456
Likes: 2
Bikes: C 93 Colnago Early 70's Colnago Sport Mid 80's I think East German National Team Bike "77" Gios Super Record Early "90's" Contini GOIDESIGN Early 90's Contini Reynolds 501 oval tube tourer 70's J van Staeyen Flemish Club bike
Easiest way to remove the lock ring is with a hammer and drift. I use a old brass padlock works every tome and no damage to the lock ring. Ed
02-19-13 | 06:25 PM
#22
Senior Member
Joined: May 2010
Posts: 3,904
Likes: 36
From: Hurricane Alley , Florida
Bikes: Treks (USA), Schwinn Paramount, Schwinn letour,Raleigh Team Professional, Gazelle GoldLine Racing, 2 Super Mondias, Carlton Professional.
02-19-13 | 06:27 PM
#23

Full Member
Joined: Dec 2012
Posts: 308
Likes: 1
From: Phoenix, AZ
 02-19-13 | 09:09 PM
#25
Jack of all trades
Joined: Nov 2011
Posts: 2,003
Likes: 2
From: Spokane, WA
Bikes: Schwinn Peloton Ventana El Saltamontes Spec Stumpjumper Conversion Gravel
^Total "Twilight Zone" scenario here guys. I've never had a problem with the link, no hint of anything but great thin tools.

