


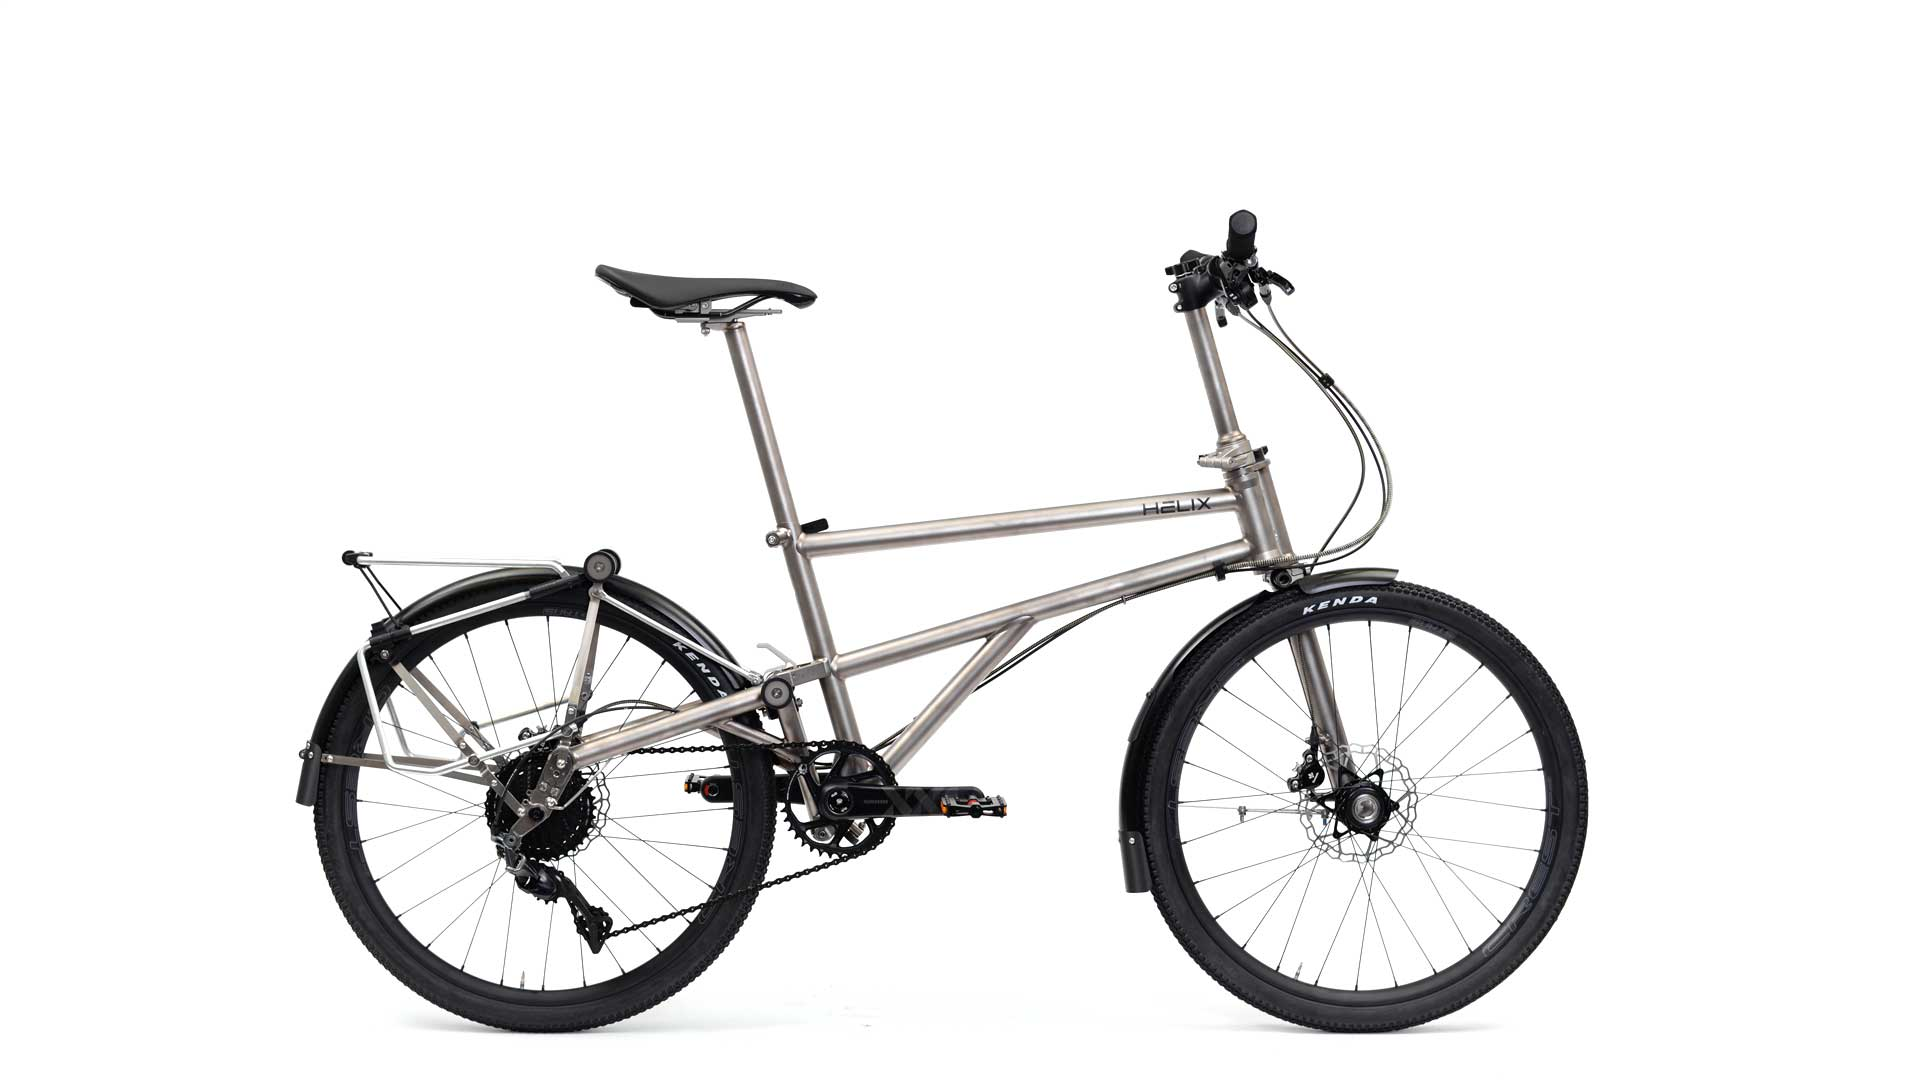
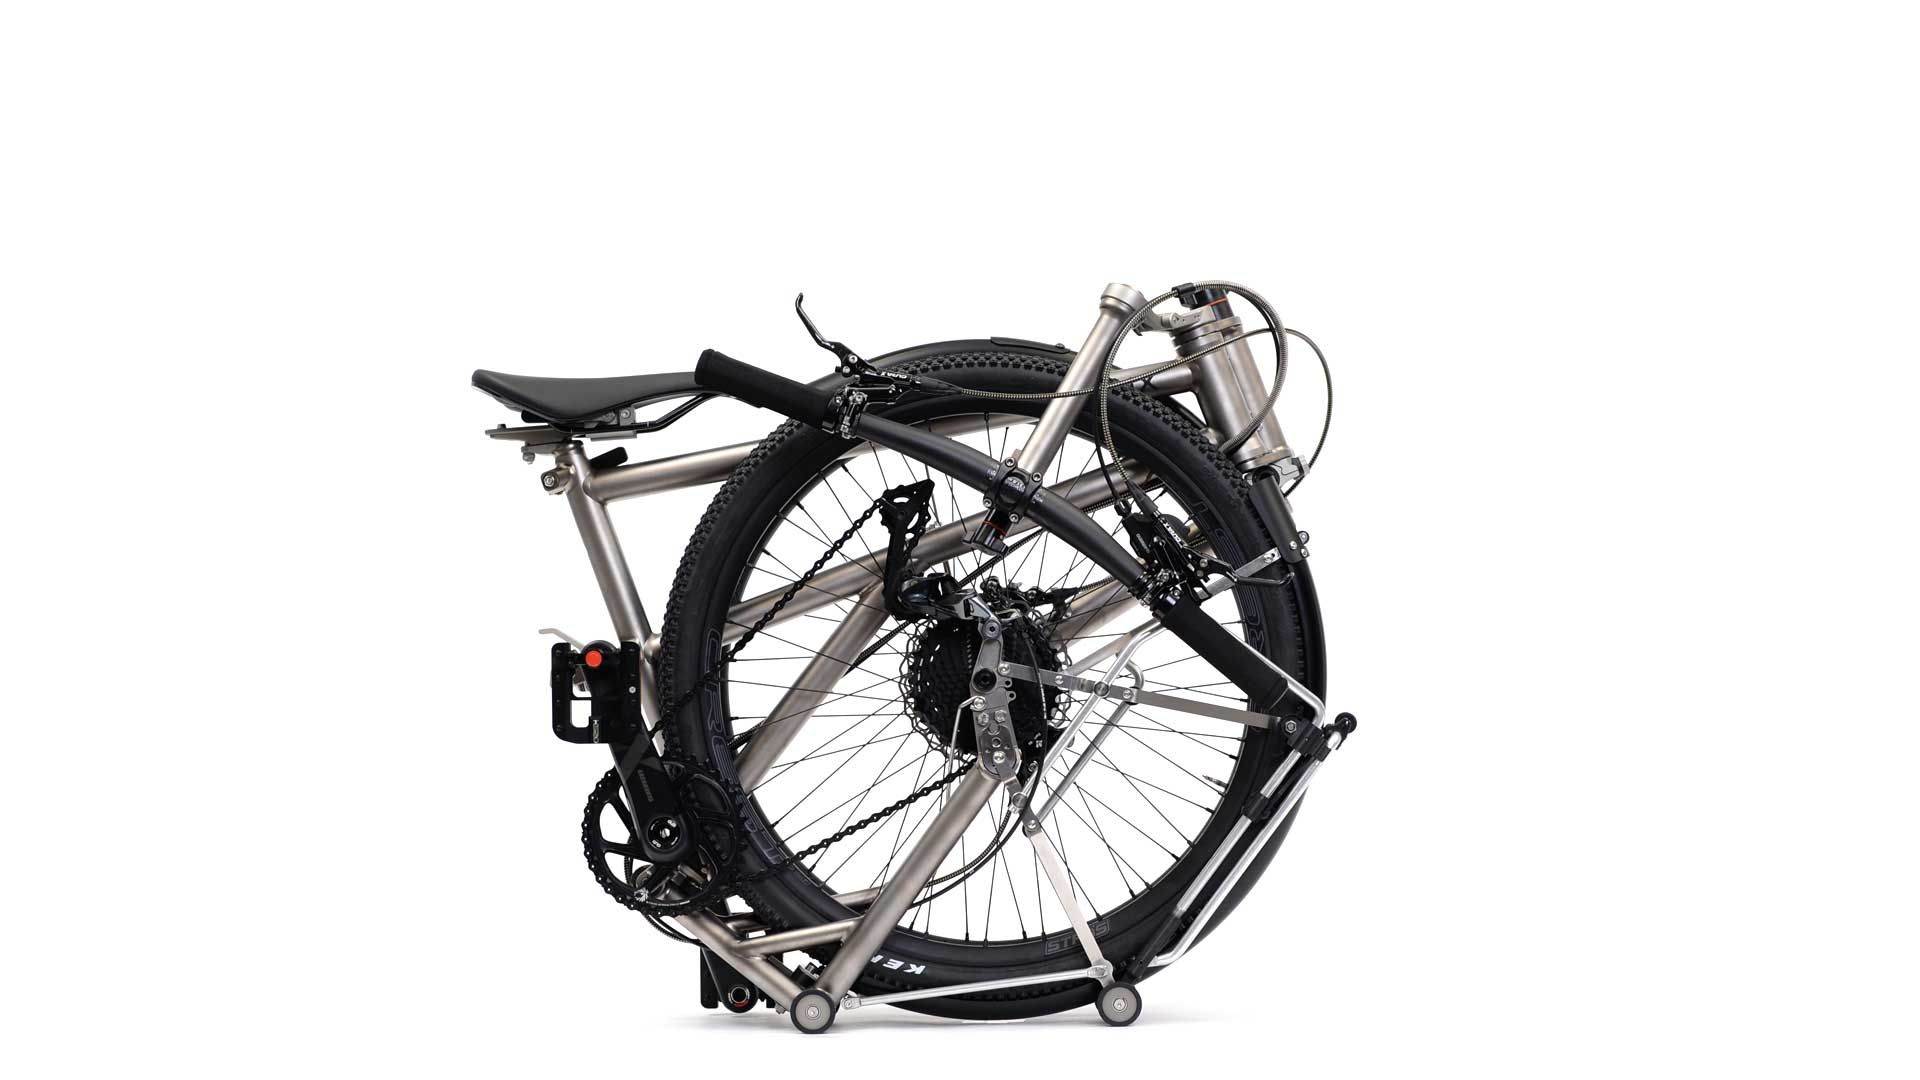
Helix Update?
 08-12-24 | 06:39 PM
#2951
Junior Member
Joined: Apr 2010
Posts: 170
Likes: 1
There isn’t enough clearance between the rear swing arms for this tyre. To get the tyre to rotate I had to trim the tread edge knobs down until they were 41mm wide to match the sidewall. The rear swing arm will not fold with this tyre inflated on the rim. It’s necessary to deflate the tyre to get the bike folded.
 08-13-24 | 12:52 AM
#2952

Junior Member

Joined: Dec 2017
Posts: 107
Likes: 30
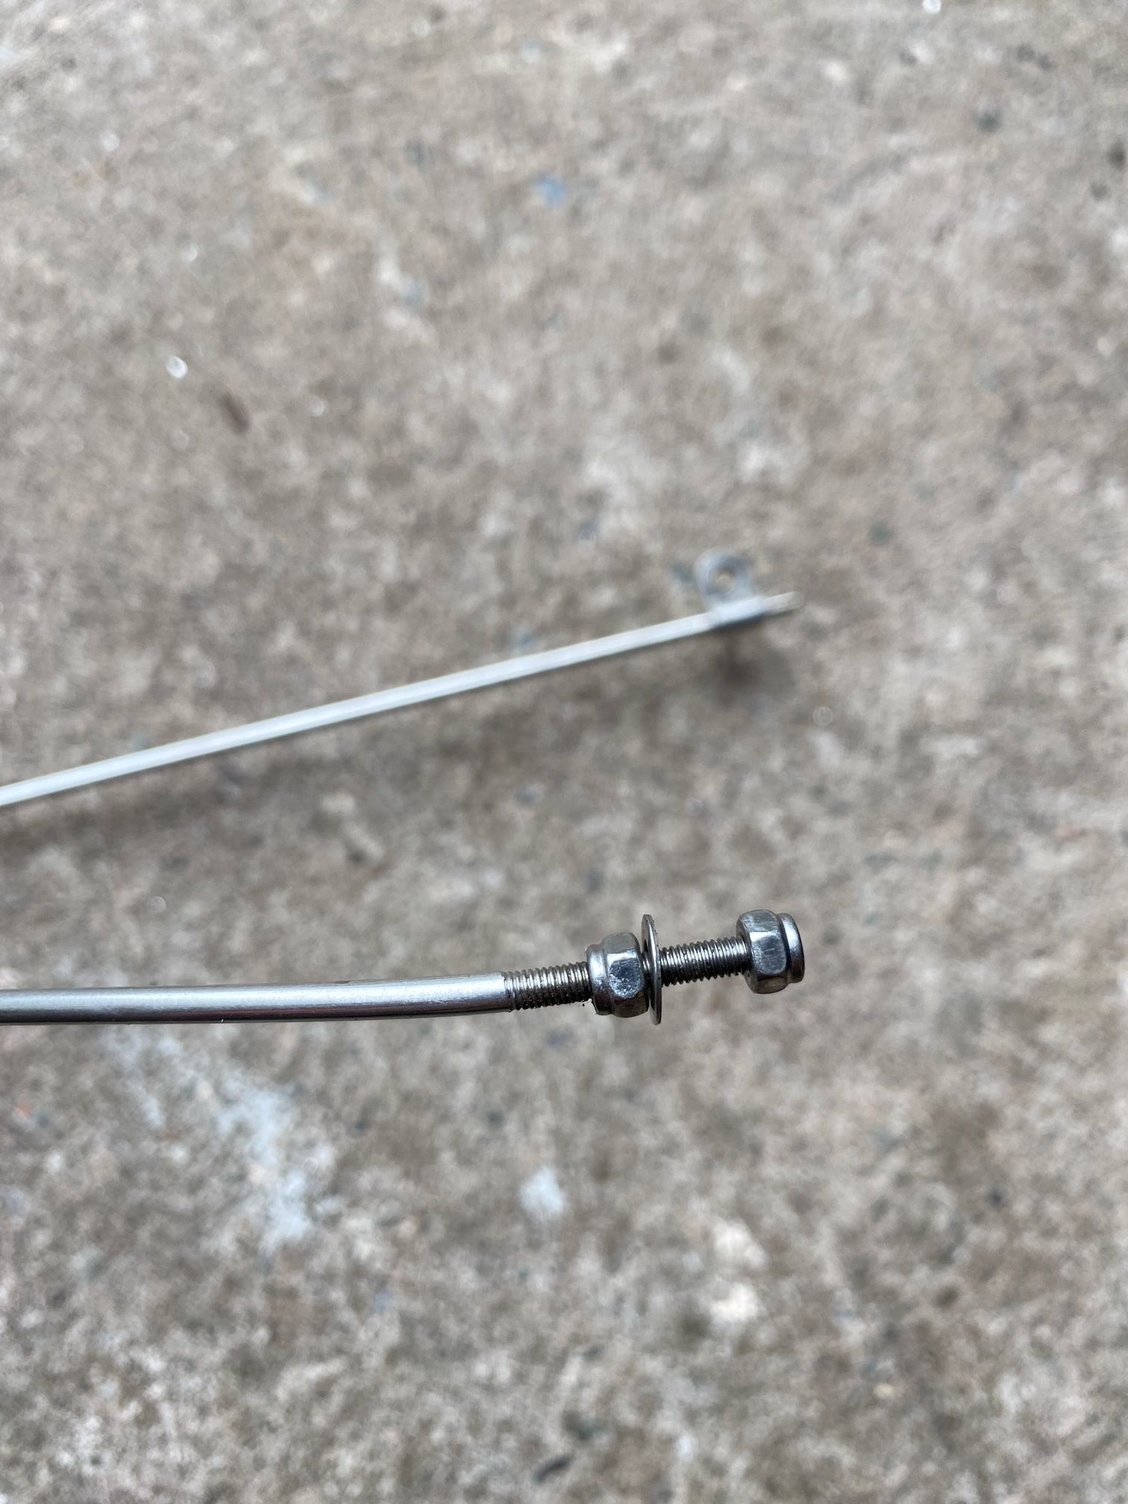
Sorry I wasn't more clear. The Duro Raider 47-507 tyre fits on the front wheel and has enough clearance all round straight out of the box. No need for any trimming. The only issue is the front wheel won't rotate when folded and locked in place.
Last edited by Jonesandrew; 08-13-24 at 02:41 AM.
08-19-24 | 01:23 AM
#2953
Junior Member
Joined: Dec 2017
Posts: 107
Likes: 30
@ DHABE1 - Rear rack on Helix
I think it could be 20 years since I bought this rack.
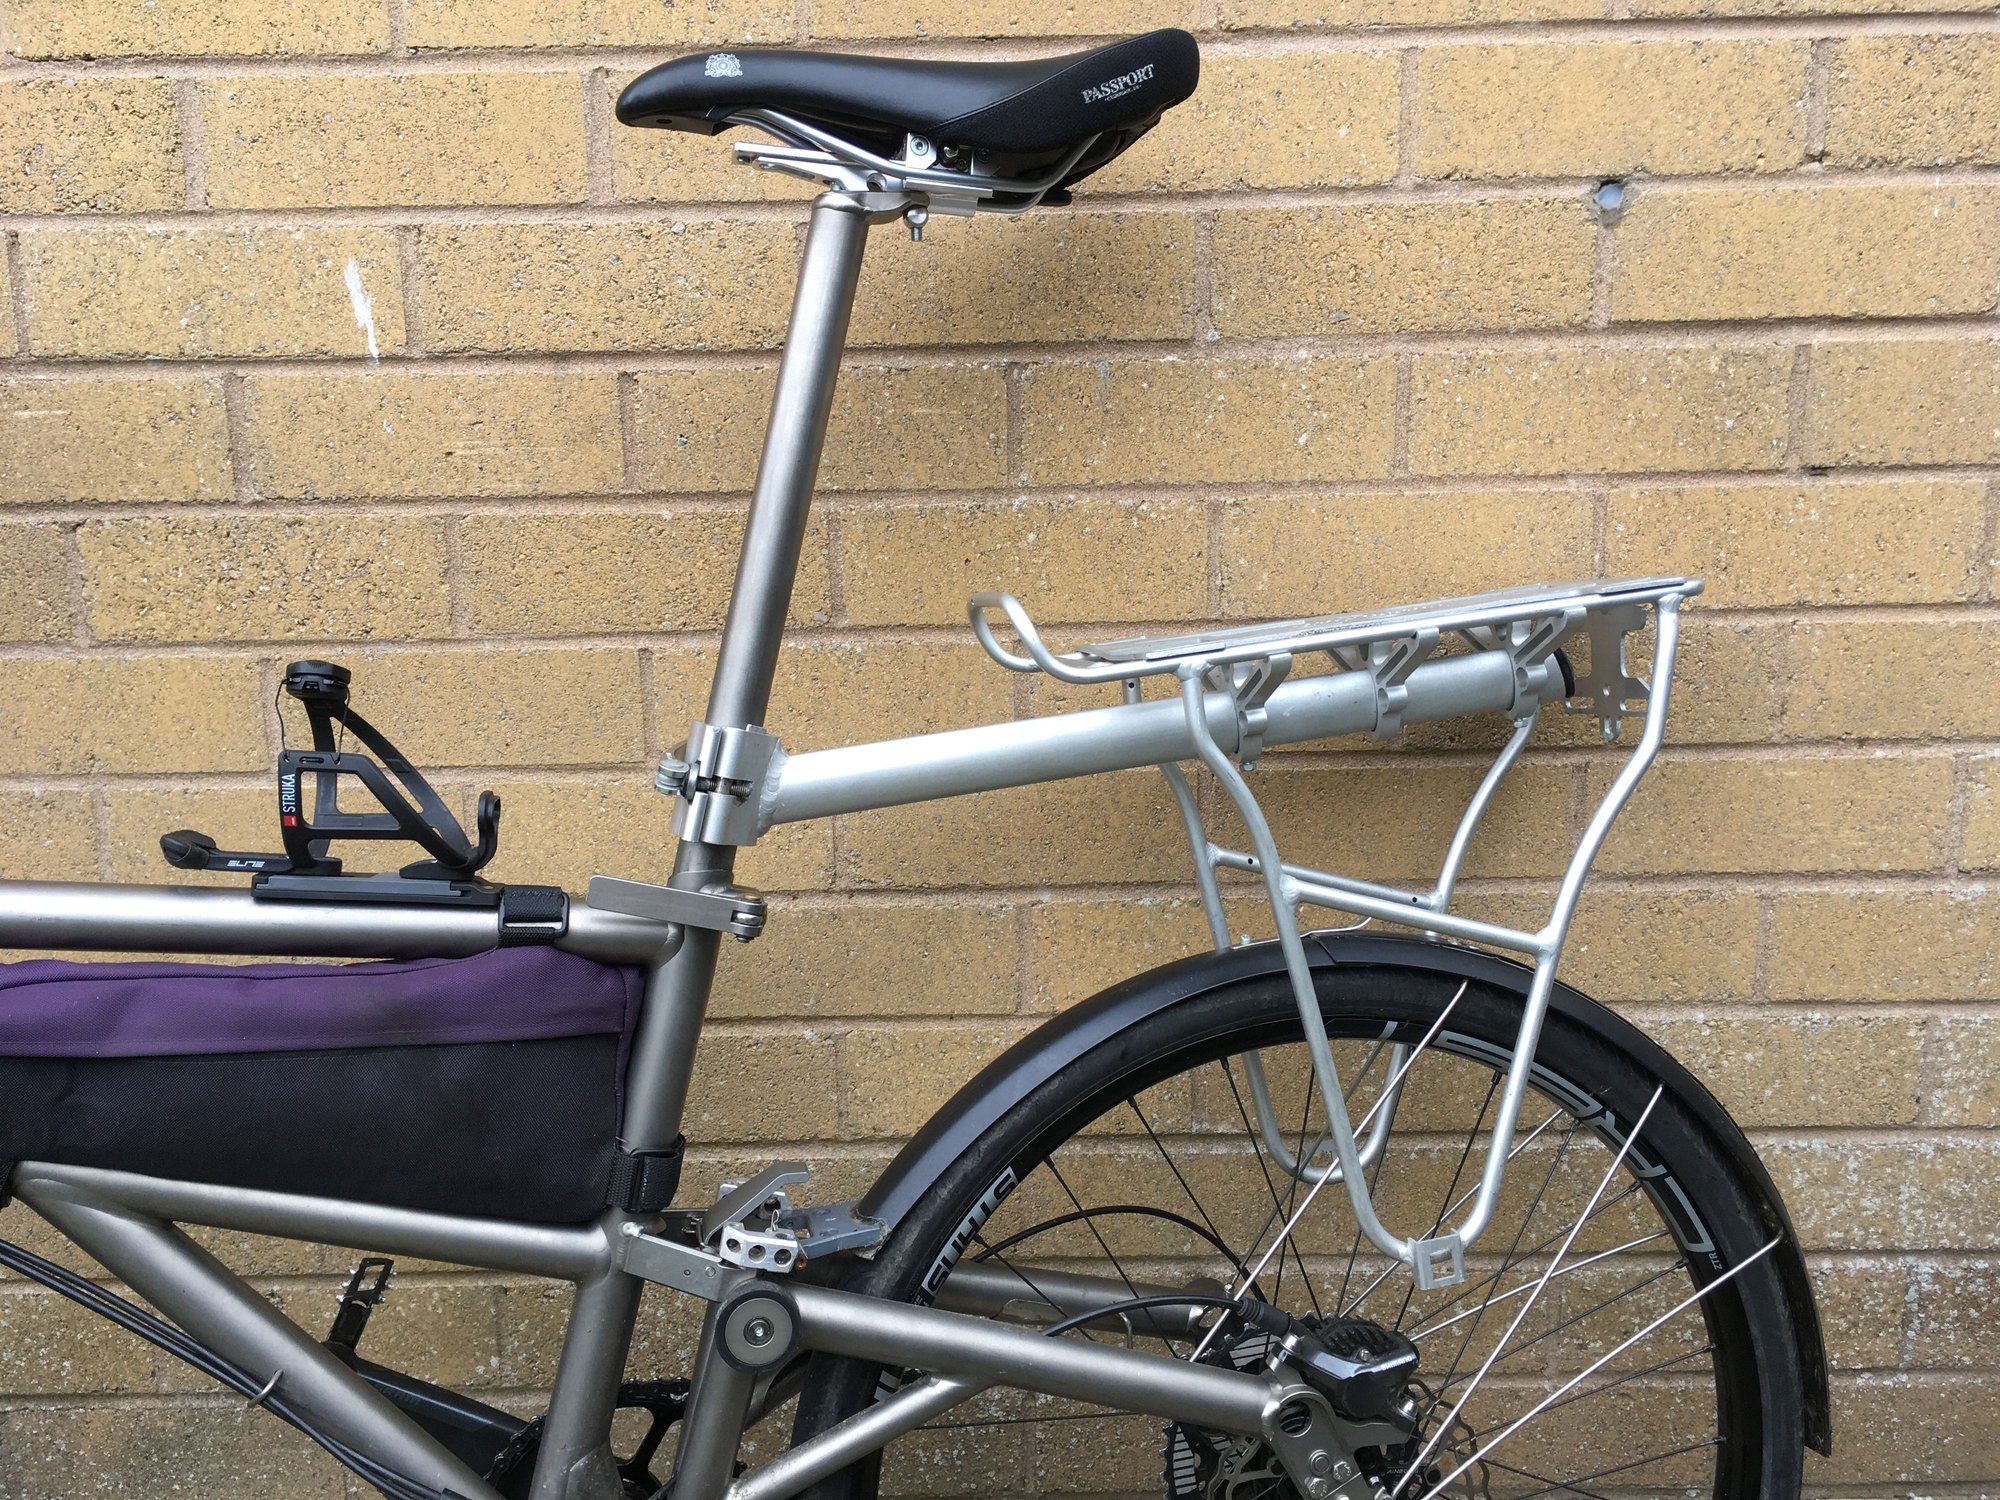
The rack is branded "Massload". It works fine clamped to the seat post although it's meant to fit around a seat tube, so I had to add a shim to get it to clamp tight.
Here it is rotated.
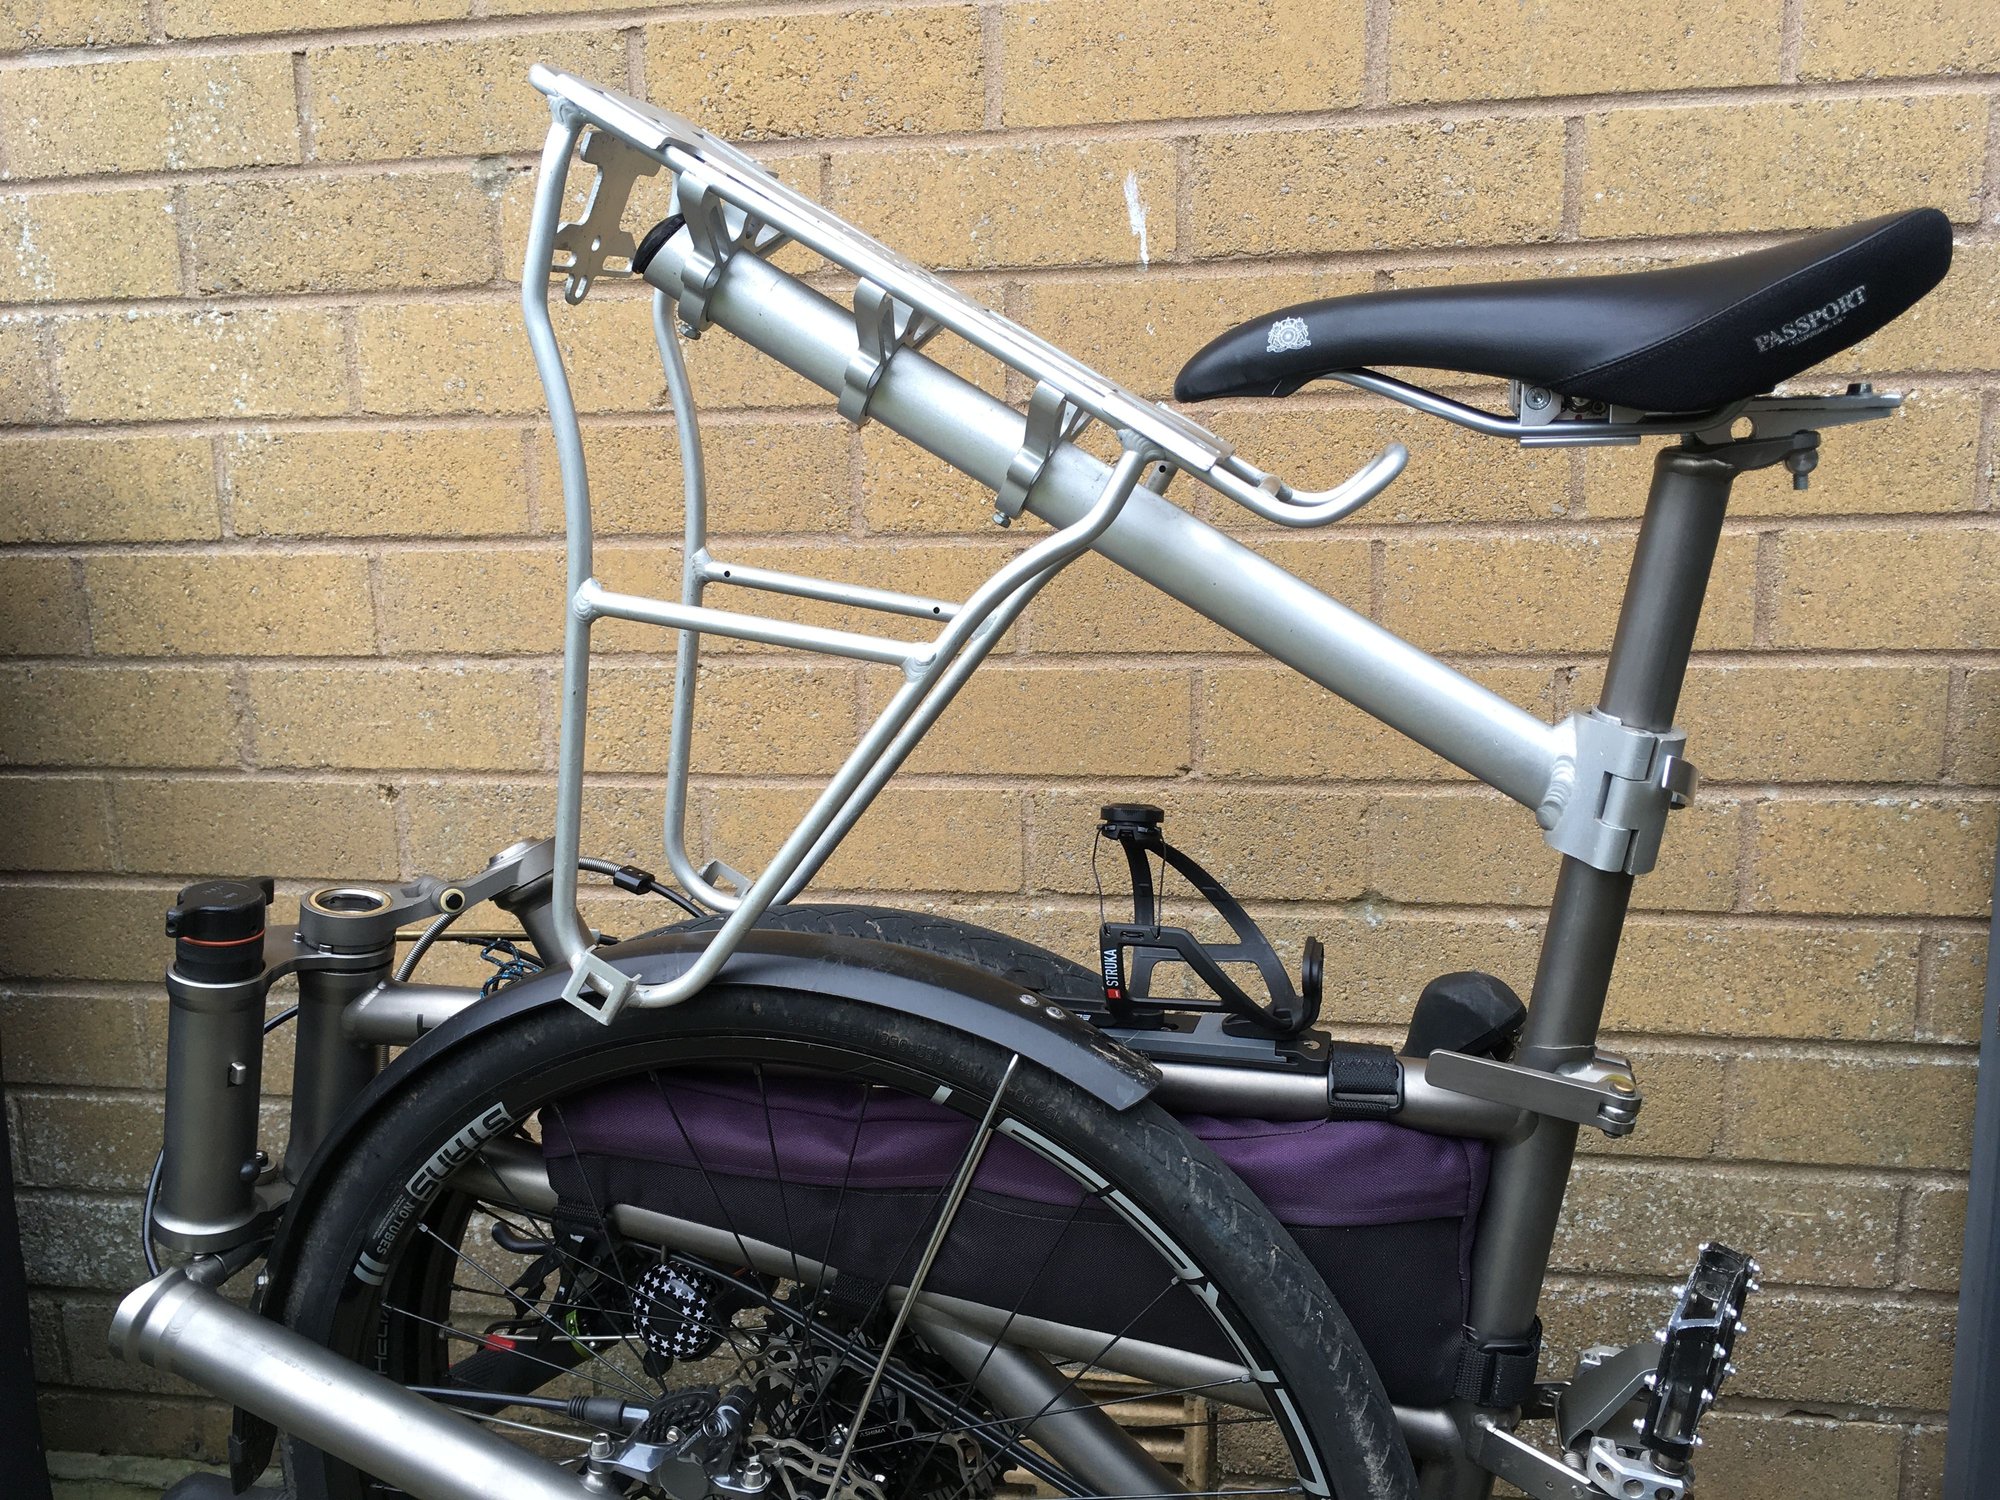
This is as low as it will go. The pannier supports are too narrow to straddle the wheels.
It's more hassle, but with it flipped over you might be able to hang a bag on the pannier supports:
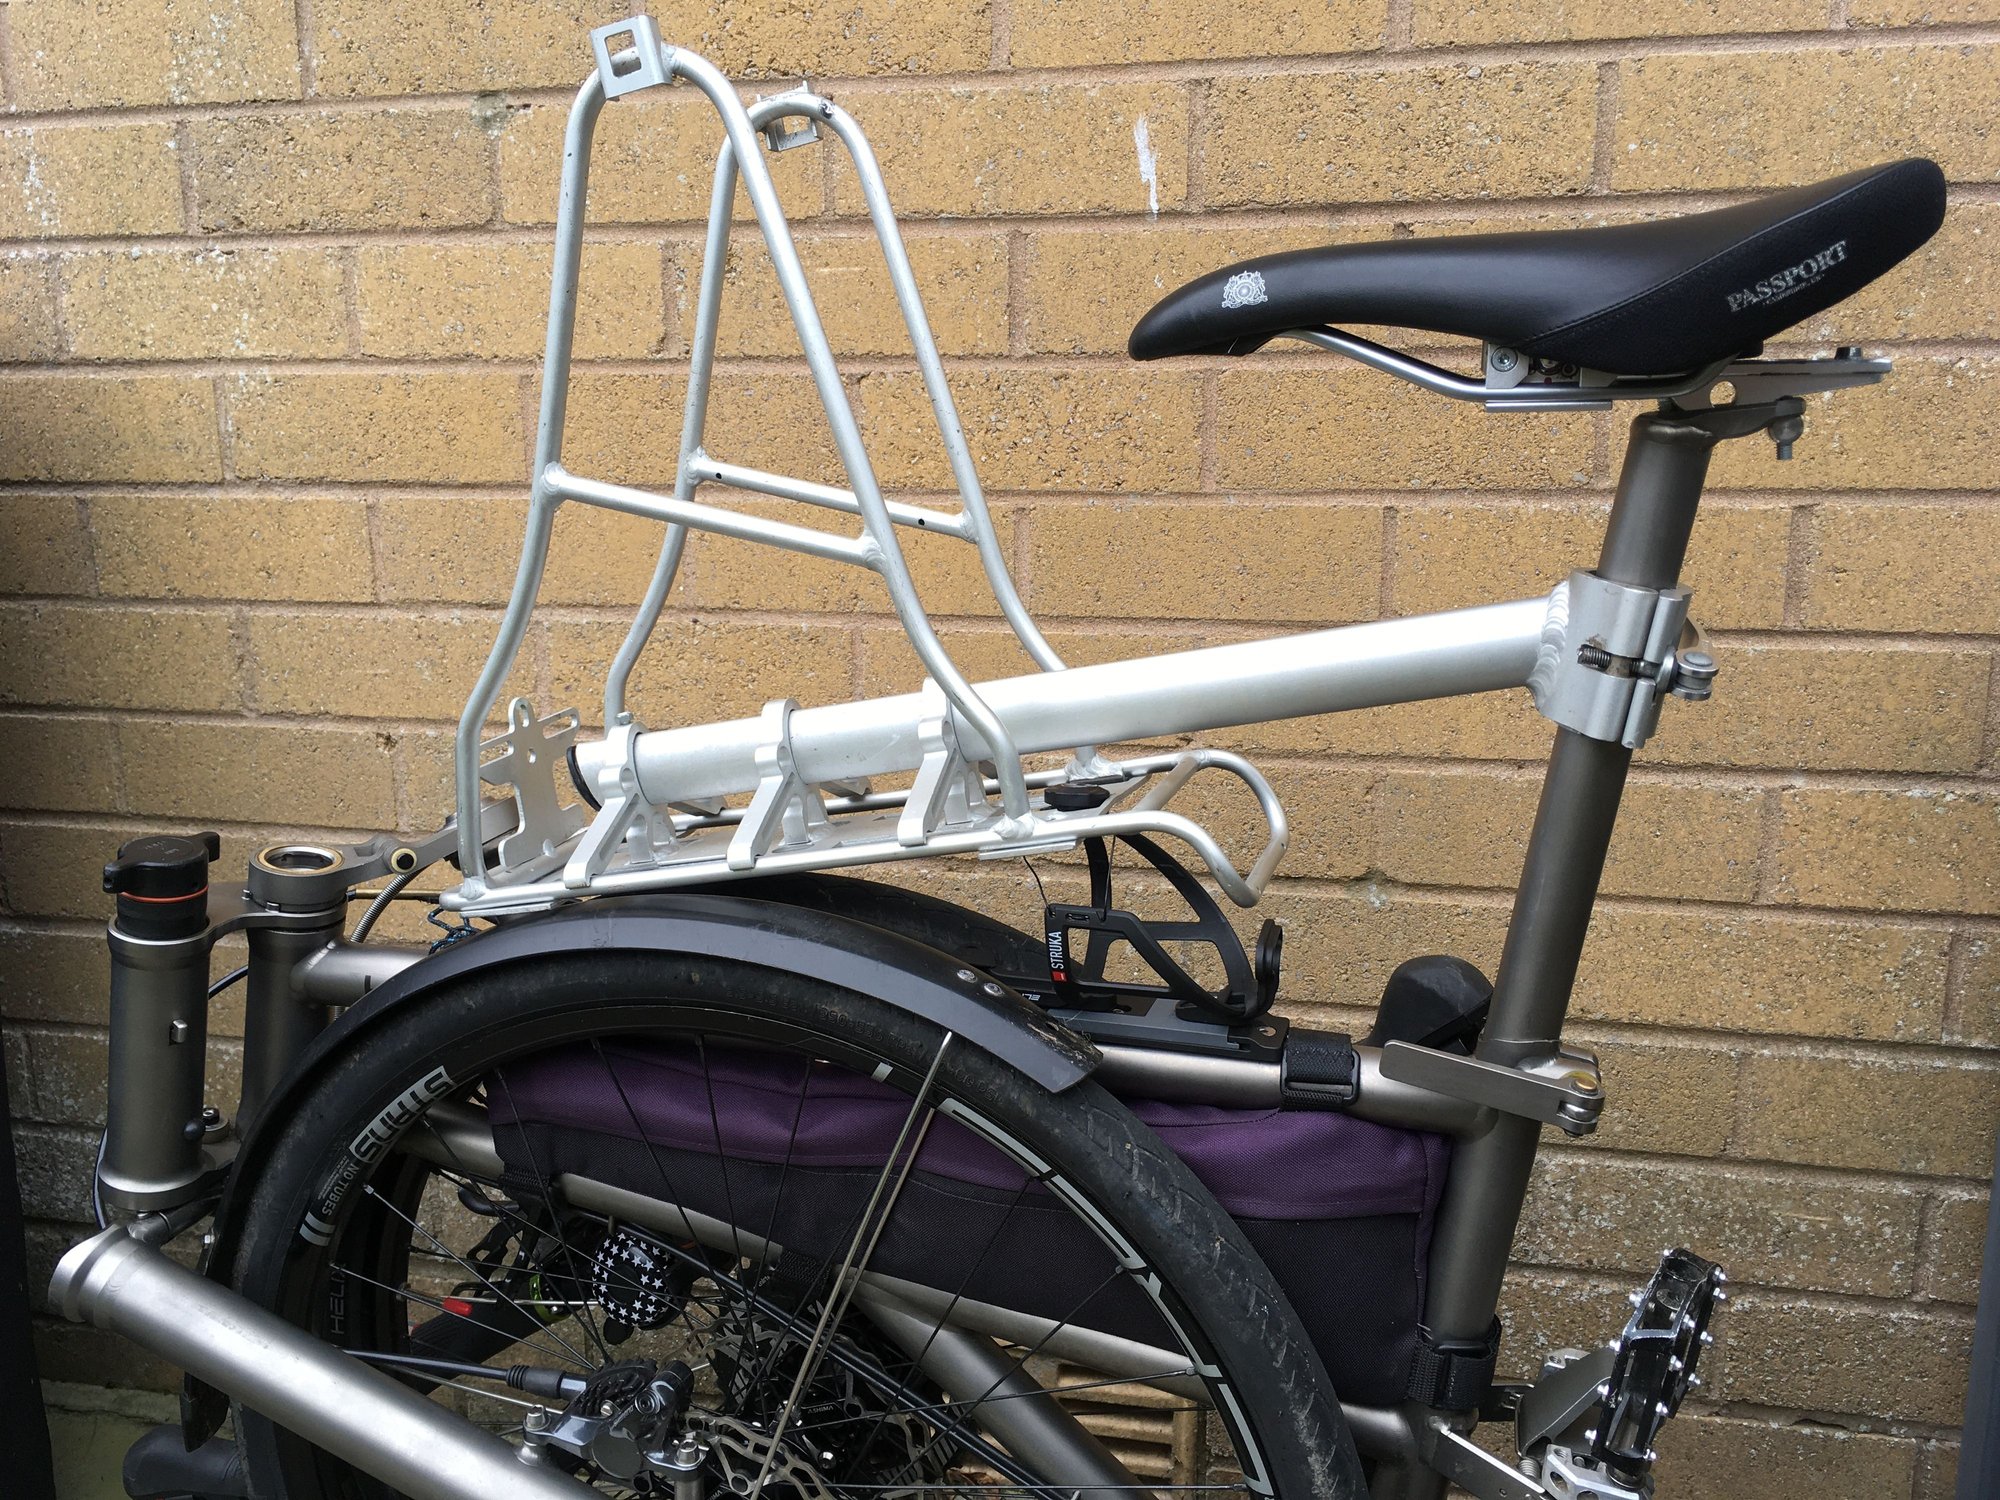
Or maybe you could make something work if you can find a rack without pannier supports (or cut them off!).
The rack is branded "Massload". It works fine clamped to the seat post although it's meant to fit around a seat tube, so I had to add a shim to get it to clamp tight.
Here it is rotated.
This is as low as it will go. The pannier supports are too narrow to straddle the wheels.
It's more hassle, but with it flipped over you might be able to hang a bag on the pannier supports:
Or maybe you could make something work if you can find a rack without pannier supports (or cut them off!).
09-07-24 | 09:23 AM
#2955
Junior Member
Joined: Apr 2010
Posts: 170
Likes: 1
Btw which mudguards are those? Are they official or adapted ones?
09-08-24 | 01:18 AM
#2956
Junior Member
Joined: Dec 2017
Posts: 107
Likes: 30
Btw which mudguards are those? Are they official or adapted ones?[/QUOTE]
They are adapted SKS. I copied the original Helix design with two piece (folding) rear guard.
let me know if you want more details but bear in mind metal and plastic working skills are required.
They are adapted SKS. I copied the original Helix design with two piece (folding) rear guard.
let me know if you want more details but bear in mind metal and plastic working skills are required.
09-08-24 | 08:39 PM
#2957
Newbie
Joined: Nov 2018
Posts: 11
Likes: 0
They are adapted SKS. I copied the original Helix design with two piece (folding) rear guard.
let me know if you want more details but bear in mind metal and plastic working skills are required.[/QUOTE]
I’d definitely be interested in details of the mudguards if you don’t mind sharing. Would be very helpful as I’ve looked at making/modifying to make a folding set for mine and never quite worked it out.
09-09-24 | 08:27 AM
#2958
Junior Member
Joined: Dec 2017
Posts: 107
Likes: 30
Adapted mudguards
OK, no problem. It will take me a few days to get to it. I’m travelling at the moment. Hopefully I’ll get time at the weekend.
09-09-24 | 02:05 PM
#2959
Newbie
Joined: Aug 2024
Posts: 2
Likes: 0
I can't post pictures until I've made 10 posts, but the bike folds the down to the original size by rotating the seat forward and removing the basket. If you keep the basket installed, the bike can be used in a sort of "shopping cart mode", similar to a folded brompton with basket (not as wide of a stance, so won't be as stable, but seems manageable).
09-11-24 | 07:57 AM
#2960
Junior Member
Joined: Apr 2010
Posts: 170
Likes: 1
I'm also interested, and no rush, but thanks very much for sharing ingenious DYI solutions to problems a manufacturer takes ages to address, much appreciated!
09-14-24 | 02:03 AM
#2961
Junior Member
Joined: Dec 2017
Posts: 107
Likes: 30
I copied my adapted mudguard principle from this Kickstarter update in 2017 which shows how the original design for the rear guard folds.
https://v2.kickstarter.com/172624332..._h264_high.mp4
Details to follow.
https://v2.kickstarter.com/172624332..._h264_high.mp4
Details to follow.
Last edited by Jonesandrew; 09-14-24 at 02:09 AM.
09-14-24 | 09:11 AM
#2962
Junior Member
Joined: Dec 2017
Posts: 107
Likes: 30
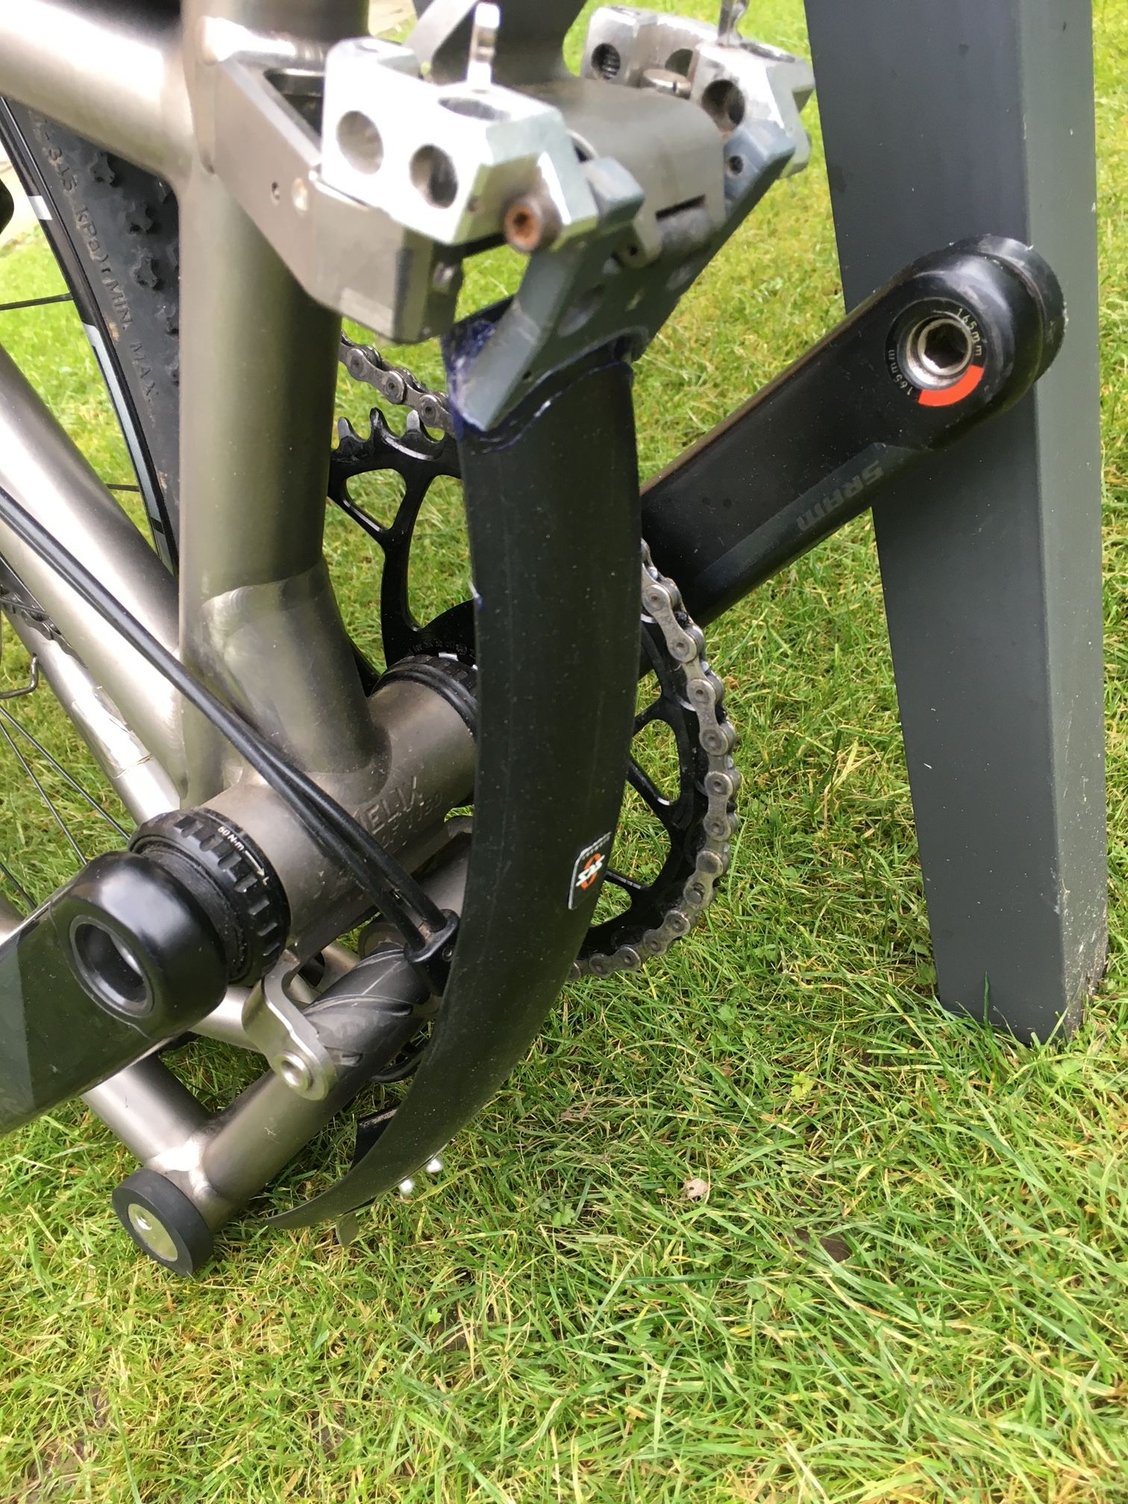
Adapted SKS mudguards
I’m posting details of the adapted SKS guards as I said I would, but please note the following:
In addition to metal and plastic working skills a lot of time is needed to modify and install these guards. I was able to justify the time taken because the bike was useless to me without them – It’s frequently wet around here. Bear in mind Helix currently say their guards will be available this month, so you may want to wait before committing to this adaptation. Also note that their current image from the upgrade guide on their website shows a single piece rear guard: https://helixhelix.b-cdn.net/support...mud_guards.png This image is several years old.
With the single piece rear guard design the rear wheel is prevented from touching the ground by the intervening guard when the bike is folded which consequently makes the bike very unstable in that mode. (I know because I copied that simpler design on my first attempt). My guess is if that design turns out to be the actual production version then you will also need to fit the folding rear rack (theoretically also available this month) and this will probably provide a stable base for the folded bike. This is just my theory- I haven’t seen final production images of guards or rack. If my theory is correct it might explain why the mudguards have been delayed so long, waiting for finalisation and production of the rear rack.
For this version I used SKS 700 x 45 matt black guards: https://www.sjscycles.co.uk/mudguard...28-inch-black/
Previously I used 700 x 53 which were wider than necessary.
It’s not possible to use the “pop out” front stay fixings. They’re way too flexible to prevent the guard constantly rubbing every time you hit a bump. So what about safety? I’ve had one experience with a strong stick slipping through the front wheel spokes when riding through woodland. I came to an abrupt stop but didn’t lose control. The guard crumpled up and the stays were bent. There was a split in the guard at one of the rivet holes. I was able to bend everything roughly back into shape by hand and continue my journey. On this basis I think there is sufficient flexibility in my construction to prevent a catastrophic “over the bars” incident. Your opinion may vary!
Obviously the guards are not the correct radius for the 507-40 tyres. The first job is to re-form them by gently clamping the end tips of the guard to a wheel (with inflated tyre) and gently warming them up with a heat gun so that they adopt the new curvature. The plastic softens at quite low temperature. When the clamps are released the guards will spring back a little and should then be the correct radius. Tips: heat up the whole length of the mudguard slowly keeping the gun moving back and forth constantly. Do not dwell on a single point. Don’t be tempted to squeeze the sides of the guard inwards to maintain the original width while doing this as its very difficult to do it evenly. The expanded width won’t be a problem.
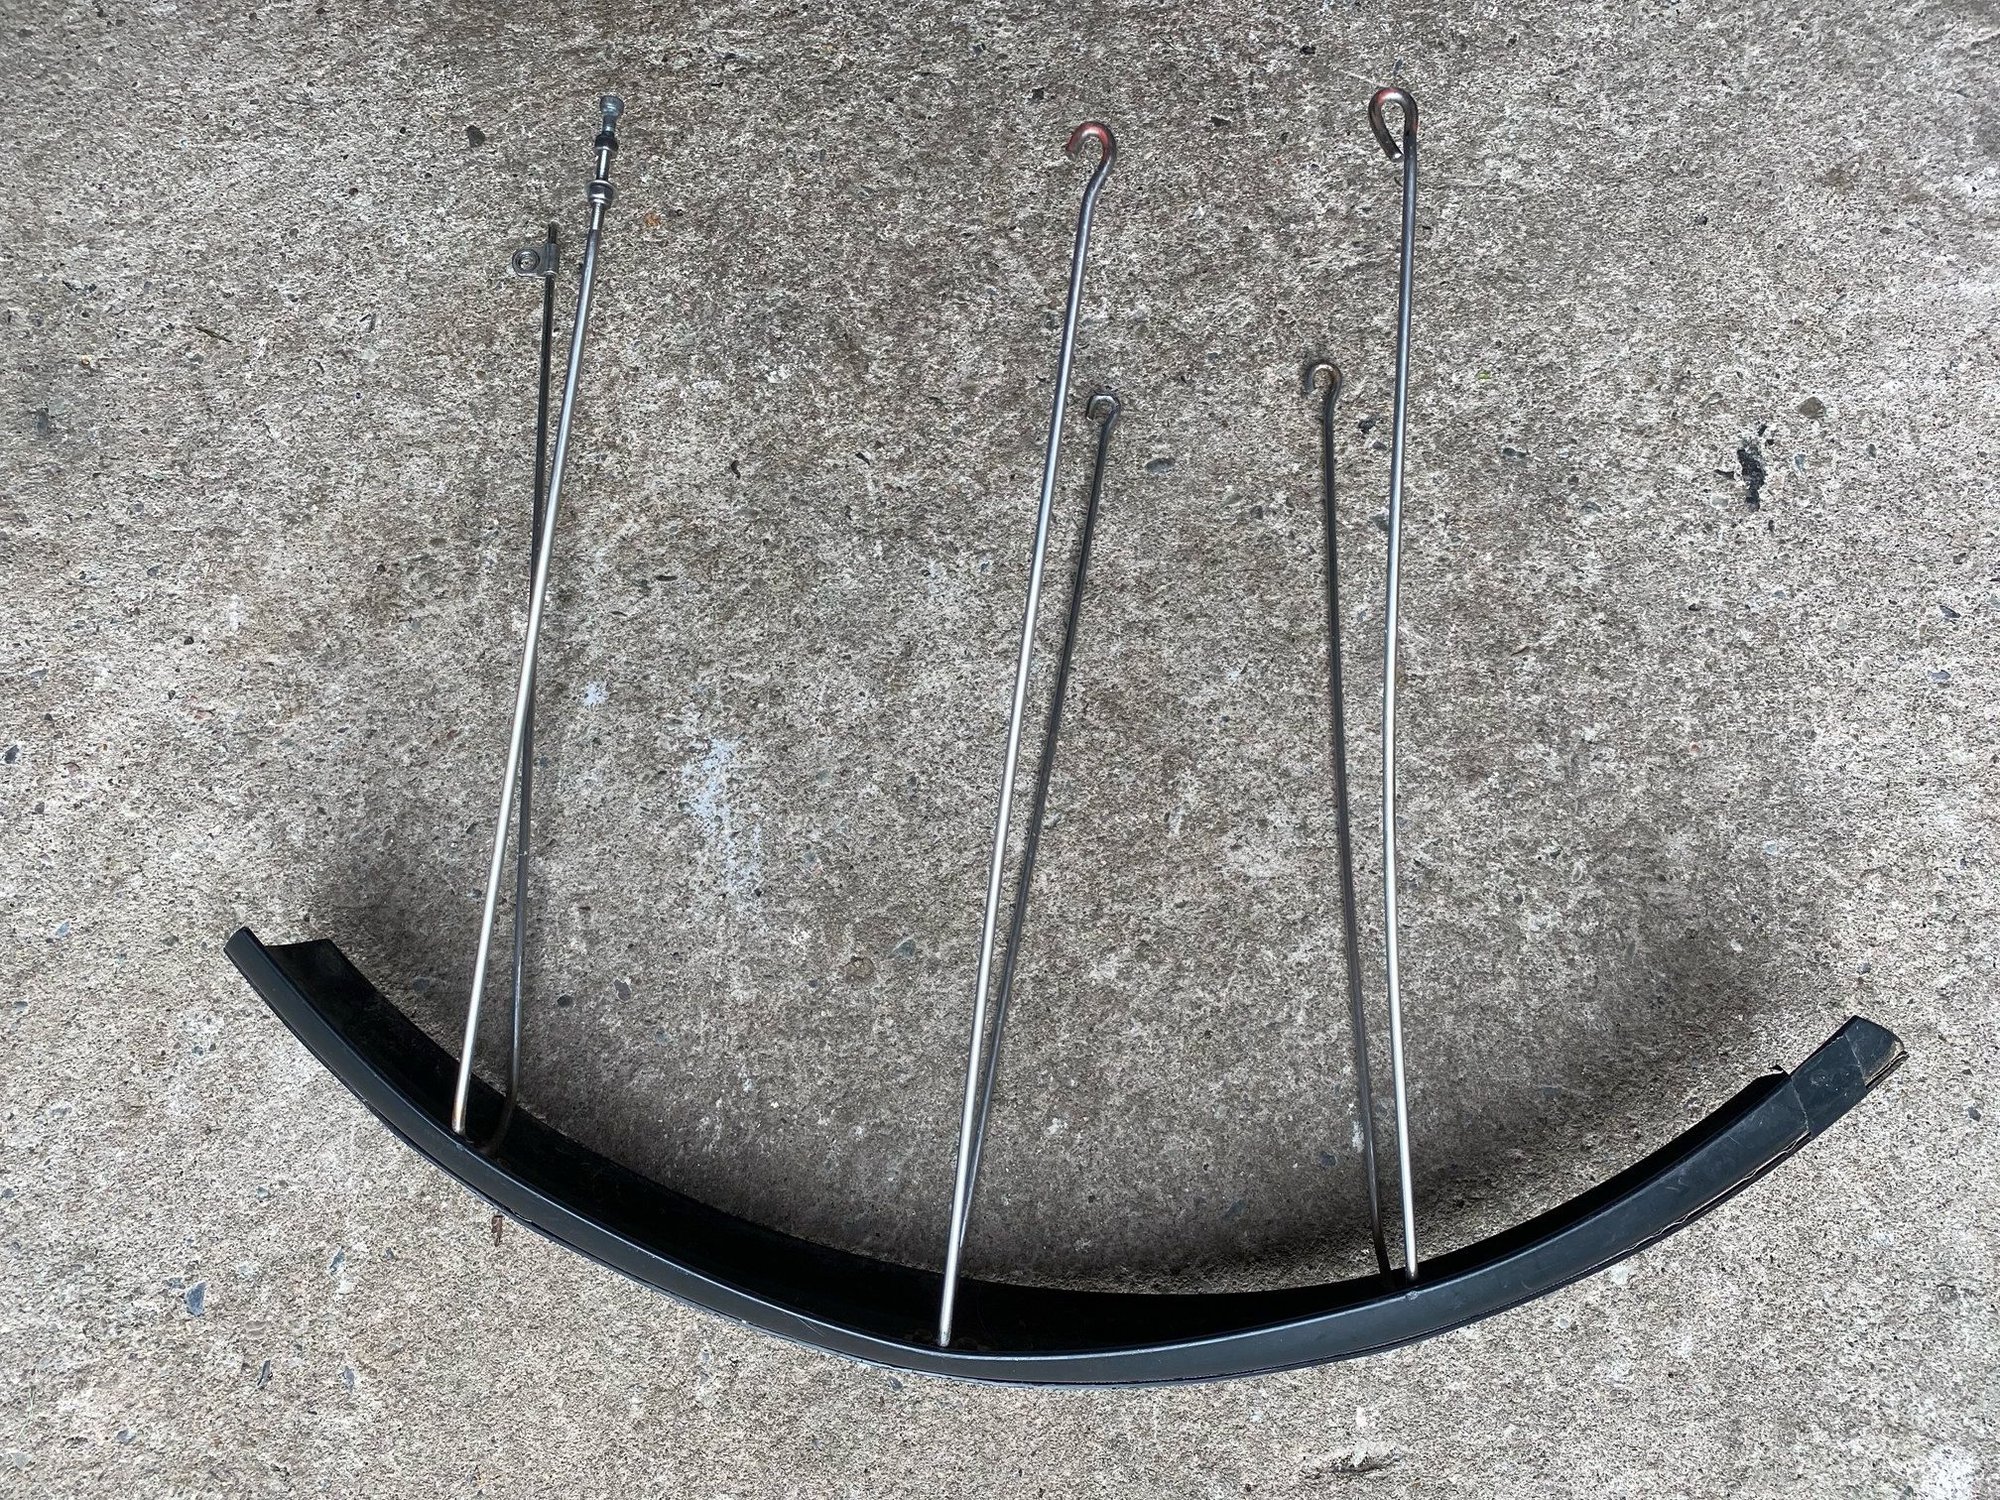
I repurposed the front stays by cutting away the moulded on plastic pop out fittings then straightening out the wire and re-bending them into a simple U shape. I would strongly recommend you make trial U shape stays out of soft steel wire about 3mm diameter which is more easily manipulated to get the required lengths. Once you’re happy with the fit you can then use these as templates to make the SKS stainless steel ones.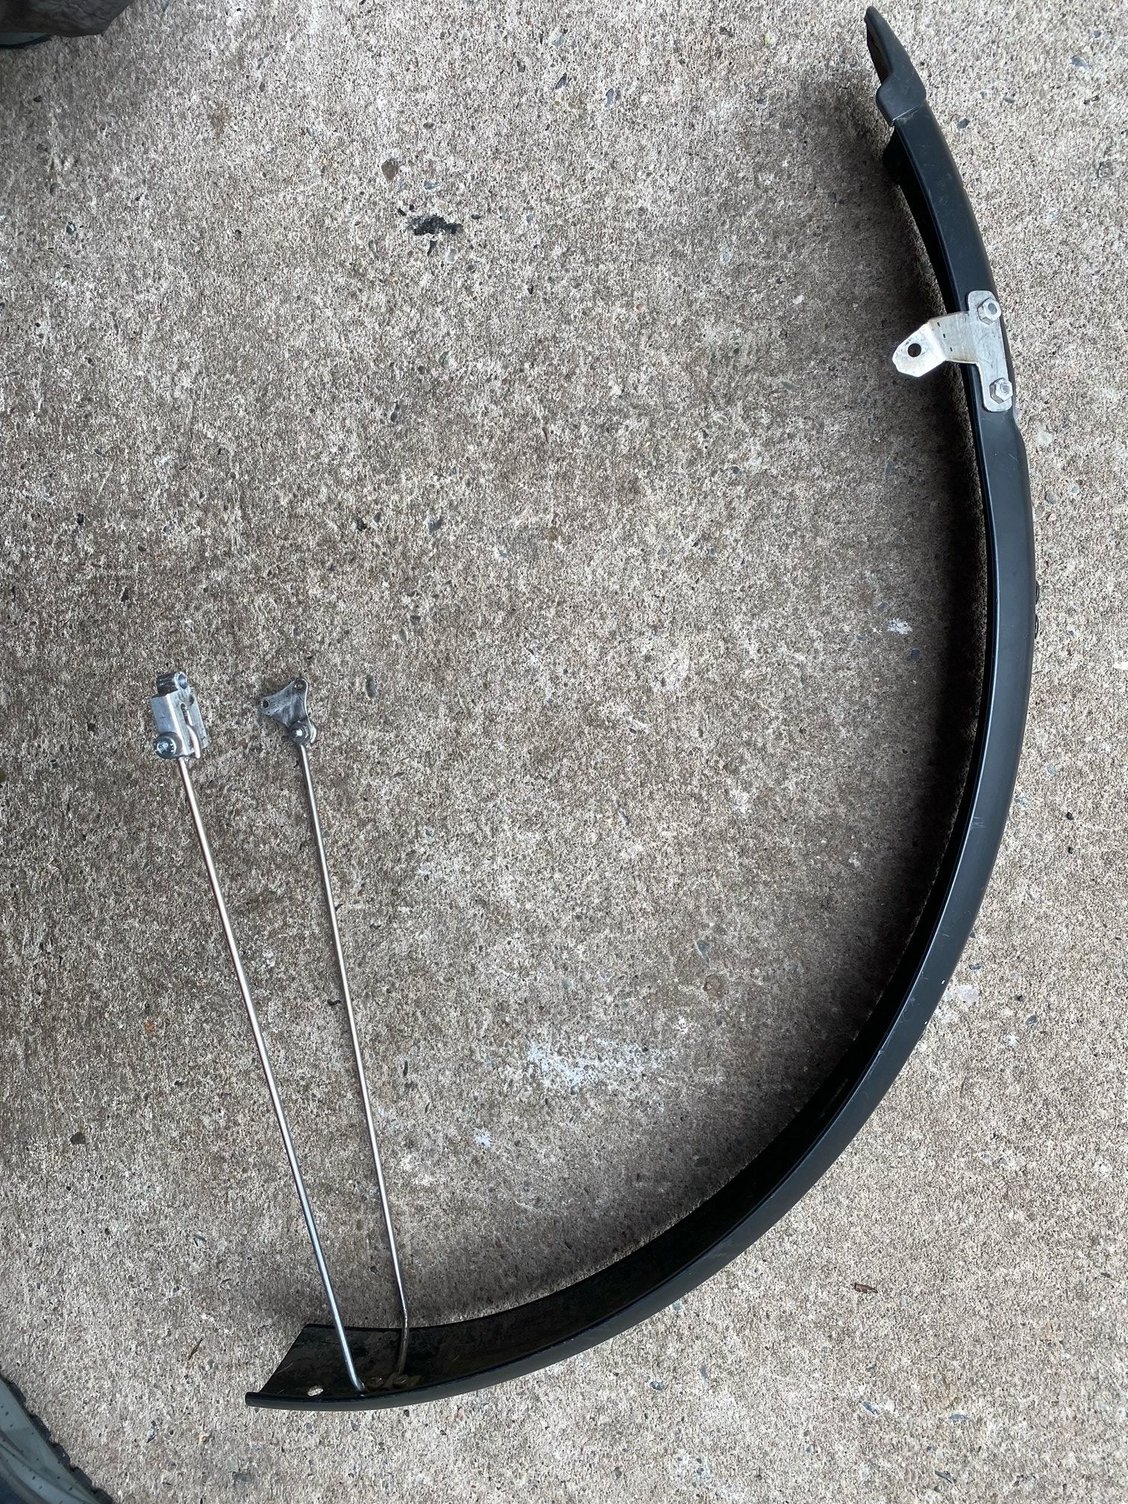
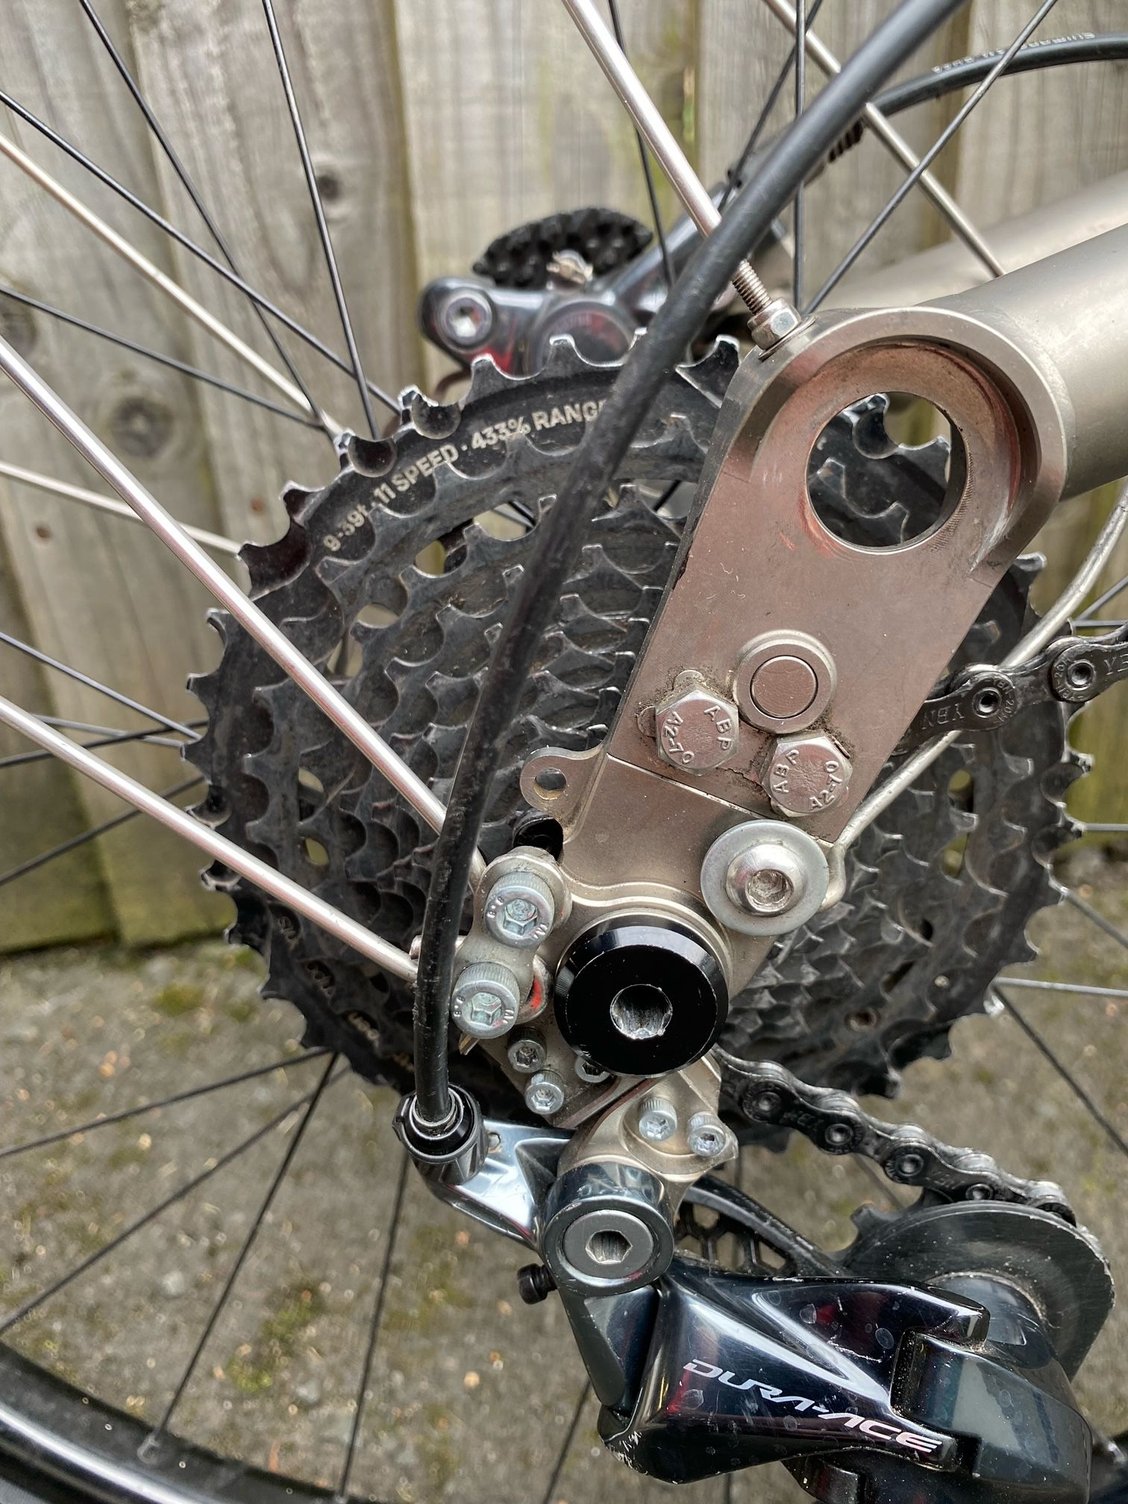
Front guard. A depression is required adjacent to the top fixing bracket to accommodate the "nut" of the front helix which otherwise forces the guard to run much too close the the tyre. I heated up that spot, then pressed a round bar down to create the depression.
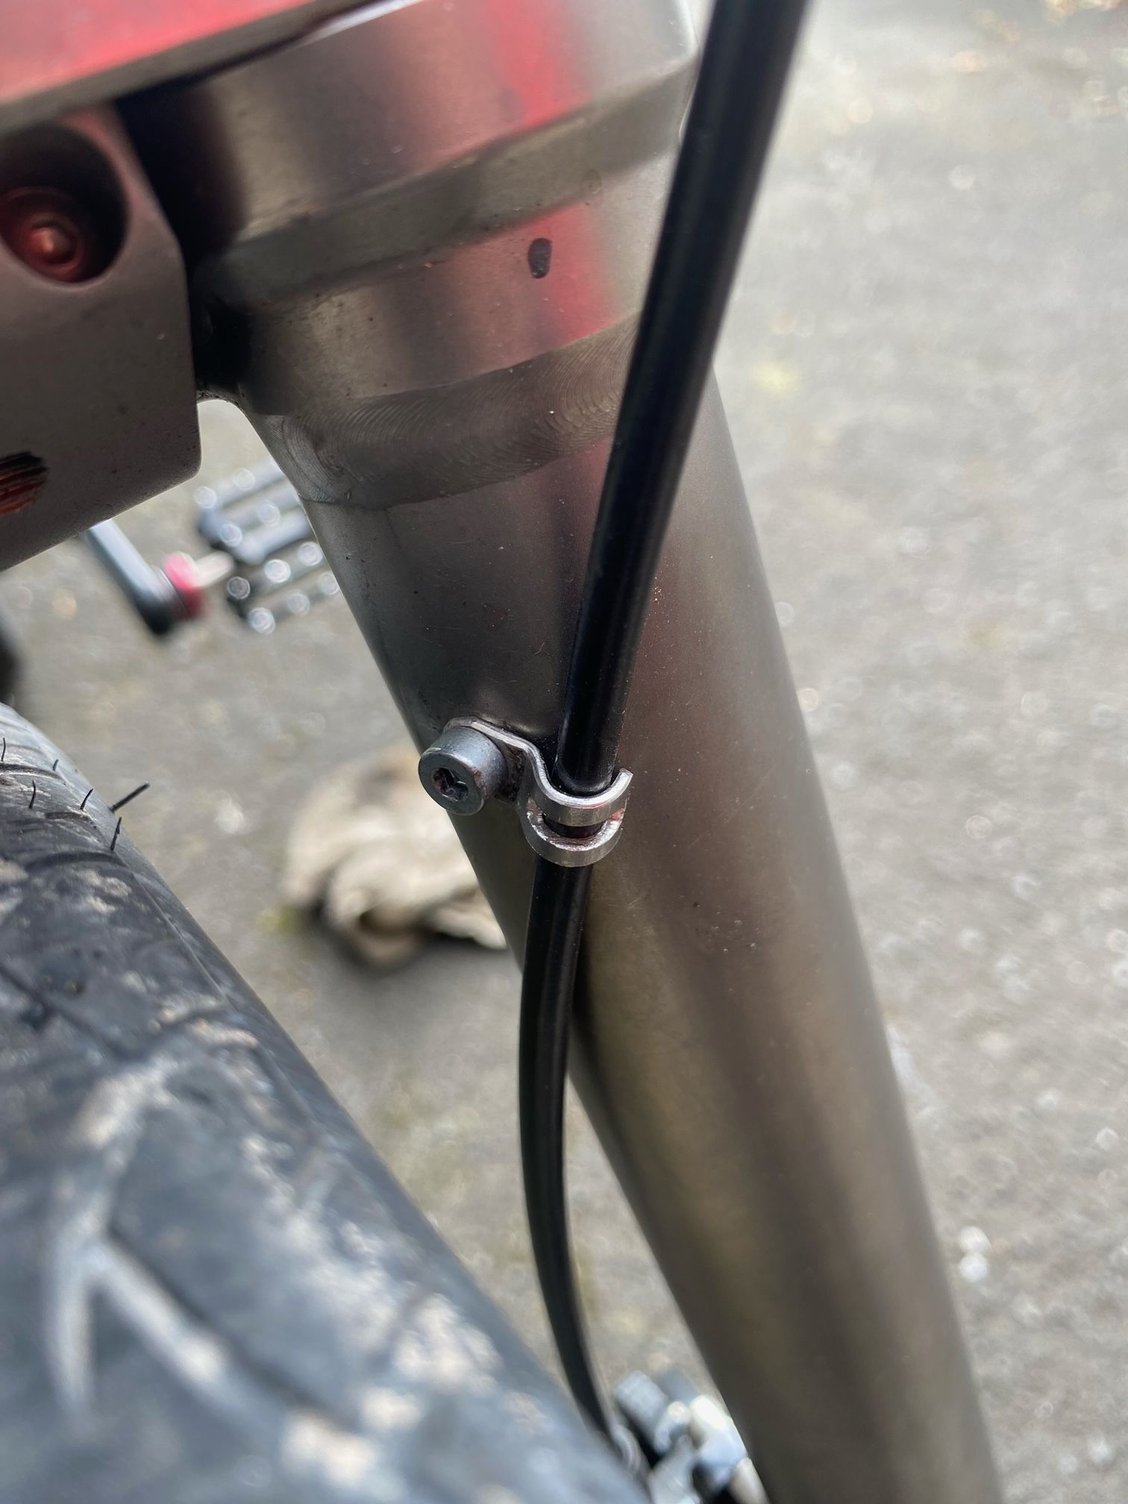
I removed the original wireform guide for the brake hose and tapped the hole M4 to provide the fixing point for the top of the front guard. I made the hose clip shown here to fix at the same point.
I drilled and tapped two M3 holes into the black plastic bush to provide a fixing point for the RH side stay.
I made the fixing plate from stainless steel plate and used M3 x 10mm socket head screws to hold it in place. I stripped one thread out because I overtightened a screw. Both are now held in place with threadlocking compound. I intend to re-drill and tap but haven't needed to do it yet. (the plastic bush is free to rotate 360°).

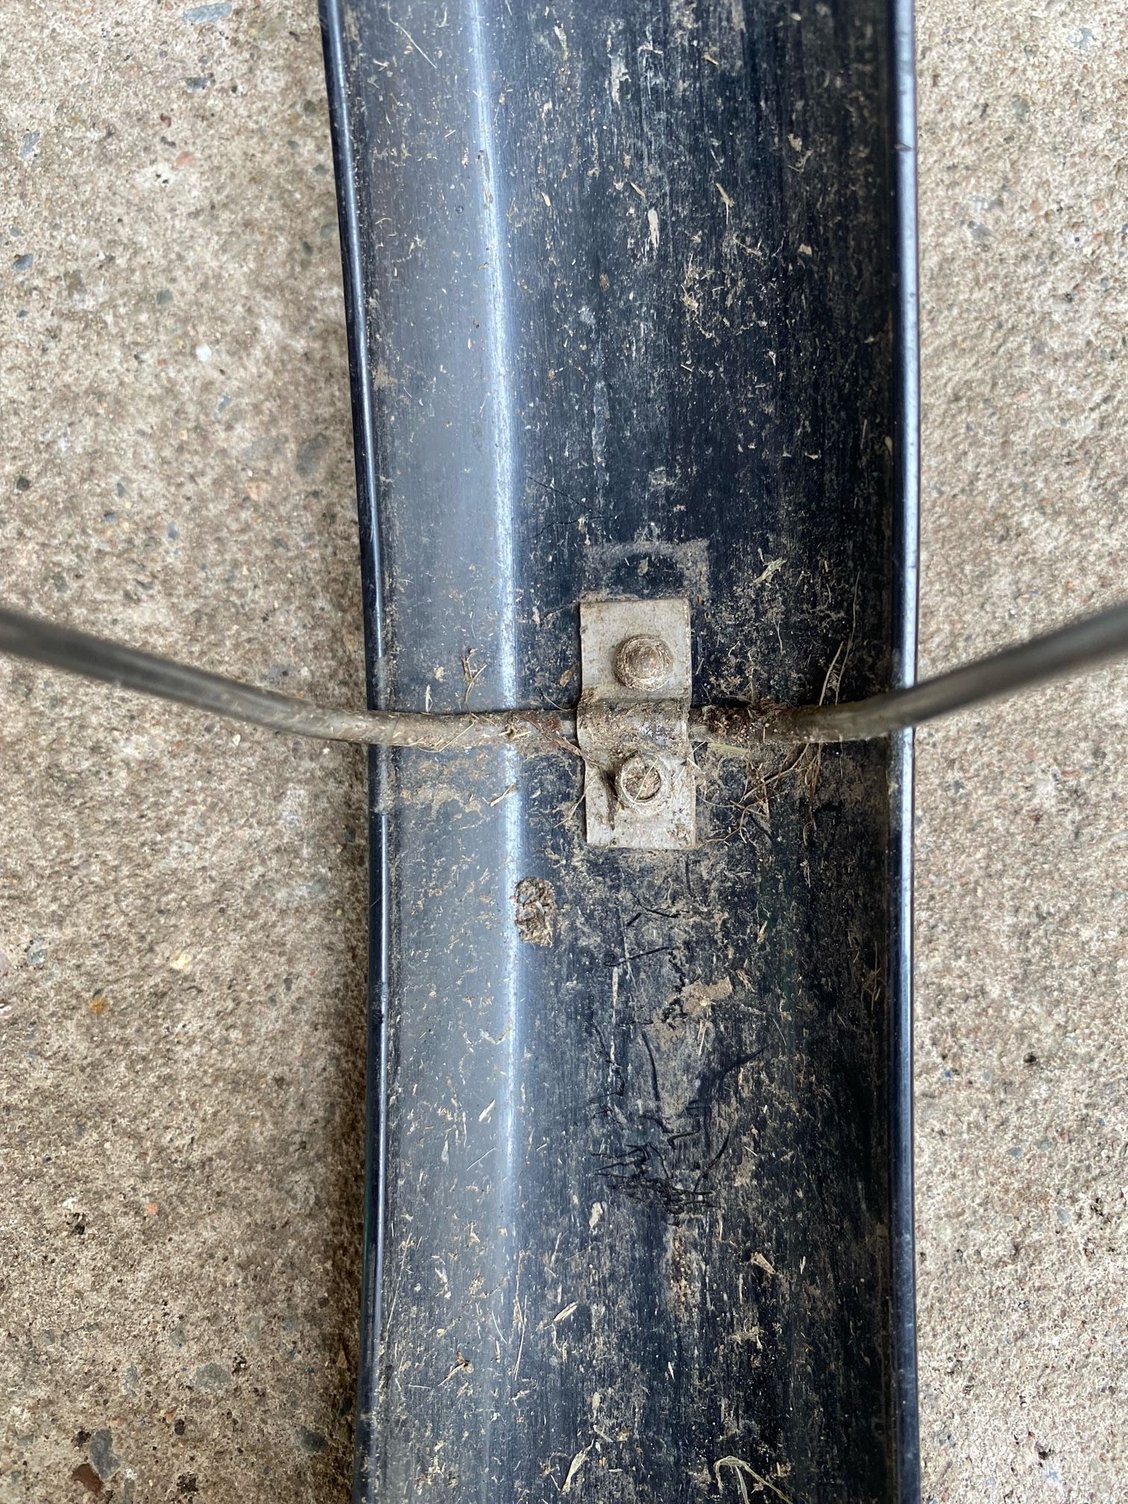
Hinged section of rear guard. Stainless steel strip pop riveted the the back end. Plastic plate held by screws at the front end. Hot glue used to seal the gaps between the plastic plate and the guard.
M4 countersunk screw in the centre. Two very small self tapping screws holding the sides to the plastic plate.

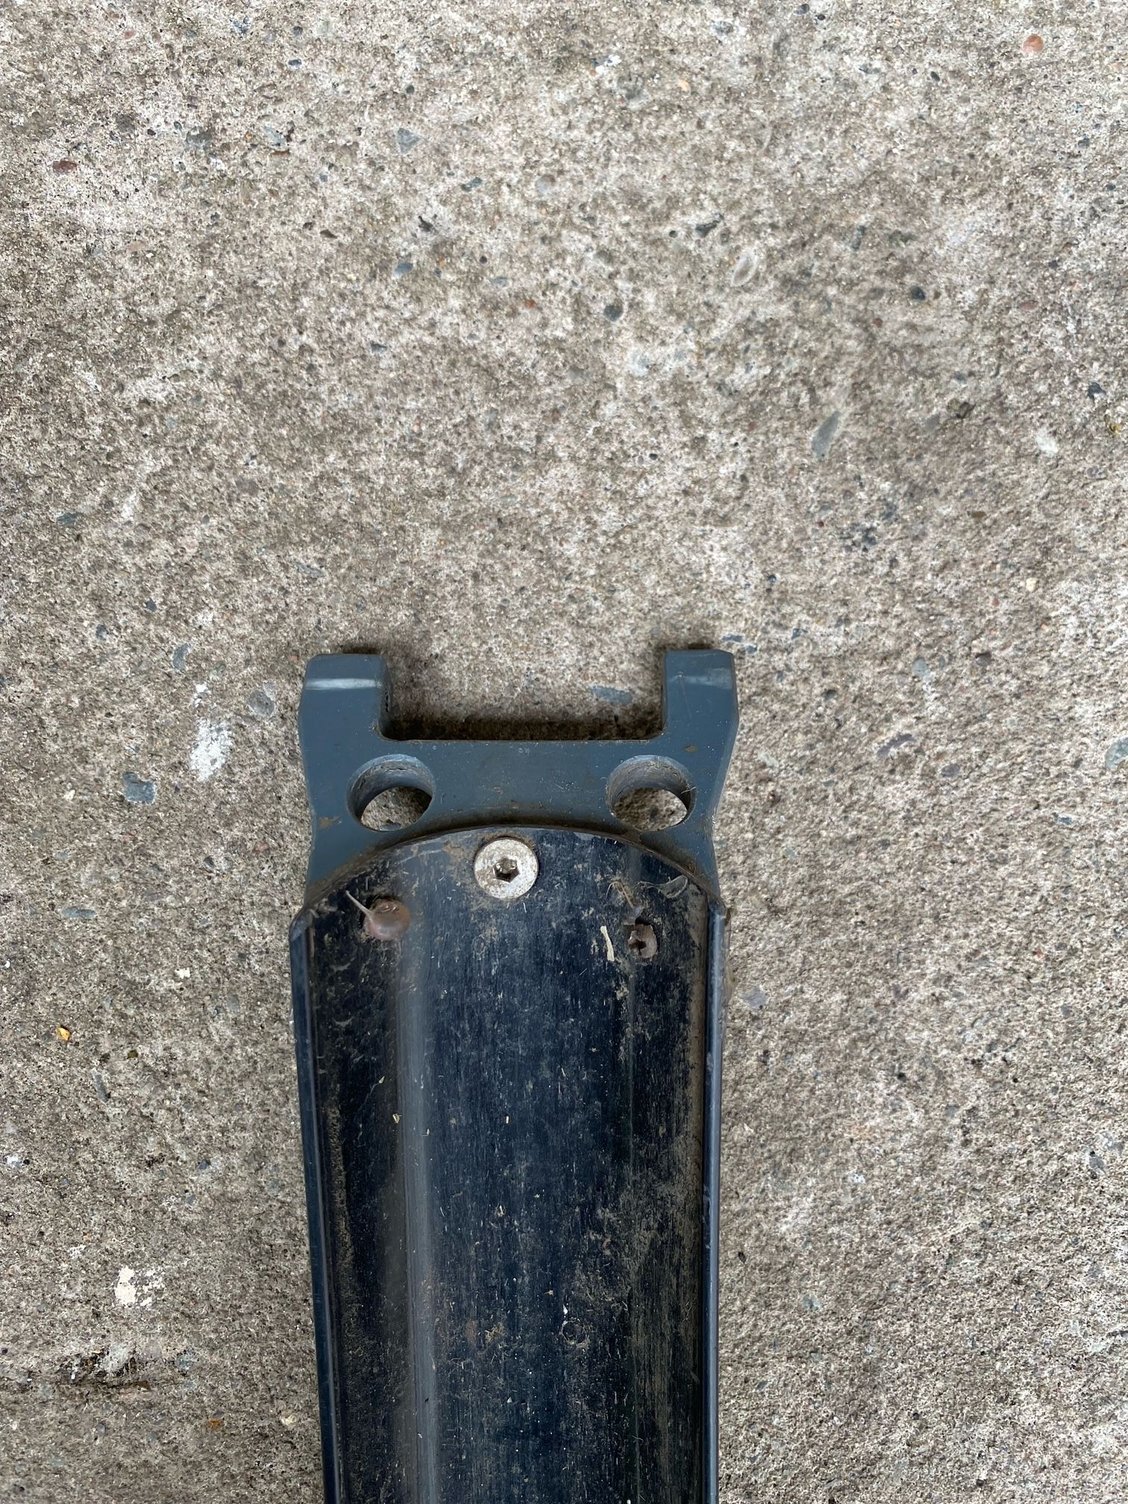
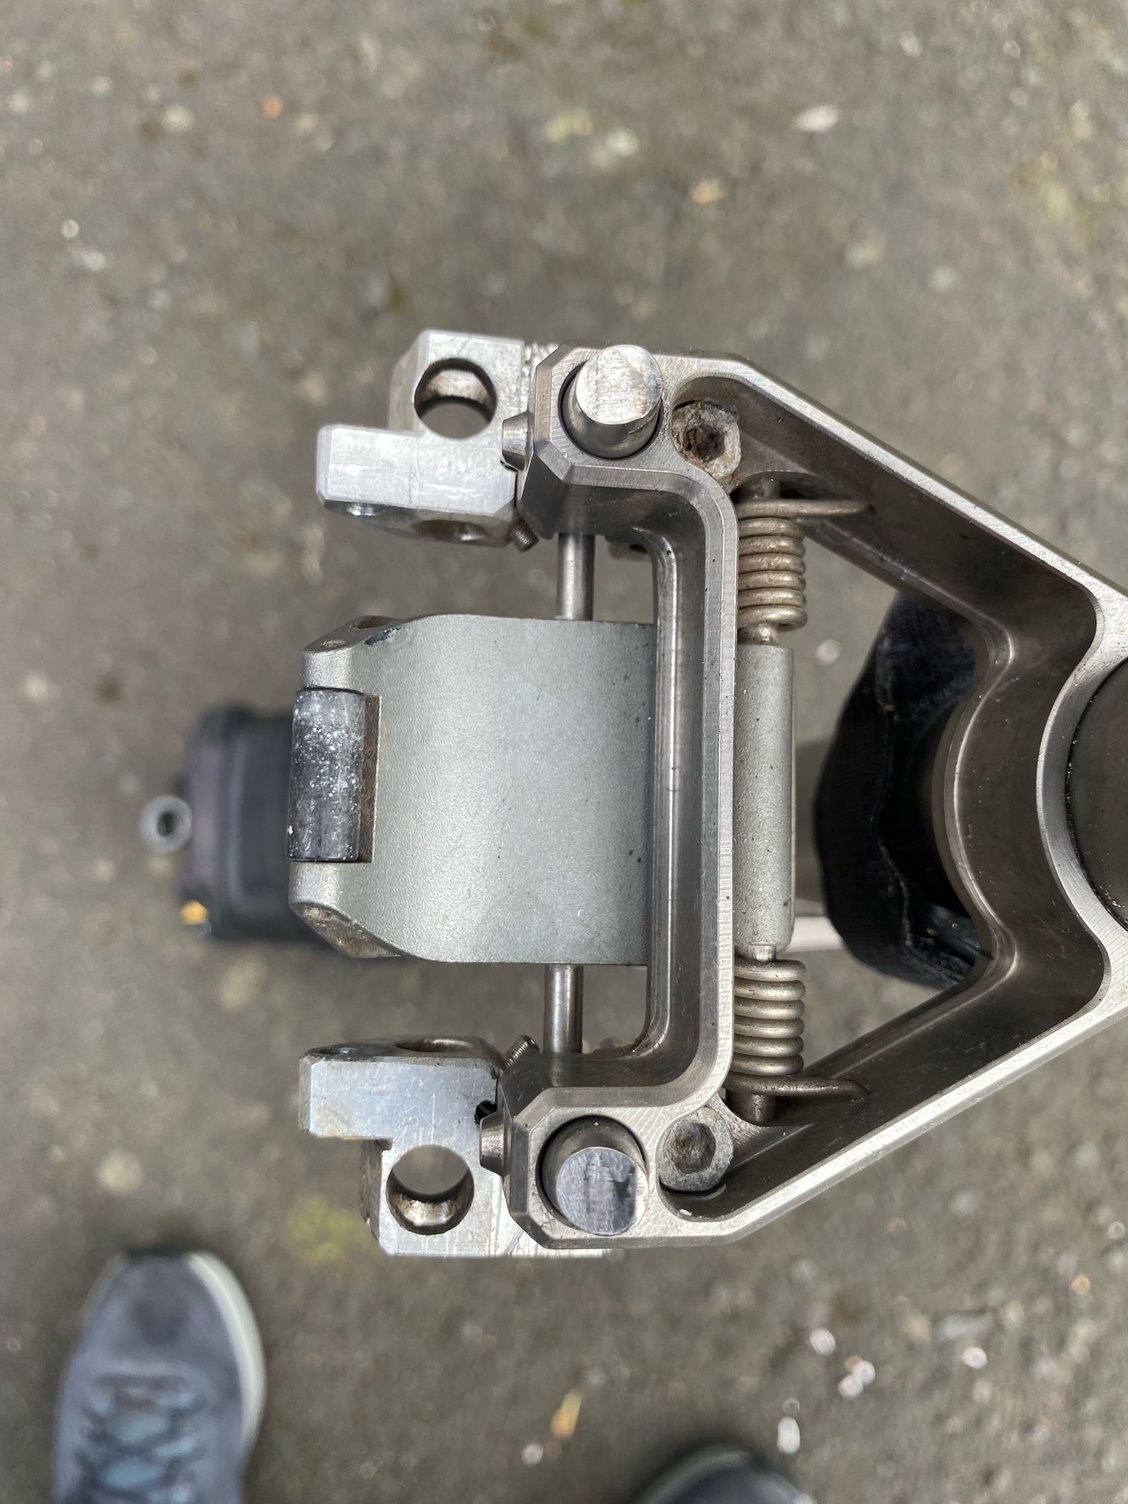
Aluminium blocks bolted to the rear latch housing to provide mounting points for the hinged part of the rear guard. The blocks are drilled to create pedal holders. Spring clips to retain pedals are fixed in small holes by M3 grub screws (headless socket screws). Spring clips are made from the stainless steel strips found in older windscreen wiper blades.
Bike upside down to show fixing screws for the hinge blocks / pedal holders.
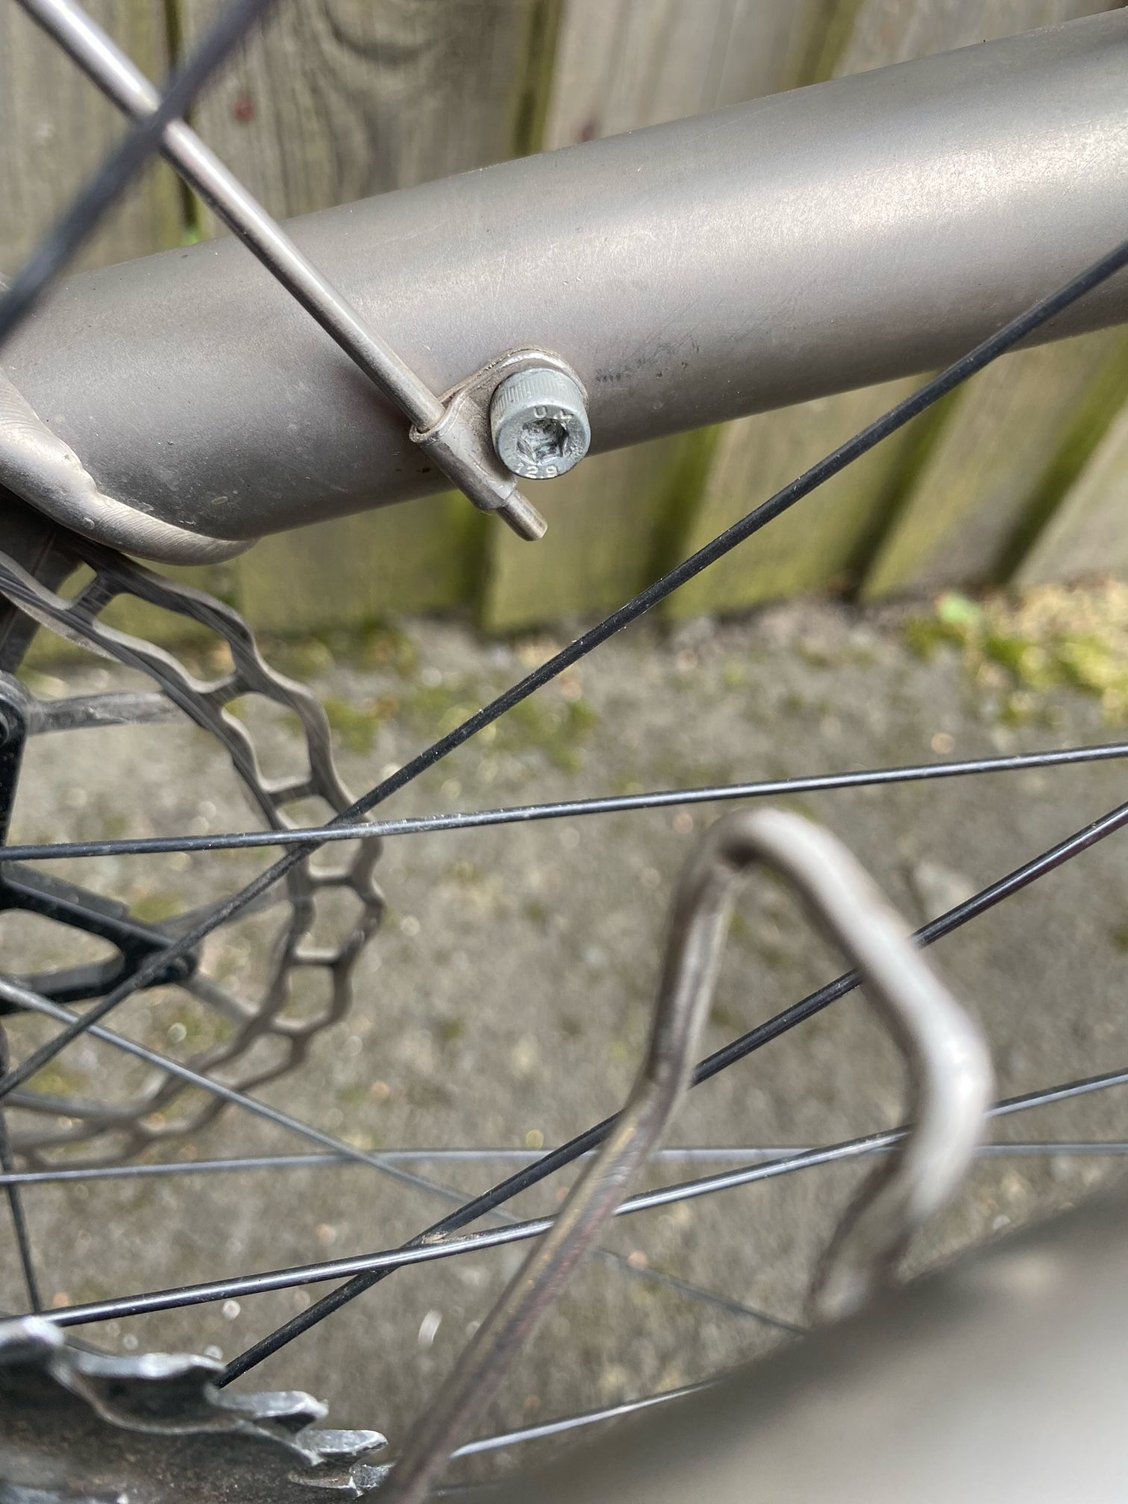
Forgot to insert the pic for the LH front stay fixing above. It's made from 8mm aluminium plate.
Bottom view of LH front stay fixed with M5 socket head screw into existing tapped hole. Before starting anything, check that you can fully insert the M5 screw!! The holes on my bike were not fully tapped out. Use a brand new tap and go very carefully if you need to re-tap your yours!!
It’s important to make the fixed rear section of the rear guard and its mountings as stiff as possible because it will contact the ground during folding and needs to carry the weight of the wheel and rear swing arm. I added a wear strip made from 1mm black nylon sheet to this section. It’s held in place with strong double sided tape and the pop rivets which hold the stays in place.
I've reached ten images so need to continue in another post.
In addition to metal and plastic working skills a lot of time is needed to modify and install these guards. I was able to justify the time taken because the bike was useless to me without them – It’s frequently wet around here. Bear in mind Helix currently say their guards will be available this month, so you may want to wait before committing to this adaptation. Also note that their current image from the upgrade guide on their website shows a single piece rear guard: https://helixhelix.b-cdn.net/support...mud_guards.png This image is several years old.
With the single piece rear guard design the rear wheel is prevented from touching the ground by the intervening guard when the bike is folded which consequently makes the bike very unstable in that mode. (I know because I copied that simpler design on my first attempt). My guess is if that design turns out to be the actual production version then you will also need to fit the folding rear rack (theoretically also available this month) and this will probably provide a stable base for the folded bike. This is just my theory- I haven’t seen final production images of guards or rack. If my theory is correct it might explain why the mudguards have been delayed so long, waiting for finalisation and production of the rear rack.
For this version I used SKS 700 x 45 matt black guards: https://www.sjscycles.co.uk/mudguard...28-inch-black/
Previously I used 700 x 53 which were wider than necessary.
It’s not possible to use the “pop out” front stay fixings. They’re way too flexible to prevent the guard constantly rubbing every time you hit a bump. So what about safety? I’ve had one experience with a strong stick slipping through the front wheel spokes when riding through woodland. I came to an abrupt stop but didn’t lose control. The guard crumpled up and the stays were bent. There was a split in the guard at one of the rivet holes. I was able to bend everything roughly back into shape by hand and continue my journey. On this basis I think there is sufficient flexibility in my construction to prevent a catastrophic “over the bars” incident. Your opinion may vary!
Obviously the guards are not the correct radius for the 507-40 tyres. The first job is to re-form them by gently clamping the end tips of the guard to a wheel (with inflated tyre) and gently warming them up with a heat gun so that they adopt the new curvature. The plastic softens at quite low temperature. When the clamps are released the guards will spring back a little and should then be the correct radius. Tips: heat up the whole length of the mudguard slowly keeping the gun moving back and forth constantly. Do not dwell on a single point. Don’t be tempted to squeeze the sides of the guard inwards to maintain the original width while doing this as its very difficult to do it evenly. The expanded width won’t be a problem.
I repurposed the front stays by cutting away the moulded on plastic pop out fittings then straightening out the wire and re-bending them into a simple U shape. I would strongly recommend you make trial U shape stays out of soft steel wire about 3mm diameter which is more easily manipulated to get the required lengths. Once you’re happy with the fit you can then use these as templates to make the SKS stainless steel ones.
Front guard. A depression is required adjacent to the top fixing bracket to accommodate the "nut" of the front helix which otherwise forces the guard to run much too close the the tyre. I heated up that spot, then pressed a round bar down to create the depression.
I removed the original wireform guide for the brake hose and tapped the hole M4 to provide the fixing point for the top of the front guard. I made the hose clip shown here to fix at the same point.
I drilled and tapped two M3 holes into the black plastic bush to provide a fixing point for the RH side stay.
I made the fixing plate from stainless steel plate and used M3 x 10mm socket head screws to hold it in place. I stripped one thread out because I overtightened a screw. Both are now held in place with threadlocking compound. I intend to re-drill and tap but haven't needed to do it yet. (the plastic bush is free to rotate 360°).
Hinged section of rear guard. Stainless steel strip pop riveted the the back end. Plastic plate held by screws at the front end. Hot glue used to seal the gaps between the plastic plate and the guard.
M4 countersunk screw in the centre. Two very small self tapping screws holding the sides to the plastic plate.
Aluminium blocks bolted to the rear latch housing to provide mounting points for the hinged part of the rear guard. The blocks are drilled to create pedal holders. Spring clips to retain pedals are fixed in small holes by M3 grub screws (headless socket screws). Spring clips are made from the stainless steel strips found in older windscreen wiper blades.
Bike upside down to show fixing screws for the hinge blocks / pedal holders.
Forgot to insert the pic for the LH front stay fixing above. It's made from 8mm aluminium plate.
Bottom view of LH front stay fixed with M5 socket head screw into existing tapped hole. Before starting anything, check that you can fully insert the M5 screw!! The holes on my bike were not fully tapped out. Use a brand new tap and go very carefully if you need to re-tap your yours!!
It’s important to make the fixed rear section of the rear guard and its mountings as stiff as possible because it will contact the ground during folding and needs to carry the weight of the wheel and rear swing arm. I added a wear strip made from 1mm black nylon sheet to this section. It’s held in place with strong double sided tape and the pop rivets which hold the stays in place.
I've reached ten images so need to continue in another post.
09-14-24 | 10:09 AM
#2963
Junior Member
Joined: Dec 2017
Posts: 107
Likes: 30
Adapted mudguards continued
Fixed section of rear guard:
The wear strip doesn't show well in this pic - see assembled pic below.
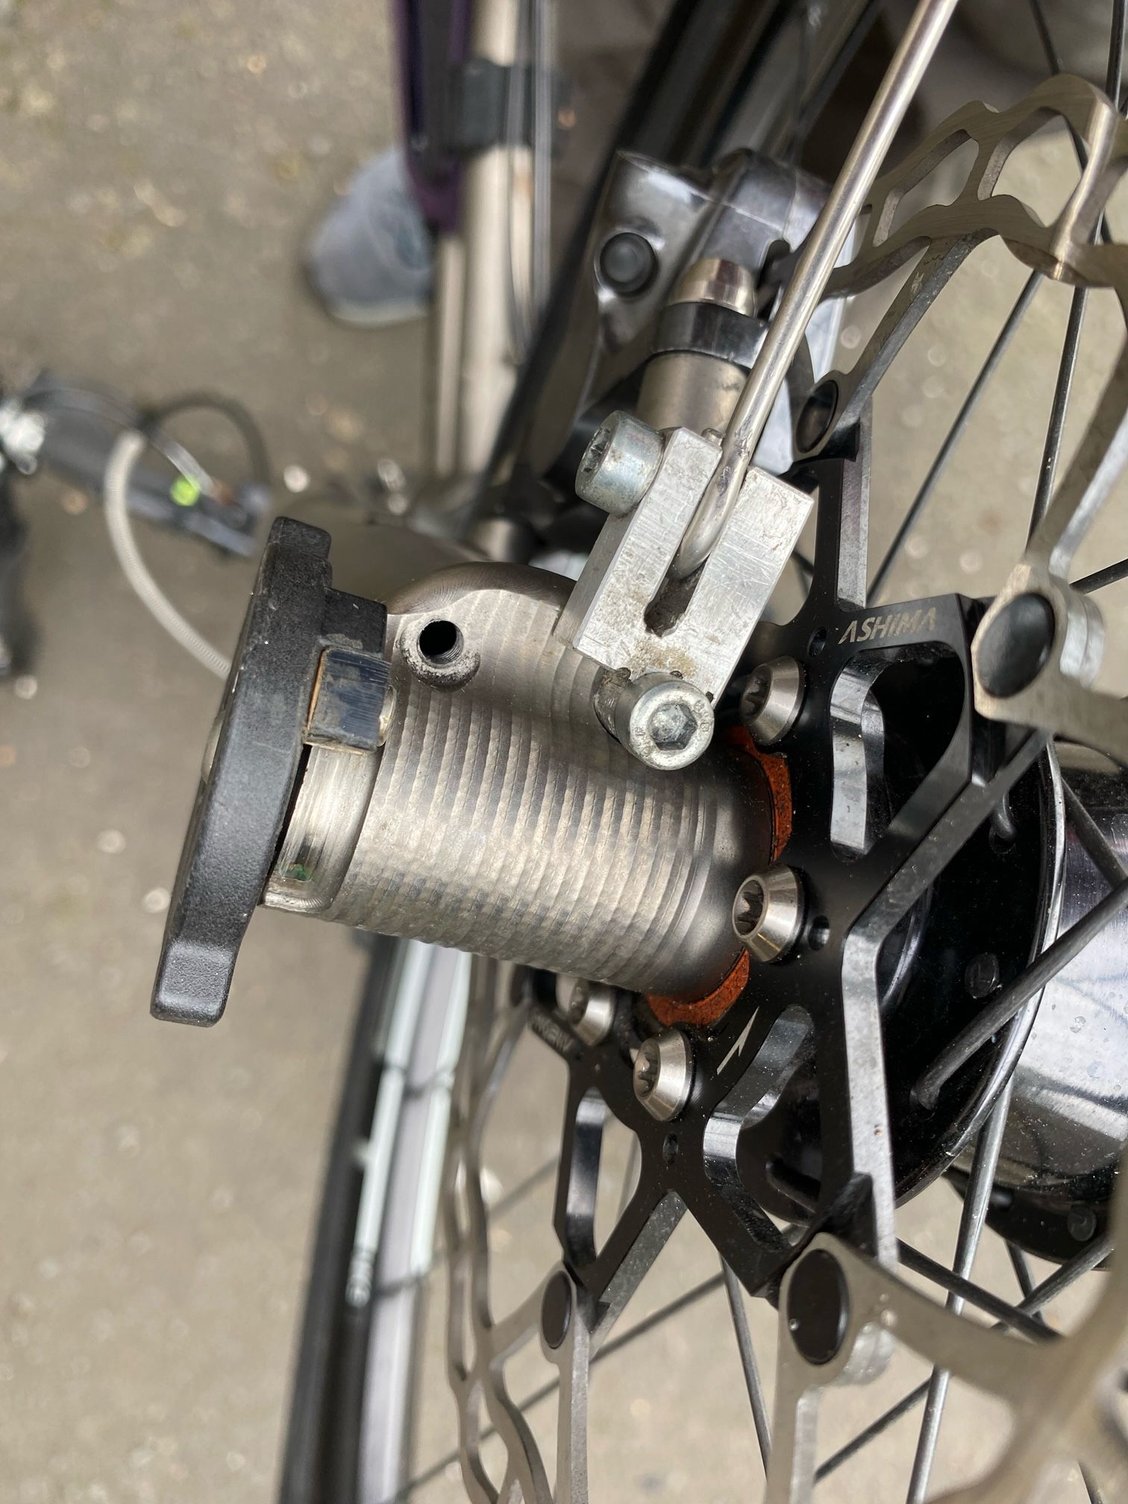
RH front stay threaded M3 to allow it to be bolted to the hole in the hood of the dropout.
All 3 stays attached to RH dropout
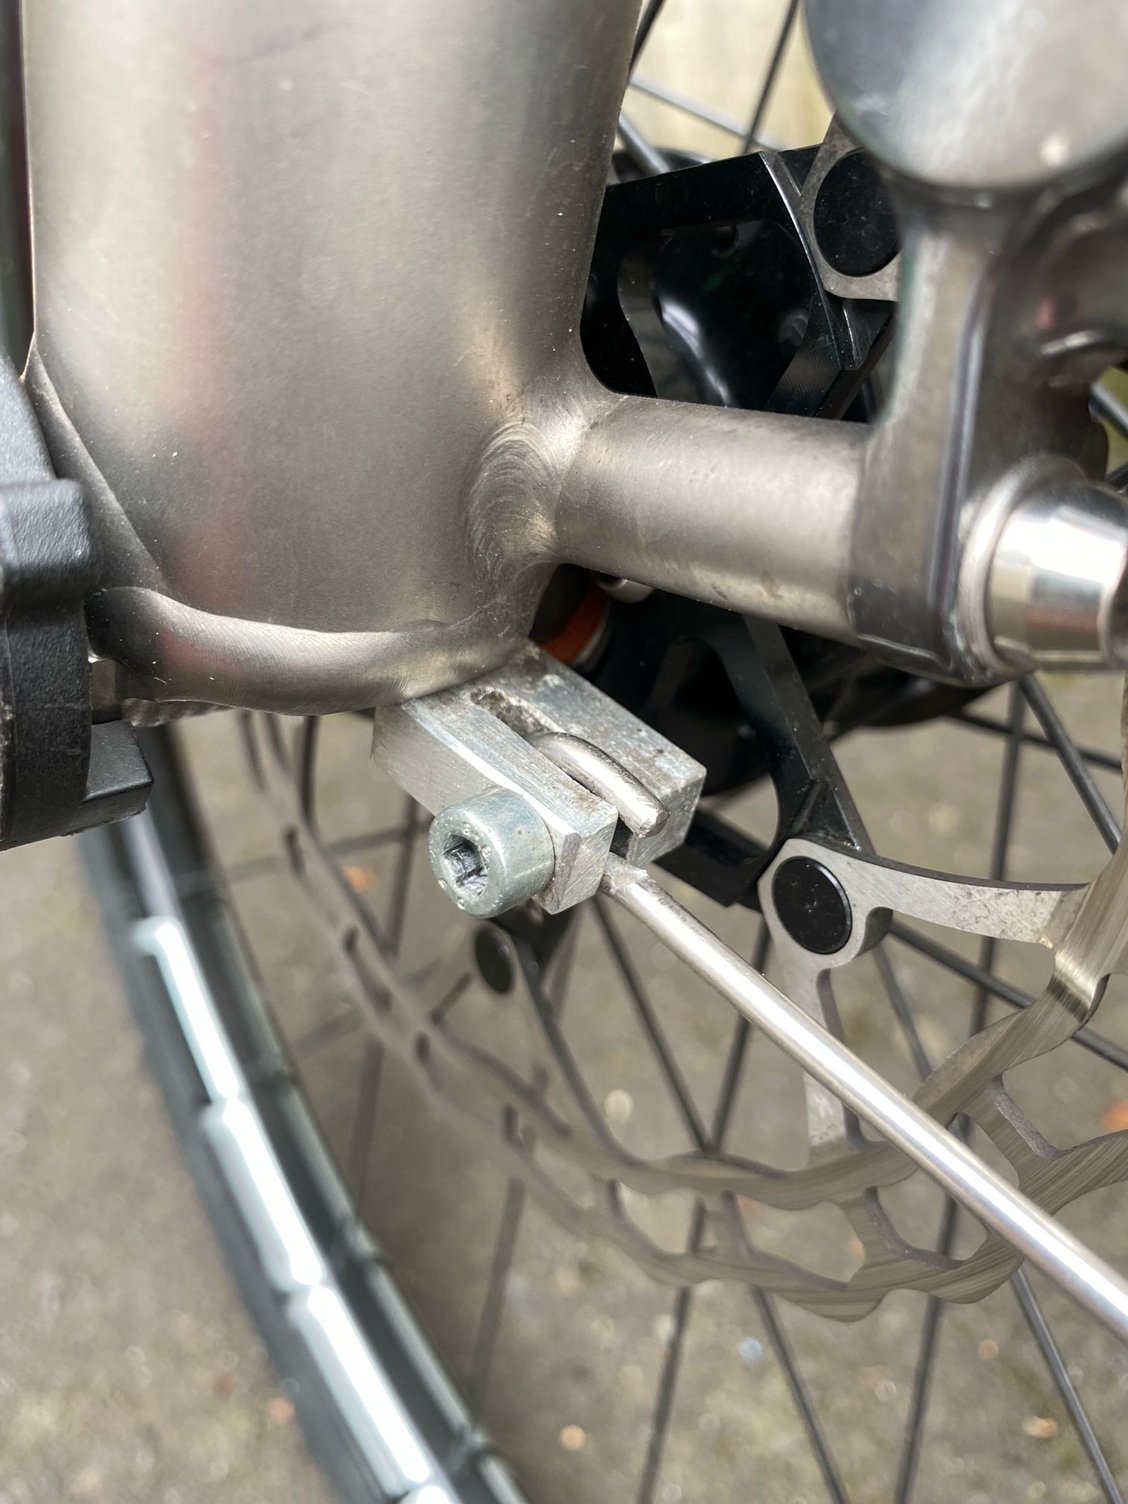
Existing hole in rear swingarm drilled out and tapped M5 to provide a fixing point for the front LH stay. Folded stainless steel plate to clamp the stay in position allows a little height adjustment - obviously more if you make the stay longer.

The two rear LH stays are fixed to the existing M5 holes in the dropout. I had to omit washers under the screw heads and cut down the screw heads to avoid interference with the front hub when the wheels are locked together.
Simple stainless steel plate fixed with pop rivets to hold the stays in place.

Rear guard unfolded.
Hinged section of rear guard in folded position. The sprung loaded latch presses on the grey plastic plate to hold the guard in this position. When unfolding the grey plate automatically pushes up past the latch assisted by the roller in the tip of the latch and yielding to the upward push from the rear swing arm as you swing it into position, exactly as shown in the animation 2 posts above.
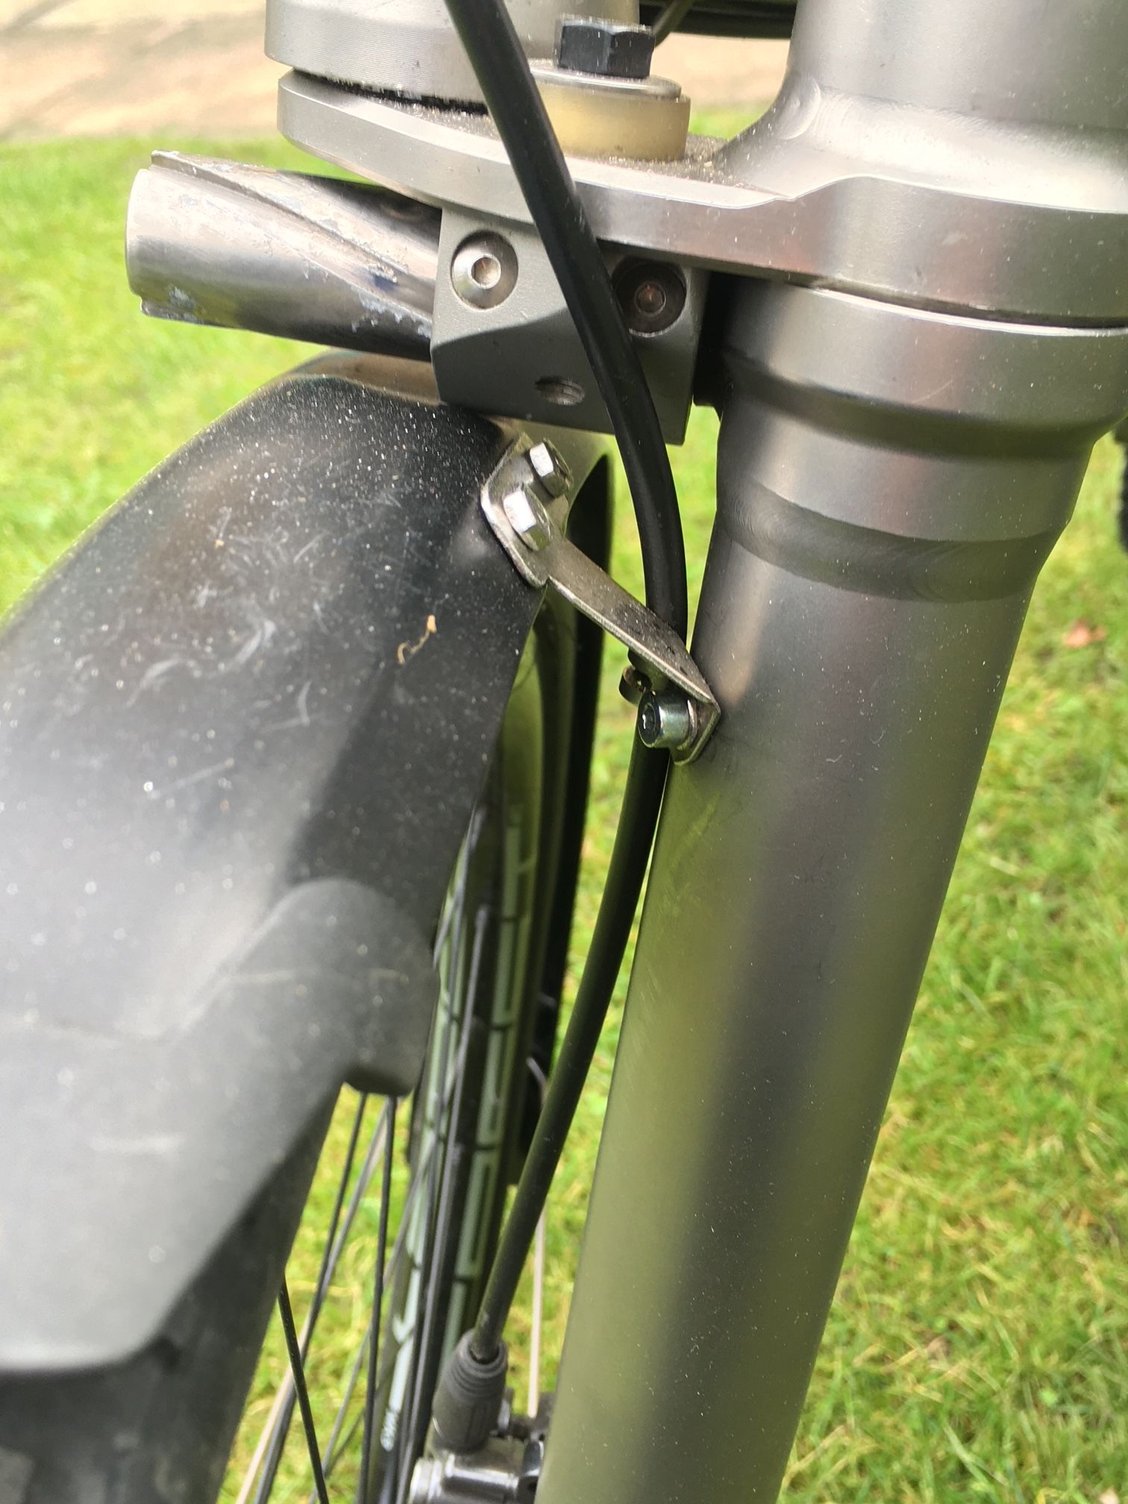
Top fixing for the front guard with hose clip in place.
Let me know if you want any more information.
The wear strip doesn't show well in this pic - see assembled pic below.
RH front stay threaded M3 to allow it to be bolted to the hole in the hood of the dropout.
All 3 stays attached to RH dropout
Existing hole in rear swingarm drilled out and tapped M5 to provide a fixing point for the front LH stay. Folded stainless steel plate to clamp the stay in position allows a little height adjustment - obviously more if you make the stay longer.
The two rear LH stays are fixed to the existing M5 holes in the dropout. I had to omit washers under the screw heads and cut down the screw heads to avoid interference with the front hub when the wheels are locked together.
Simple stainless steel plate fixed with pop rivets to hold the stays in place.
Rear guard unfolded.
Hinged section of rear guard in folded position. The sprung loaded latch presses on the grey plastic plate to hold the guard in this position. When unfolding the grey plate automatically pushes up past the latch assisted by the roller in the tip of the latch and yielding to the upward push from the rear swing arm as you swing it into position, exactly as shown in the animation 2 posts above.
Top fixing for the front guard with hose clip in place.
Let me know if you want any more information.
03-07-25 | 01:26 PM
#2965
Newbie
Joined: Jun 2023
Posts: 22
Likes: 9
03-09-25 | 04:33 AM
#2966
Newbie
Joined: May 2023
Posts: 54
Likes: 23
From: Ile-de-France
Bikes: Tern Verge X11 (2021), Helix Ultralight (2023)
The page is hidden, so I'll wait for the official announcement.
It should be coming soon as the projected delivery is June 1st.
The rear rack and mudguards are promising.
"The pannier rail is retractable and moves out of the way to facilitate folding and rolling your bike when folded. The rack can support 50lbs of cargo."
Rear rack and mudguards
Designed for folded Helix
03-09-25 | 05:16 AM
#2967
Senior Member
Joined: Feb 2017
Posts: 2,529
Likes: 568
 03-09-25 | 10:44 AM
#2968

Schwinnasaur

Joined: Dec 2006
Posts: 1,943
Likes: 354
From: New Orleans, LA
Do we know if they are meeting their dates these days?
03-09-25 | 11:18 AM
#2969
Newbie
Joined: May 2023
Posts: 54
Likes: 23
From: Ile-de-France
Bikes: Tern Verge X11 (2021), Helix Ultralight (2023)
There is also the small chance of a discount at launch.
For the bikes, I think so.
For the accessories in pre-order, not really.
The travel case is 1 year late. They explained the delays
When we took pre-orders for the travelcase it was in the final development phase but then we had a breakthrough design change that warranted a complete redesign. We're excited to let you know the final design is revolutionary just like Helix itself.
We have minimized the overall volume by changing the top of the case to a curved design. This allows the case to fit in more places, for example it is more likely to clear the sloping window of a hatchback trunk.
We have also incorporated a telescopic handle without sacrificing internal space.
The case is actually smaller than the overall dimensions of your bike. This was made possible by designing two quick-release mechanisms to add to your existing bike which will allow you to condense the size of your Helix by roughly 20%. This in itself represents a breakthrough in folding bike design as Helix is the only folding bike to fold and break-away offering two folding modes - small and smaller! These mechanisms also make your bike far more durable in transit as they eliminate the risk of damage to key impact points.
I guess they are waiting for this milestone before announcing the product and a delivery date.
I'm looking forward to the mudguards as they will be more practical than the rollable ones I use.
They have a perfectionist mentality and mean well.
The products are late, but very well designed. My Helix is still amazing after a year and a half.
03-09-25 | 12:26 PM
#2970
Senior Member
Joined: Feb 2017
Posts: 2,529
Likes: 568
No idea, as you seen there are very few return of experience about the Helix since a long time.
But there is now a delivery date.
When I search "helix rear rack and mudguard" on Google, the first answer I receive is a link to the above page were its possible to buy them with June 1st delivery!
But there is now a delivery date.
When I search "helix rear rack and mudguard" on Google, the first answer I receive is a link to the above page were its possible to buy them with June 1st delivery!
 03-21-25 | 09:44 PM
#2972
Highly Enriched Driftium


Joined: Apr 2017
Posts: 6,715
Likes: 2,174
No idea, as you seen there are very few return of experience about the Helix since a long time.
But there is now a delivery date.
When I search "helix rear rack and mudguard" on Google, the first answer I receive is a link to the above page were its possible to buy them with June 1st delivery!
But there is now a delivery date.
When I search "helix rear rack and mudguard" on Google, the first answer I receive is a link to the above page were its possible to buy them with June 1st delivery!
03-22-25 | 12:59 AM
#2973
Senior Member
Joined: Feb 2017
Posts: 2,529
Likes: 568
After having delivered bikes to part of the kickstarter backers and having sold and delivered bikes bought at a much higher price when Helix was available, many years after the first backers received their bikes, they propose a choice to the remaining kickstarter backers: either pay an additional amount and received their Helix or a refund of their pledge within an undefined time.
I haven't seen any feedback about what happened after this proposal, neither of kickstarter backers who paid the additional amount asked and received their Helix nor of kickstarter backers who refused to pay and receive a refund.
03-22-25 | 01:29 AM
#2974
Highly Enriched Driftium
Joined: Apr 2017
Posts: 6,715
Likes: 2,174
I just looked on the Helix website, to see what prices are these days. Standard model 10 speed derailleur is just below USD$3k. 11-36 cassette is lame, 327%, given that there is space for more. What is "Hong Kong Spec"? I do a general search online... HAH!:

467% range. Now that's more like it! That yields 24-111 gear inches. Yeah I'd replace the 42 narrow-wide ring with either a 32 narrow-wide ring for 18-85 G.I., or a 34 narrow-wide ring for 19-90 G.I. Or, leave the stock 42 ring on and put on a 10-50 cassette for 20-100 G.I.
A Helix is a lot racier than my 20" folder, so I can see folks wanting higher than 85 gear inches.
Last edited by Duragrouch; 03-22-25 at 01:48 AM.
03-22-25 | 03:28 AM
#2975
Senior Member
Joined: Feb 2017
Posts: 2,529
Likes: 568
Its a new proposition of Helix: the standard Helix but with the wide range transmission.
Previously, the Hong Kong specs AKA wide range cassette was only available for the more expensive Ultralight component package.
I just see that the availability of several accessories is delayed "Mudguards, Travel Case, Rear Rack & Trailer Hitch available Fall 2024." the rear rack and mudguards was announced for shipping in June.