


Do It Yourself (DIY)
 04-12-07, 01:55 PM
#176
Don't smoke Mike
Join Date: Apr 2007
Location: Toronto
Posts: 651
Bikes: monster island fixie, Fisher sugar, sexine conversion, OLMO Superlight
Mentioned: 0 Post(s)
Tagged: 0 Thread(s)
Quoted: 0 Post(s)
Likes: 0
Liked 0 Times
in
0 Posts
keepin that chain tight
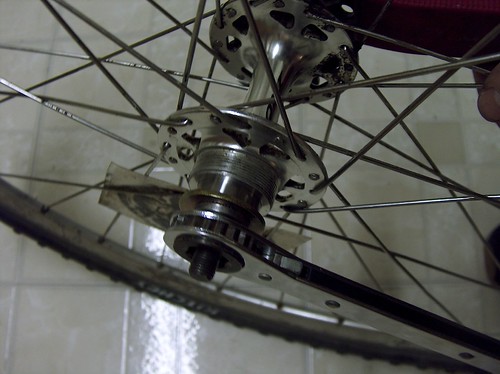
My chain on an 47 17 with track dropouts always seems to have a little play. It never gets worse, but it never stays perfectly tight after adjusting. any suggestions? is this normal? I have never ridden someone elses fixie.
 04-12-07, 04:00 PM
#177
yo yo yo yo yo
Join Date: Nov 2005
Location: delaware
Posts: 2,518
Mentioned: 0 Post(s)
Tagged: 0 Thread(s)
Quoted: 0 Post(s)
Likes: 0
Liked 0 Times
in
0 Posts
it's cool
04-12-07, 10:57 PM
#178
Senior Member
Join Date: Aug 2005
Posts: 1,152
Mentioned: 0 Post(s)
Tagged: 0 Thread(s)
Quoted: 0 Post(s)
Likes: 0
Liked 1 Time
in
1 Post
Not sure if this has been posted, and for all of y'all who never run a brake on any bike, feel free to ignore, but:
To adjust toe in:
1. fold a lil piece of cardstock in half - that should be about 1.5mm thick, give or take a few microns
2. wedge that piece in between your rim and the back of the brake pad.
3. loosen up the brake pad holder bolt
4. squeeze the lever good and hard. While maintaining pressure, adjust your pad so that it's square to the rim, and hitting it at the right height.
5. While maintaining death grip, wrap electrical tape around the lever and bar to hold the lever in position.
6. tighten up the brake pad bolt
7. rinse and repeat.
To centre your brake pads (info courteousy of Dave Moulton):
1. place a punch or a big old bolt against the brake spring on the far out side. Tap the bolt with a hammer.
2. Is it centred? If not, do it again until it is.
3. squeeze the lever a few times. If the brake pads don't stay centred, either your brake bolt is too loose or your housing is too long (and is pushing the brake back into wonky position). Fix that.
04-13-07, 04:00 AM
#179
the goal
Join Date: Feb 2005
Location: Brixton, London
Posts: 457
Bikes: Bob Jackson track
Mentioned: 0 Post(s)
Tagged: 0 Thread(s)
Quoted: 0 Post(s)
Likes: 0
Liked 0 Times
in
0 Posts
Originally Posted by mander
How to mod a Surly Tuggnut chain tensioner to work with Campy 1010 or similar horizontal dropouts
04-16-07, 02:37 PM
#182


Elitist
Thread Starter

Join Date: Jul 2005
Location: Atlanta, GA
Posts: 15,965
Mentioned: 88 Post(s)
Tagged: 0 Thread(s)
Quoted: 1386 Post(s)
Liked 92 Times
in
77 Posts
Originally Posted by [165]
unstuck - part of the RESOURCE thread - please keep giving input here!!!!
Thanks for the RAM, too.
 08-15-07, 01:27 PM
#183
Senior Member

Join Date: Jul 2007
Location: dc
Posts: 90
Mentioned: 0 Post(s)
Tagged: 0 Thread(s)
Quoted: 0 Post(s)
Likes: 0
Liked 0 Times
in
0 Posts
Since I was looking for this thread (which was hard to search for, for some reason)
for like 40 pages, figured I'd up it.
for like 40 pages, figured I'd up it.
08-15-07, 02:31 PM
#184
Senior Member

Join Date: Dec 2006
Location: 'burbs of Ft Lauderdale, FL
Posts: 429
Mentioned: 0 Post(s)
Tagged: 0 Thread(s)
Quoted: 0 Post(s)
Likes: 0
Liked 0 Times
in
0 Posts
You could always just go to the resource thread sticky yknow.
08-15-07, 02:38 PM
#185
Senior Member
Join Date: Jul 2007
Location: dc
Posts: 90
Mentioned: 0 Post(s)
Tagged: 0 Thread(s)
Quoted: 0 Post(s)
Likes: 0
Liked 0 Times
in
0 Posts
08-15-07, 03:38 PM
#186
Member
Join Date: Jun 2007
Posts: 45
Mentioned: 0 Post(s)
Tagged: 0 Thread(s)
Quoted: 0 Post(s)
Likes: 0
Liked 0 Times
in
0 Posts
how do you guys remove headset cups without this? and without damaging the steerer tube?
08-21-07, 06:38 PM
#187
Senior Member
Join Date: Jun 2005
Location: Toronto
Posts: 140
Mentioned: 0 Post(s)
Tagged: 0 Thread(s)
Quoted: 0 Post(s)
Likes: 0
Liked 0 Times
in
0 Posts
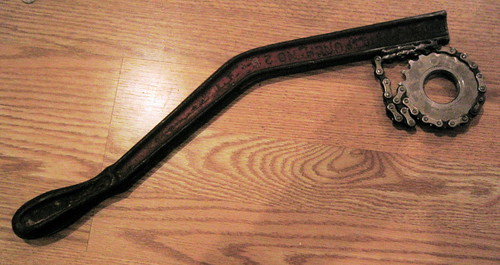
Here is my chain whip:
recycled part of a fork with a chain attached to the fender hole.
Tools used: hacksaw, chaintool.


recycled part of a fork with a chain attached to the fender hole.
Tools used: hacksaw, chaintool.
Last edited by Alzonder; 08-22-07 at 10:38 AM.
08-21-07, 07:11 PM
#188

Senior Member

Join Date: Sep 2006
Location: Gnv, FL
Posts: 1,890
Mentioned: 0 Post(s)
Tagged: 0 Thread(s)
Quoted: 0 Post(s)
Likes: 0
Liked 0 Times
in
0 Posts
That's cool, but how do you get any leverage without a second length of chain? Maybe you could cut slots in the fork blade to grip the cogs' teeth!
08-22-07, 08:33 AM
#189
Senior Member
Join Date: Jun 2005
Location: Toronto
Posts: 140
Mentioned: 0 Post(s)
Tagged: 0 Thread(s)
Quoted: 0 Post(s)
Likes: 0
Liked 0 Times
in
0 Posts
I don't know. but it works well 

 02-13-08, 12:20 PM
#192
i'd leave the sweet stuff

Join Date: Nov 2006
Location: x32308x: where all our dreams come true!
Posts: 727
Bikes: BCA ten speed / 2007 bfssfg group buy IRO
Mentioned: 0 Post(s)
Tagged: 0 Thread(s)
Quoted: 0 Post(s)
Likes: 0
Liked 0 Times
in
0 Posts
please add this thread about how to tape bullhorns (by c0urt):
https://bikeforums.net/showthread.php?p=6158792
kthxbye!
https://bikeforums.net/showthread.php?p=6158792
kthxbye!
 02-13-08, 08:24 PM
#194
Senior Member
Join Date: Nov 2007
Location: Quarantine
Posts: 238
Bikes: fixed gear raleigh super record, Fixed gear tall bike, SS tall bike, Triple high tall bike, Trek 4500, Diamond back viper, trek 800/nishiki chopper bike, I think/hope thats all
Mentioned: 0 Post(s)
Tagged: 0 Thread(s)
Quoted: 0 Post(s)
Likes: 0
Liked 0 Times
in
0 Posts
I have a welder, extra chain, and random pieces of metal to work as a lever but no chain whip... why haven't I thought of that before. Thanks for the inspiration.
02-13-08, 08:38 PM
#195
Senior Member
Join Date: Nov 2007
Location: Quarantine
Posts: 238
Bikes: fixed gear raleigh super record, Fixed gear tall bike, SS tall bike, Triple high tall bike, Trek 4500, Diamond back viper, trek 800/nishiki chopper bike, I think/hope thats all
Mentioned: 0 Post(s)
Tagged: 0 Thread(s)
Quoted: 0 Post(s)
Likes: 0
Liked 0 Times
in
0 Posts
I've never made one but I don't see how it would be hard. from the photos i've done similar work with a sawz-all (can be done with a hacksaw but that would be danm annoying). Place tubing in vice vertically, make 2 cuts at 90 degree angles and pry the tabs outwards. I'll try to get around to posting photos but no guarantees, hopefully you get the idea.
03-05-08, 09:49 AM
#196
Junior Member
Join Date: Mar 2008
Location: Long Island, NY
Posts: 5
Bikes: 700c Schwinn World conv. to fixie; 24" DK Gen. Lee (Black)
Mentioned: 0 Post(s)
Tagged: 0 Thread(s)
Quoted: 0 Post(s)
Likes: 0
Liked 0 Times
in
0 Posts
HEY So did I, was it a schiwnn world?
03-05-08, 12:33 PM
#197
Junior Member
Join Date: Mar 2008
Location: Long Island, NY
Posts: 5
Bikes: 700c Schwinn World conv. to fixie; 24" DK Gen. Lee (Black)
Mentioned: 0 Post(s)
Tagged: 0 Thread(s)
Quoted: 0 Post(s)
Likes: 0
Liked 0 Times
in
0 Posts
I'm going to throw my tutorial on making a belt with a bike tube up on here in a few days or so once I make my second one and take pictures while in the process, so it'll be very thorough and with pictures each step. what do you guys think? is there already one for bike tube belts, should i post it?
 03-07-08, 08:55 PM
#199
Senior Member
Join Date: Nov 2007
Location: Quarantine
Posts: 238
Bikes: fixed gear raleigh super record, Fixed gear tall bike, SS tall bike, Triple high tall bike, Trek 4500, Diamond back viper, trek 800/nishiki chopper bike, I think/hope thats all
Mentioned: 0 Post(s)
Tagged: 0 Thread(s)
Quoted: 0 Post(s)
Likes: 0
Liked 0 Times
in
0 Posts
Leather Saddle Restoration
Thing's you'll need:
1. Old saddle in need of love
2. Beer
3. Proofide / Snoseal/ or some other wax based leather treatment
4. C-Clamps /Twine
5. Oven
6. About 1.5 hours
Ok time to get started.
Step 1. Open Beer
Step 2. Turn on oven to about 200 F
Step 3. Apply proofide to saddle (Focus more on the underside, but get the top too.)
Step 4. Place in Oven for about 5 min. In the mean time enjoy beer.
Step 5. Remove from oven. Let cool another 5 min. Enjoy more brew.
Step 6. Repeat step 3
Step 7. If the sides are splayed outwards clamp them in in the seat rails with seat clamps. if not skip this step.
Step 8. Place back in oven for another 5 min.
Step 9. Remove, and repeat above steps as necessary.
!!!!Be sure to let Saddle cool/dry over night before removing clamps!!!!!
03-07-08, 08:56 PM
#200
Senior Member
Join Date: Nov 2007
Location: Quarantine
Posts: 238
Bikes: fixed gear raleigh super record, Fixed gear tall bike, SS tall bike, Triple high tall bike, Trek 4500, Diamond back viper, trek 800/nishiki chopper bike, I think/hope thats all
Mentioned: 0 Post(s)
Tagged: 0 Thread(s)
Quoted: 0 Post(s)
Likes: 0
Liked 0 Times
in
0 Posts
The DIY thread should be sticky!!