


How do you torque BB cups with no flanges?
 02-20-18 | 04:52 PM
#1

Thread Starter
Senior Member
Joined: Jul 2017
Posts: 1,523
Likes: 183
From: Queens, NY for now...
Bikes: 82 Lotus Unique, 86 Lotus Legend, 88 Basso Loto, 88 Basso PR, 89 Basso PR, 96 Bianchi CDI, 2013 Deda Aegis, 2019 Basso Diamante SV
How do you torque BB cups with no flanges?
Wasn't sure if I should post this here or in C&V, but here goes...
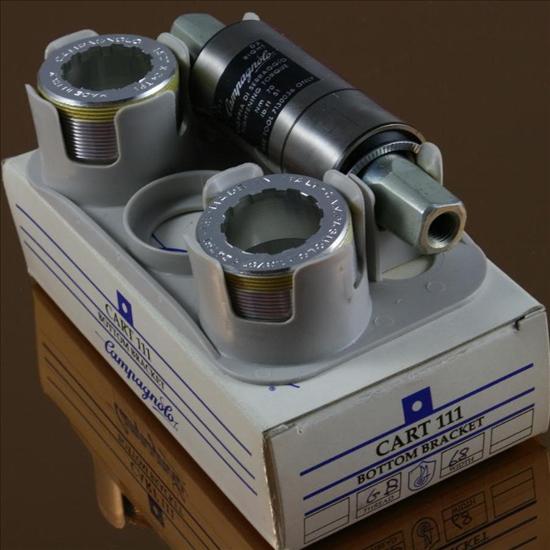
I recently picked up an older Campagnolo Athena (might be Chorus) sealed bottom bracket as shown in the photos. This particular model has two identical cups with no flange or lip on them. The threads run right to the edge, with nothing stopping them or making them "bottom out" against the frame flange.
When I did a dry run on each side, to make sure the threads were nice and clean, I noticed that I could keep screwing them in until they starting going well beyond the edge of the frame.
So when it came time to do the actual installation, as feared it was problematic to tighten them down, without a hard stop to use as a reference point. When I would tighten the right hand cup, the left hand cup would start to spin, and vice-versa left to right. The BB is Italian, so this meant that one would loosen as the other was tightening.
I have the appropriate Campagnolo splined tool, but only one of the. I was able to generate some torque by holding up the opposite side with needle-nose pliers, but I didn't trust putting 70nm of torque on it with just the pliers on the other side.
Is there some trick I am missing? Do I need to but a second splined nut to hold the opposite side in place while I torque one side to spec? Can someone with some experience on this offer some advice?
(For the record: I'm putting anti-seize on the threads, although I don't see how thread-locker would really solve this problem with that much torque)
 02-20-18 | 06:09 PM
#2

I never finish anyth


Joined: Jul 2010
Posts: 1,114
Likes: 137
From: Western KY
Bikes: 2008 Merckx LXM, 2003 Giant XTC mtb, 2001 Lemond Alpe d'Huez, 1997 Lemond Zurich, 1989 Cannondale ST, 1988 Masi Nuovo Strada, 1983 Pinarello Turismo
What do the install instructions say? I think these cups use the same tool as the cassette lockring, which is actually a nice touch by Campy.
Depending on the depth of the threads in the BB shell, you might be able to fine-tune the chainline with these cups.
I'd read through the directions, and follow them if they are specific enough. My second method would be to thread the DS cup in until the threads are just covered by the BB shell. Then I would test-fit the crankset on the DS spindle, checking the chainline measurement. If it's good, thread in the NDS cup and tighten to spec.
I don't see anything to indicate the BB width, but you can sometimes deduce it from the threading, which I don't see either. English threads would normally use a 68mm shell, italian would normally use a 70mm shell.
__________________
Dale, NL4T
Dale, NL4T
02-20-18 | 06:23 PM
#3
Senior Member


Joined: Apr 2011
Posts: 12,787
Likes: 4,889
You don't need to hold one cup, but you should grease where the body goes into the cups so the cups can be turned without turning the cartridge itself.
You'll find that if you get both cups in position and then torque down just the non-drive side that will go fine. There's no reason for the other cup to want to move - especially if it is English.
And that yellow stuff is thread locker.
You'll find that if you get both cups in position and then torque down just the non-drive side that will go fine. There's no reason for the other cup to want to move - especially if it is English.
And that yellow stuff is thread locker.
02-20-18 | 06:30 PM
#4
Senior Member
Joined: Jul 2009
Posts: 786
Likes: 6
Wasn't sure if I should post this here or in C&V, but here goes...
I recently picked up an older Campagnolo Athena (might be Chorus) sealed bottom bracket as shown in the photos. This particular model has two identical cups with no flange or lip on them. The threads run right to the edge, with nothing stopping them or making them "bottom out" against the frame flange.
When I did a dry run on each side, to make sure the threads were nice and clean, I noticed that I could keep screwing them in until they starting going well beyond the edge of the frame.
So when it came time to do the actual installation, as feared it was problematic to tighten them down, without a hard stop to use as a reference point. When I would tighten the right hand cup, the left hand cup would start to spin, and vice-versa left to right. The BB is Italian, so this meant that one would loosen as the other was tightening.
I have the appropriate Campagnolo splined tool, but only one of the. I was able to generate some torque by holding up the opposite side with needle-nose pliers, but I didn't trust putting 70nm of torque on it with just the pliers on the other side.
Is there some trick I am missing? Do I need to but a second splined nut to hold the opposite side in place while I torque one side to spec? Can someone with some experience on this offer some advice?
(For the record: I'm putting anti-seize on the threads, although I don't see how thread-locker would really solve this problem with that much torque)
Obviously what's happening is that the BB cartridge is turning with the cups. I would try a little anti-seize on the inside of the cup to reduce the friction. That might be enough to keep the other cup from turning while torquing. If not, then yes, you'll need another tool.
Even though you'll be tempted to use a Shimano lockring tool because gosh, it looks so similar, I'd strongly advise you not to, not with those alloy cups. You will probably regret it. I know I've regretted having to work on lots of BBs like that that someone used the Shimano tool on.
02-21-18 | 08:00 AM
#5
Senior Member

Joined: Jan 2013
Posts: 3,151
Likes: 888
Bikes: too many sparkly Italians, some sweet Americans and a couple interesting Japanese
You don't need to hold one cup, but you should grease where the body goes into the cups so the cups can be turned without turning the cartridge itself.
You'll find that if you get both cups in position and then torque down just the non-drive side that will go fine. There's no reason for the other cup to want to move - especially if it is English.
And that yellow stuff is thread locker.
You'll find that if you get both cups in position and then torque down just the non-drive side that will go fine. There's no reason for the other cup to want to move - especially if it is English.
And that yellow stuff is thread locker.
02-21-18 | 10:56 AM
#6
Senior Member

Joined: May 2003
Posts: 4,057
Likes: 166
From: Mountain Brook. AL
Looks like if you get the Park variant of the Campy 7130036 tool (https://www.parktool.com/product/fre...ol-bbt-5-fr-11)
you could use a socket and torque wrench to torque the BB on the L side. Park tool is nominally priced @ $9.
I realize this is not helpful to the OP unless OP decides he really does need a 2d tool.
you could use a socket and torque wrench to torque the BB on the L side. Park tool is nominally priced @ $9.
I realize this is not helpful to the OP unless OP decides he really does need a 2d tool.
02-21-18 | 05:06 PM
#7
Thread Starter
Senior Member
Joined: Jul 2017
Posts: 1,523
Likes: 183
From: Queens, NY for now...
Bikes: 82 Lotus Unique, 86 Lotus Legend, 88 Basso Loto, 88 Basso PR, 89 Basso PR, 96 Bianchi CDI, 2013 Deda Aegis, 2019 Basso Diamante SV
Thanks for all the feedback, guys.
Those pictures were taken from the internet. I got mine used from Ebay, and so I don't have any directions. But it seems like trying to torque down the NDS first, once the DS is in the spot I want it to be, is the way to go.
I did put a nice amount of grease (actually, anti-seize) between the cups and the body, but wrenching on the drive side was still making the non-drive side spin. Strangely, though, tightening the NDS didn't spin the DS as easily, so I guess this is the way forward.
For the record, the BB is Italian, and the factory thread lock is long since worn away.
Maybe I will try to slather on a bit more anti-seize. I know it's only a $10 tool, but buying a second one just for this seems a bit ridiculous.
That is exactly the tool that I have, but see above. Maybe I just need to find a local friend with Campagnolo bits.
I'd read through the directions, and follow them if they are specific enough. My second method would be to thread the DS cup in until the threads are just covered by the BB shell. Then I would test-fit the crankset on the DS spindle, checking the chainline measurement. If it's good, thread in the NDS cup and tighten to spec.
Originally Posted by Kontact
You don't need to hold one cup, but you should grease where the body goes into the cups so the cups can be turned without turning the cartridge itself.
You'll find that if you get both cups in position and then torque down just the non-drive side that will go fine. There's no reason for the other cup to want to move - especially if it is English.
And that yellow stuff is thread locker.
You'll find that if you get both cups in position and then torque down just the non-drive side that will go fine. There's no reason for the other cup to want to move - especially if it is English.
And that yellow stuff is thread locker.
For the record, the BB is Italian, and the factory thread lock is long since worn away.
Originally Posted by Ghrumpy
That might be enough to keep the other cup from turning while torquing. If not, then yes, you'll need another tool.
Originally Posted by sch
Park tool is nominally priced @ $9.
I realize this is not helpful to the OP unless OP decides he really does need a 2d tool.
I realize this is not helpful to the OP unless OP decides he really does need a 2d tool.
02-21-18 | 05:09 PM
#8

FLIR Kitten to 0.05C
Joined: Sep 2014
Posts: 5,331
Likes: 409
From: Lincoln, Nebraska
Bikes: Roadie: Seven Axiom Race Ti w/Chorus 11s. CX/Adventure: Carver Gravel Grinder w/ Di2
Thanks for all the feedback, guys.
Those pictures were taken from the internet. I got mine used from Ebay, and so I don't have any directions. But it seems like trying to torque down the NDS first, once the DS is in the spot I want it to be, is the way to go.
I did put a nice amount of grease (actually, anti-seize) between the cups and the body, but wrenching on the drive side was still making the non-drive side spin. Strangely, though, tightening the NDS didn't spin the DS as easily, so I guess this is the way forward.
For the record, the BB is Italian, and the factory thread lock is long since worn away.
Maybe I will try to slather on a bit more anti-seize. I know it's only a $10 tool, but buying a second one just for this seems a bit ridiculous.
That is exactly the tool that I have, but see above. Maybe I just need to find a local friend with Campagnolo bits.
02-21-18 | 05:15 PM
#9
Thread Starter
Senior Member
Joined: Jul 2017
Posts: 1,523
Likes: 183
From: Queens, NY for now...
Bikes: 82 Lotus Unique, 86 Lotus Legend, 88 Basso Loto, 88 Basso PR, 89 Basso PR, 96 Bianchi CDI, 2013 Deda Aegis, 2019 Basso Diamante SV
As I mentioned, those pics are from the internet, and not my actual BB. Mine is the exact same model, just used. The best I can understand is that it's mid to late 1990's Chorus or Athena. I'll try to snap a pic of mine later, and post it up tomorrow.
02-21-18 | 05:21 PM
#10
Senior Member
Joined: Apr 2011
Posts: 12,787
Likes: 4,889
Put the Loctite on the DS cup, insert it to the proper spot and let it cure. Then assemble and torque from the NDS.
If you don't want to do that, give the DS cup a healthy wrap of teflon plumbers tape to keep it from spinning.
02-22-18 | 08:12 AM
#11
Senior Member
Joined: Jan 2013
Posts: 3,151
Likes: 888
Bikes: too many sparkly Italians, some sweet Americans and a couple interesting Japanese
Early '90, IIRC, I have use these with good success, Athena, Chorus, and Record. Don't recall using any of them in the lower cost BBs. I still have a '92 Tommasini Diamante and a CIOCC Designer '84 (replacement BB) with Campy BBs w/o flanges and running strong. I recall liking dialing in the chain line on the CIOCC.
02-22-18 | 05:08 PM
#12
Banned
Joined: Jun 2010
Posts: 43,586
Likes: 1,380
From: NW,Oregon Coast
Bikes: 8
Wasn't sure if I should post this here or in C&V, but here goes...
I recently picked up an older Campagnolo Athena (might be Chorus) sealed bottom bracket as shown in the photos. This particular model has two identical cups with no flange or lip on them. The threads run right to the edge, with nothing stopping them or making them "bottom out" against the frame flange.
When I did a dry run on each side, to make sure the threads were nice and clean, I noticed that I could keep screwing them in until they starting going well beyond the edge of the frame.
So when it came time to do the actual installation, as feared it was problematic to tighten them down, without a hard stop to use as a reference point. When I would tighten the right hand cup, the left hand cup would start to spin, and vice-versa left to right. The BB is Italian, so this meant that one would loosen as the other was tightening.
I have the appropriate Campagnolo splined tool, but only one of the. I was able to generate some torque by holding up the opposite side with needle-nose pliers, but I didn't trust putting 70nm of torque on it with just the pliers on the other side.
Is there some trick I am missing? Do I need to but a second splined nut to hold the opposite side in place while I torque one side to spec? Can someone with some experience on this offer some advice?
(For the record: I'm putting anti-seize on the threads, although I don't see how thread-locker would really solve this problem with that much torque)
I recently picked up an older Campagnolo Athena (might be Chorus) sealed bottom bracket as shown in the photos. This particular model has two identical cups with no flange or lip on them. The threads run right to the edge, with nothing stopping them or making them "bottom out" against the frame flange.
When I did a dry run on each side, to make sure the threads were nice and clean, I noticed that I could keep screwing them in until they starting going well beyond the edge of the frame.
So when it came time to do the actual installation, as feared it was problematic to tighten them down, without a hard stop to use as a reference point. When I would tighten the right hand cup, the left hand cup would start to spin, and vice-versa left to right. The BB is Italian, so this meant that one would loosen as the other was tightening.
I have the appropriate Campagnolo splined tool, but only one of the. I was able to generate some torque by holding up the opposite side with needle-nose pliers, but I didn't trust putting 70nm of torque on it with just the pliers on the other side.
Is there some trick I am missing? Do I need to but a second splined nut to hold the opposite side in place while I torque one side to spec? Can someone with some experience on this offer some advice?
(For the record: I'm putting anti-seize on the threads, although I don't see how thread-locker would really solve this problem with that much torque)
Cheaper one uses a flanged external spline ,, I also like that I can add an O ring , before putting the arm on , for an additional seal
..
Last edited by fietsbob; 02-22-18 at 05:13 PM.
03-19-18 | 12:36 PM
#13
Thread Starter
Senior Member
Joined: Jul 2017
Posts: 1,523
Likes: 183
From: Queens, NY for now...
Bikes: 82 Lotus Unique, 86 Lotus Legend, 88 Basso Loto, 88 Basso PR, 89 Basso PR, 96 Bianchi CDI, 2013 Deda Aegis, 2019 Basso Diamante SV
Just wanted to post an update, if anyone is ever curious.
I ended up thoroughly cleaning off the anti-sleaze I had applied, and instead I placed some blue thread locker on the threads and inside the cup where the edge of the BB mates with the cup (there is a little washer there).
I tightened the non-drive side pretty firmly and let it set overnight, and then installed the drive side. No spinning of the opposite side at all, and was able to torque it down to 70nm with no problems. Interestingly, when I then put the torque wrench on the NDS, to make sure it was also tight enough, it didn't turn at all before the wrench clicked, so I guess the pressure of the drive side pushing back on the NDS was enough to make it tighter as well.
So far so good and I'll let you know how it rides. Despite being used, this BB spins SUPER smooth when you mount the cranks, and it looks happy to spin for a long, long time.
PS. Blue threadlocker from loctite now comes in a red tube. WTF?! Thank god my GF was with me at the store, because I was already saying, "just my luck, they are out of the blue..." When she pointing out that some of the read tubes said "blue" on them. Why?
03-19-18 | 01:06 PM
#14
Senior Member
Joined: Sep 2015
Posts: 1,696
Likes: 114
From: New Jersey
Just wanted to post an update, if anyone is ever curious.
I ended up thoroughly cleaning off the anti-sleaze I had applied, and instead I placed some blue thread locker on the threads and inside the cup where the edge of the BB mates with the cup (there is a little washer there).
I tightened the non-drive side pretty firmly and let it set overnight, and then installed the drive side. No spinning of the opposite side at all, and was able to torque it down to 70nm with no problems. Interestingly, when I then put the torque wrench on the NDS, to make sure it was also tight enough, it didn't turn at all before the wrench clicked, so I guess the pressure of the drive side pushing back on the NDS was enough to make it tighter as well.
So far so good and I'll let you know how it rides. Despite being used, this BB spins SUPER smooth when you mount the cranks, and it looks happy to spin for a long, long time.
PS. Blue threadlocker from loctite now comes in a red tube. WTF?! Thank god my GF was with me at the store, because I was already saying, "just my luck, they are out of the blue..." When she pointing out that some of the read tubes said "blue" on them. Why?
I ended up thoroughly cleaning off the anti-sleaze I had applied, and instead I placed some blue thread locker on the threads and inside the cup where the edge of the BB mates with the cup (there is a little washer there).
I tightened the non-drive side pretty firmly and let it set overnight, and then installed the drive side. No spinning of the opposite side at all, and was able to torque it down to 70nm with no problems. Interestingly, when I then put the torque wrench on the NDS, to make sure it was also tight enough, it didn't turn at all before the wrench clicked, so I guess the pressure of the drive side pushing back on the NDS was enough to make it tighter as well.
So far so good and I'll let you know how it rides. Despite being used, this BB spins SUPER smooth when you mount the cranks, and it looks happy to spin for a long, long time.
PS. Blue threadlocker from loctite now comes in a red tube. WTF?! Thank god my GF was with me at the store, because I was already saying, "just my luck, they are out of the blue..." When she pointing out that some of the read tubes said "blue" on them. Why?
 03-19-18 | 01:22 PM
#15
Senior Member
Joined: Apr 2011
Posts: 12,787
Likes: 4,889
Just wanted to post an update, if anyone is ever curious.
I ended up thoroughly cleaning off the anti-sleaze I had applied, and instead I placed some blue thread locker on the threads and inside the cup where the edge of the BB mates with the cup (there is a little washer there).
I tightened the non-drive side pretty firmly and let it set overnight, and then installed the drive side. No spinning of the opposite side at all, and was able to torque it down to 70nm with no problems. Interestingly, when I then put the torque wrench on the NDS, to make sure it was also tight enough, it didn't turn at all before the wrench clicked, so I guess the pressure of the drive side pushing back on the NDS was enough to make it tighter as well.
So far so good and I'll let you know how it rides. Despite being used, this BB spins SUPER smooth when you mount the cranks, and it looks happy to spin for a long, long time.
PS. Blue threadlocker from loctite now comes in a red tube. WTF?! Thank god my GF was with me at the store, because I was already saying, "just my luck, they are out of the blue..." When she pointing out that some of the read tubes said "blue" on them. Why?
I ended up thoroughly cleaning off the anti-sleaze I had applied, and instead I placed some blue thread locker on the threads and inside the cup where the edge of the BB mates with the cup (there is a little washer there).
I tightened the non-drive side pretty firmly and let it set overnight, and then installed the drive side. No spinning of the opposite side at all, and was able to torque it down to 70nm with no problems. Interestingly, when I then put the torque wrench on the NDS, to make sure it was also tight enough, it didn't turn at all before the wrench clicked, so I guess the pressure of the drive side pushing back on the NDS was enough to make it tighter as well.
So far so good and I'll let you know how it rides. Despite being used, this BB spins SUPER smooth when you mount the cranks, and it looks happy to spin for a long, long time.
PS. Blue threadlocker from loctite now comes in a red tube. WTF?! Thank god my GF was with me at the store, because I was already saying, "just my luck, they are out of the blue..." When she pointing out that some of the read tubes said "blue" on them. Why?
 03-19-18 | 01:46 PM
#18

Senior Member
Joined: Nov 2010
Posts: 22,994
Likes: 10,499
From: Sacramento, CA
Bikes: old ones
Fear not however. Our friends at *other online forum which cannot be named but begins with R* have covered the topic admirably.
 threadlock_packaging
03-19-18 | 01:51 PM
threadlock_packaging
03-19-18 | 01:51 PM
#19
Senior Member
Joined: Nov 2010
Posts: 22,994
Likes: 10,499
From: Sacramento, CA
Bikes: old ones
.
...when I was using more Phil Wood BB's, I just bit the bullet and bought two of the specific tools.
If you're doing a lot of chainline tweaking for a variety of older applications, you start to appreciate the options.
...when I was using more Phil Wood BB's, I just bit the bullet and bought two of the specific tools.
If you're doing a lot of chainline tweaking for a variety of older applications, you start to appreciate the options.
03-19-18 | 02:54 PM
#21
Senior Member
Joined: Apr 2011
Posts: 12,787
Likes: 4,889
03-19-18 | 03:15 PM
#22
Banned
Joined: Jun 2010
Posts: 43,586
Likes: 1,380
From: NW,Oregon Coast
Bikes: 8
Torque is a standardized number scale to write how tight, in a commonly understood method, if its torqued to Spec it will not loosen..
You have not done any auto engine overhauls, mr Contrarian, have you. ?
Get OFF My Lawn Sonny.. ..
You have not done any auto engine overhauls, mr Contrarian, have you. ?
Get OFF My Lawn Sonny.. ..
03-19-18 | 03:26 PM
#23
Senior Member
Joined: Apr 2011
Posts: 12,787
Likes: 4,889
I think everyone here understands what torque is. I was wondering if your post addressed anything in particular that was being said or if it was a non sequitar?
03-19-18 | 04:27 PM
#24
Thread Starter
Senior Member
Joined: Jul 2017
Posts: 1,523
Likes: 183
From: Queens, NY for now...
Bikes: 82 Lotus Unique, 86 Lotus Legend, 88 Basso Loto, 88 Basso PR, 89 Basso PR, 96 Bianchi CDI, 2013 Deda Aegis, 2019 Basso Diamante SV
Anyway, my procedure was thus:
1. Threadlock applied to NDS cup threads and inside washer
2. Install BB with nothing (no thread lock) on DS threads, with desired chainline placement (although there really isn't that much room for adjustment) set on DS
3. Tighten NDS side down firmly, but not quite to full torque spec
4. Next day remove DS, apply threadlock, re-install DS and torque to 70nm
5. Go around and put the torque wrench on the NDS, and find that it immediately clicks off a 70nm
Now, I'm not saying this is correct or anything, just sharing what I did. And I'm satisfied that everything is as it should be.
Originally Posted by trailangel
Ya, Drive side first... then NDS
Originally Posted by fietsbob
with a large enough socket , 1/2" drive, you can use a torque wrench
Well, not exactly. If you want get crazy, my torque wrench is 3/8 inch drive, so I picked up a 1" socket with 3/8 inch drive, and used the 1" socket to drive my Park Took Campagnolo Bottom Bracket (BB5 or whatever it is) key/nut/tool thing.
03-19-18 | 04:40 PM
#25
Senior Member
Joined: Apr 2011
Posts: 12,787
Likes: 4,889
Sorry, I should have been a little more detailed (also just notices the "anti-sleaze" typo, which obviously should have been seize).
Anyway, my procedure was thus:
1. Threadlock applied to NDS cup threads and inside washer
2. Install BB with nothing (no thread lock) on DS threads, with desired chainline placement (although there really isn't that much room for adjustment) set on DS
3. Tighten NDS side down firmly, but not quite to full torque spec
4. Next day remove DS, apply threadlock, re-install DS and torque to 70nm
5. Go around and put the torque wrench on the NDS, and find that it immediately clicks off a 70nm
Now, I'm not saying this is correct or anything, just sharing what I did. And I'm satisfied that everything is as it should be.
Do you mean simply installing the cups, or tightening down to final torque spec? As mentioned, I "set" the NDS side first with locktite where I wanted it, then torqued the DS to spec, followed by a check of the NDS. Is that OK, or do you think I should re-do it?
When you have the cups essentially tightening into each other on a BB like this, 70nM of torque on one side is 70nM on the other.