


The "Before And After" Thread

 04-04-15 | 10:26 PM
#1927

Freshman Member


Joined: Mar 2014
Posts: 5,867
Likes: 4,154
From: City of Angels
Bikes: A few too many
04-04-15 | 10:31 PM
#1928

tantum vehi

Joined: Jul 2008
Posts: 4,619
Likes: 1,314
From: Flathead Valley, MT
Bikes: More than I care to admit
")


 04-05-15 | 01:22 PM
#1931

Bianchi Goddess
Joined: Apr 2009
Posts: 28,888
Likes: 4,133
From: Shady Pines Retirement Fort Wayne, In
Bikes: Too many to list here check my signature.
My Bianchi Campione Vento Specialisima 603 Tour Pro Team with the Shipmano Sante' group

And after I sold the Sante' group. The bar/stem, seatpost and wheels are the same but in place of the Sante' I used 1st gen Chorus cranks and brake calipers, a later model CampI brake lever, an old Cyclone FD, 600 RD and Rival index shifters. Hopefully I'll get to do short shake down after work
tomorrow.
__________________
�One morning you wake up, the girl is gone, the bikes are gone, all that's left behind is a pair of old tires and a tube of tubular glue, all squeezed out"
Sugar "Kane" Kowalczyk
�One morning you wake up, the girl is gone, the bikes are gone, all that's left behind is a pair of old tires and a tube of tubular glue, all squeezed out"
Sugar "Kane" Kowalczyk
Last edited by Bianchigirll; 04-05-15 at 01:29 PM.
04-05-15 | 01:30 PM
#1932
Bianchi Goddess
Joined: Apr 2009
Posts: 28,888
Likes: 4,133
From: Shady Pines Retirement Fort Wayne, In
Bikes: Too many to list here check my signature.
Beautiful!!


__________________
�One morning you wake up, the girl is gone, the bikes are gone, all that's left behind is a pair of old tires and a tube of tubular glue, all squeezed out"
Sugar "Kane" Kowalczyk
�One morning you wake up, the girl is gone, the bikes are gone, all that's left behind is a pair of old tires and a tube of tubular glue, all squeezed out"
Sugar "Kane" Kowalczyk
04-05-15 | 03:15 PM
#1933

Calamari Marionette Ph.D
Joined: Dec 2013
Posts: 7,861
Likes: 41
From: Coeur d' Alene
Bikes: 3 Chinese Gas Pipe Nerdcycles and 2 Chicago Electroforged Boat Anchors
^thanks mountaindave
Not worthy of a separate thread on the project but here's the refinishing story.


Paint professionally done by Mr. Rusty Oleum. With material and all supplies, cost approximately $12.
I had this bike 300 miles away from the workshop and just wasn't up to dragging
another project to block the doorway or mix with the others...lol. My thinking was
while at the other location, it would stand out and say 'fix me'! Decided late last
Fall when the mosquito's left, the winds were calm and the temps hovering at 70, I
used Mother Natures paint booth.
The Motobecane stickers of that 70's era are tough to remove with some clear over
them. Used a heatgun and mild scrape to remove them. With a razor blade, was able to
cut around the fork blade decals, lift and save. Received a degrease bath with liquid
Dawn. She's hot in the water.
Most would probably strip the finish to bare metal, but sometimes its just as good to
not bother. All depends though. This one had good original paint adhesion (no chrome
underneath) but did have the surface corrosion areas. The rust portions were taken
care of and the frame sanded to 320 grit only. Areas of knick or scratches the paint
edges were sanded level, feathered.
A thorough wipe down just prior to paint with thinner and tack cloth. At this point,
its hands off - no oil.
The magic of Rusty Oleum. This rattle can stuff is really good. Its the 2X coverage
with primer. A can cost $6 but I found it on sale for half that! Of note - you can
spay while inverted plus the plastic nozzle doesn't spit and has a more atomized
output. For out of a can, coverage is excellent and its the best I've found. This
bike was a complete color change, NO pre-primer! Didn't want to go with multiple
coats and have that thick or powdercoat look plus later was getting clear urethane.
Post paint. Left it outside for an hour before handling. Later shove it up on a shelf
in the garage and forget about it. Winter time with a nice long cure. Gather parts,
wheel related, decal ideas, etc..
Spring arrived and got carried away with a gold paint pen outline, DIY sort of
graphics. Spent $10 for the chrome Motobecane letters. The rest is my own concept home
made sort decals. Love, hate, odd or indifferent, brings up conversation of triumph
and battle both race drama and personally of Ocana.
Anyways, back outside in Ma Natures paint booth on a perfect, no wind day. Received a
top coat of clear urethane by Mr. Rusty 2X again. This covered good but was a little
trickier in the flow. Seemed thin on the output. Had a few minor runs but while wet
fixed immediately and had to rotisserie the frame for a few minutes preventing runs
on the tube surfaces. It would be a different story using this stuff on flat surfaces
but for compound surfaces like tubes, its challenging.
Really impressed how tough this paint cured. Excellent coverage and no soft feel to
it. Nice and hard cure. Thought to have chipped it a few times moving around and
during a realignment of the front derailleur, loosened and rotated with the cable
still on, no mar on the tube.
Fortunate to have all the good equipment and anytime access to a pro paint booth but
with a tight budget in mind, didn't want to invest in the high cost paint / chemicals,
etc.. The goal was completing the project and something different. Hope one of the
girls will ride on some C&V events or will be loaned out.
Not worthy of a separate thread on the project but here's the refinishing story.
Paint professionally done by Mr. Rusty Oleum. With material and all supplies, cost approximately $12.
I had this bike 300 miles away from the workshop and just wasn't up to dragging
another project to block the doorway or mix with the others...lol. My thinking was
while at the other location, it would stand out and say 'fix me'! Decided late last
Fall when the mosquito's left, the winds were calm and the temps hovering at 70, I
used Mother Natures paint booth.
The Motobecane stickers of that 70's era are tough to remove with some clear over
them. Used a heatgun and mild scrape to remove them. With a razor blade, was able to
cut around the fork blade decals, lift and save. Received a degrease bath with liquid
Dawn. She's hot in the water.
Most would probably strip the finish to bare metal, but sometimes its just as good to
not bother. All depends though. This one had good original paint adhesion (no chrome
underneath) but did have the surface corrosion areas. The rust portions were taken
care of and the frame sanded to 320 grit only. Areas of knick or scratches the paint
edges were sanded level, feathered.
A thorough wipe down just prior to paint with thinner and tack cloth. At this point,
its hands off - no oil.
The magic of Rusty Oleum. This rattle can stuff is really good. Its the 2X coverage
with primer. A can cost $6 but I found it on sale for half that! Of note - you can
spay while inverted plus the plastic nozzle doesn't spit and has a more atomized
output. For out of a can, coverage is excellent and its the best I've found. This
bike was a complete color change, NO pre-primer! Didn't want to go with multiple
coats and have that thick or powdercoat look plus later was getting clear urethane.
Post paint. Left it outside for an hour before handling. Later shove it up on a shelf
in the garage and forget about it. Winter time with a nice long cure. Gather parts,
wheel related, decal ideas, etc..
Spring arrived and got carried away with a gold paint pen outline, DIY sort of
graphics. Spent $10 for the chrome Motobecane letters. The rest is my own concept home
made sort decals. Love, hate, odd or indifferent, brings up conversation of triumph
and battle both race drama and personally of Ocana.
Anyways, back outside in Ma Natures paint booth on a perfect, no wind day. Received a
top coat of clear urethane by Mr. Rusty 2X again. This covered good but was a little
trickier in the flow. Seemed thin on the output. Had a few minor runs but while wet
fixed immediately and had to rotisserie the frame for a few minutes preventing runs
on the tube surfaces. It would be a different story using this stuff on flat surfaces
but for compound surfaces like tubes, its challenging.
Really impressed how tough this paint cured. Excellent coverage and no soft feel to
it. Nice and hard cure. Thought to have chipped it a few times moving around and
during a realignment of the front derailleur, loosened and rotated with the cable
still on, no mar on the tube.
Fortunate to have all the good equipment and anytime access to a pro paint booth but
with a tight budget in mind, didn't want to invest in the high cost paint / chemicals,
etc.. The goal was completing the project and something different. Hope one of the
girls will ride on some C&V events or will be loaned out.
 05-03-15 | 06:21 PM
#1934
tantum vehi
Joined: Jul 2008
Posts: 4,619
Likes: 1,314
From: Flathead Valley, MT
Bikes: More than I care to admit
Because She Who Must Be Obeyed, must be obeyed:


To make a short story long, I bought some white-hooded Shimano Tricolor brake levers that came with "spare white hoods" that were a phenomenal deal. I must have been so excited that I didn't bother to look closely at the pictures of the "spares." Turns out they were Dia Compe aero lever hoods. I cleaned them up and put them aside.
Some time later my wife complained again that she couldn't use the brake levers on the Allez that she dearly loves and a lightbulb went off! I began scouring the interweb for some era-appropriate Dia Compe aero levers and some chrome inline brake levers. I found a cheap pair of DCs with gross hoods (the white "spares" fit perfectly), acquired the necessary Soma silver inline levers and went to work.
If I'm not mistaken, DC made the Superbe levers so I figured that a straight up DC swap would still match the grouppo. Besides, those Cane Creek replacement hoods don't fit worth beans. It's not complete yet, but after a 40 mile ride with some short but wicked gravel descents, my wife is very pleased!
To make a short story long, I bought some white-hooded Shimano Tricolor brake levers that came with "spare white hoods" that were a phenomenal deal. I must have been so excited that I didn't bother to look closely at the pictures of the "spares." Turns out they were Dia Compe aero lever hoods.
I cleaned them up and put them aside. Some time later my wife complained again that she couldn't use the brake levers on the Allez that she dearly loves and a lightbulb went off!
I began scouring the interweb for some era-appropriate Dia Compe aero levers and some chrome inline brake levers. I found a cheap pair of DCs with gross hoods (the white "spares" fit perfectly), acquired the necessary Soma silver inline levers and went to work. If I'm not mistaken, DC made the Superbe levers so I figured that a straight up DC swap would still match the grouppo. Besides, those Cane Creek replacement hoods don't fit worth beans. It's not complete yet, but after a 40 mile ride with some short but wicked gravel descents, my wife is very pleased!
05-13-15 | 05:33 PM
#1935

Port

Joined: Jan 2008
Posts: 9,160
Likes: 6,092
From: Boston
Bikes: 2022 Soma Fog Cutter, 2021 Calfee Draqonfly 44, 1984 Peter Mooney, 2017 Soma Stanyan, 1990 Fuji Ace, 1990 Bridgestone RB-1, 1995 Independent Fabrications Track, 2003 Calfee Dragonfly Pro
This is a friend's bike. He inherited it when a roommate of his abandoned it when he moved out. It has an interesting mish-mash of parts. Mostly low-end: Shimano Light Action derailleurs + shifters, dia-compe brakes (with rusted/siezed springs) and levers, no-name post, god-awful saddle, rusty steel pedals. But it also has some very nice high-end bits: Campy Recod hubs, Ambrosio rims, Mavic HS, Cinelli Criterium bars...
Before:


My friend wanted it to be a nice-ish commuter.
After:

New Tiagra brakes.
New Shimano Altus 7 speed brifters.
New Shimano 7 speed freewheel.
New KMC 7 speed chain
New Nashbar saddle
New Nashbar pedals, clips, straps
New cables
New rim strips
New Easton tape
Parts-bin FSA carbon post
Overhauled hubs, BB and HS.
It shifts and brakes very nice, but it will not go straight! It pulls hard to the right. I suspect the fork is bent. It was hard to fit the front wheel in, and required spreading the fork-ends apart. I'll see if I can persuade it back into alignment tomorrow.
Also, if I could find an easy way to remove the horrible yellow decals....
Before:
My friend wanted it to be a nice-ish commuter.
After:
New Tiagra brakes.
New Shimano Altus 7 speed brifters.
New Shimano 7 speed freewheel.
New KMC 7 speed chain
New Nashbar saddle
New Nashbar pedals, clips, straps
New cables
New rim strips
New Easton tape
Parts-bin FSA carbon post
Overhauled hubs, BB and HS.
It shifts and brakes very nice, but it will not go straight! It pulls hard to the right. I suspect the fork is bent. It was hard to fit the front wheel in, and required spreading the fork-ends apart. I'll see if I can persuade it back into alignment tomorrow.
Also, if I could find an easy way to remove the horrible yellow decals....
__________________
https://rowdml.tripod.com/panmass
https://rowdml.tripod.com/panmass
Last edited by Rocket-Sauce; 05-13-15 at 06:48 PM.

 05-16-15 | 10:11 AM
#1938
Banned.
Joined: May 2011
Posts: 4,816
Likes: 29
From: on the beach
Bikes: '73 falcon sr, '76 grand record, '84 davidson
^ for the windsor, i used a duplicolor silver for the seat stays, top tube, head tube and fork.
and, yes, i replaced the suntour rd, huret fd and suntour shifters with nuovo record.
it's a nice bike. i like the 17" stays. makes a bike more comfortable. it's fast too.
and, yes, i replaced the suntour rd, huret fd and suntour shifters with nuovo record.
it's a nice bike. i like the 17" stays. makes a bike more comfortable. it's fast too.
06-09-15 | 10:45 AM
#1939
Port
Joined: Jan 2008
Posts: 9,160
Likes: 6,092
From: Boston
Bikes: 2022 Soma Fog Cutter, 2021 Calfee Draqonfly 44, 1984 Peter Mooney, 2017 Soma Stanyan, 1990 Fuji Ace, 1990 Bridgestone RB-1, 1995 Independent Fabrications Track, 2003 Calfee Dragonfly Pro
1988 Trek 560
As found:

It was unridden since the 1980s. I think it was probably stored in an attic or near a radiator because all the grease was completely dry and tar-like. Headset and BB would barely move. Nothing a little elbow grease wouldn't remedy. Tires were new, but completely dry-rotted. They held air, but I wouldn't trust 'em -or the glue holding them one.
Now:


As found:
It was unridden since the 1980s. I think it was probably stored in an attic or near a radiator because all the grease was completely dry and tar-like. Headset and BB would barely move. Nothing a little elbow grease wouldn't remedy. Tires were new, but completely dry-rotted. They held air, but I wouldn't trust 'em -or the glue holding them one.
Now:
__________________
https://rowdml.tripod.com/panmass
https://rowdml.tripod.com/panmass
06-11-15 | 06:10 AM
#1941


Super Moderator

Joined: Jul 2004
Posts: 21,979
Likes: 1,154
From: Ffld Cnty Connecticut
Bikes: Old Steelies I made, Old Cannondales
Before (generic oic)

After: Built 1982-ish (fuzzy memory) as my race bike, upgraded parts a couple of years ago.
After: Built 1982-ish (fuzzy memory) as my race bike, upgraded parts a couple of years ago.


__________________
Bikes: Old steel race bikes, old Cannondale race bikes, less old Cannondale race bike, crappy old mtn bike.
FYI: https://www.bikeforums.net/forum-sugg...ad-please.html
Bikes: Old steel race bikes, old Cannondale race bikes, less old Cannondale race bike, crappy old mtn bike.
FYI: https://www.bikeforums.net/forum-sugg...ad-please.html
Last edited by Homebrew01; 06-11-15 at 06:14 AM.

 06-24-15 | 09:11 AM
#1943
Senior Member
Joined: Apr 2014
Posts: 320
Likes: 12
From: Central Florida
Bikes: 2010 Schwinn Madison, 1994 Kona Lava Dome, 1991 Quattro Assi, 1990 Bottecchia Team ADR SL
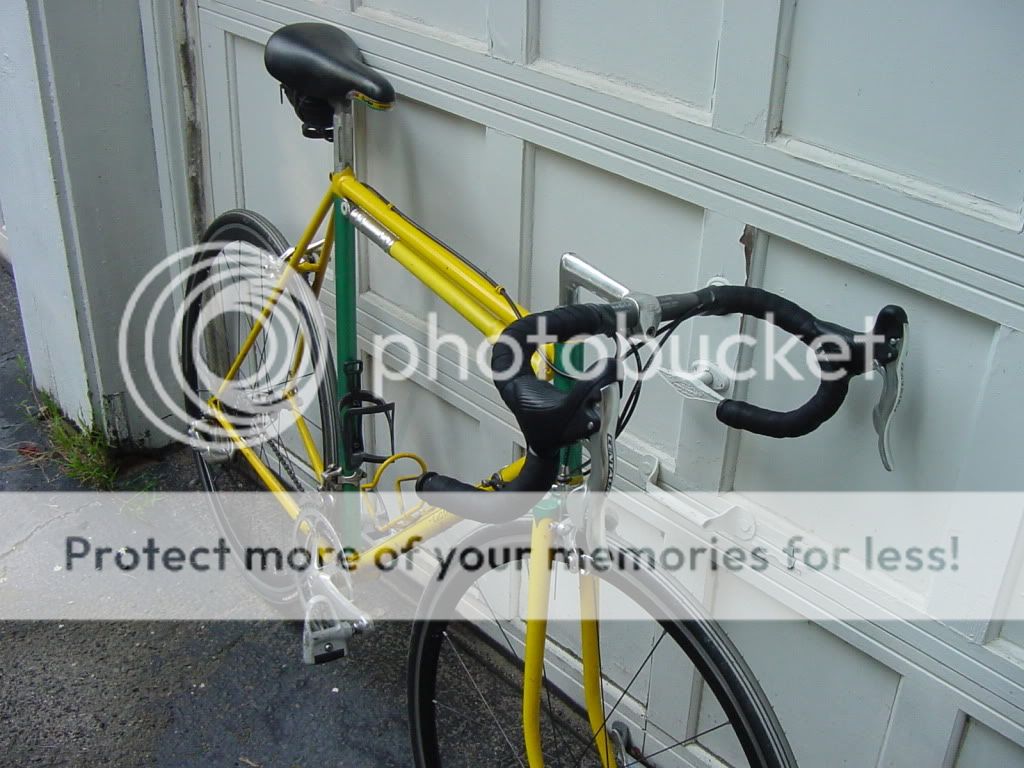
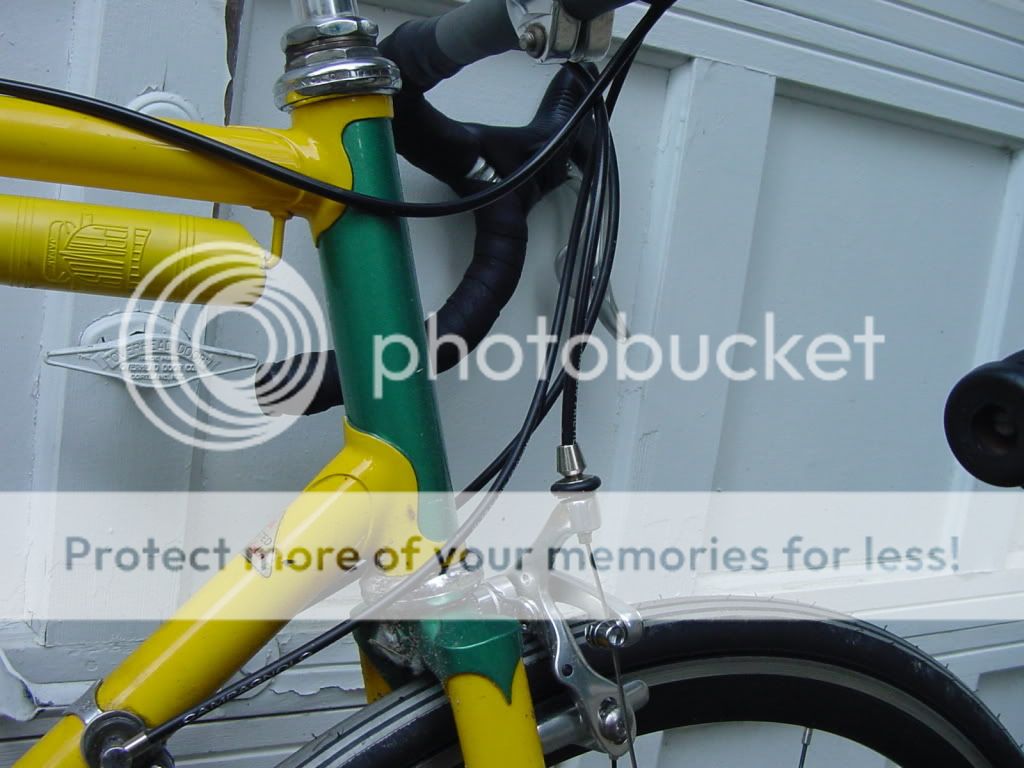
1986-87 Bianchi Colorado Springs before and after:

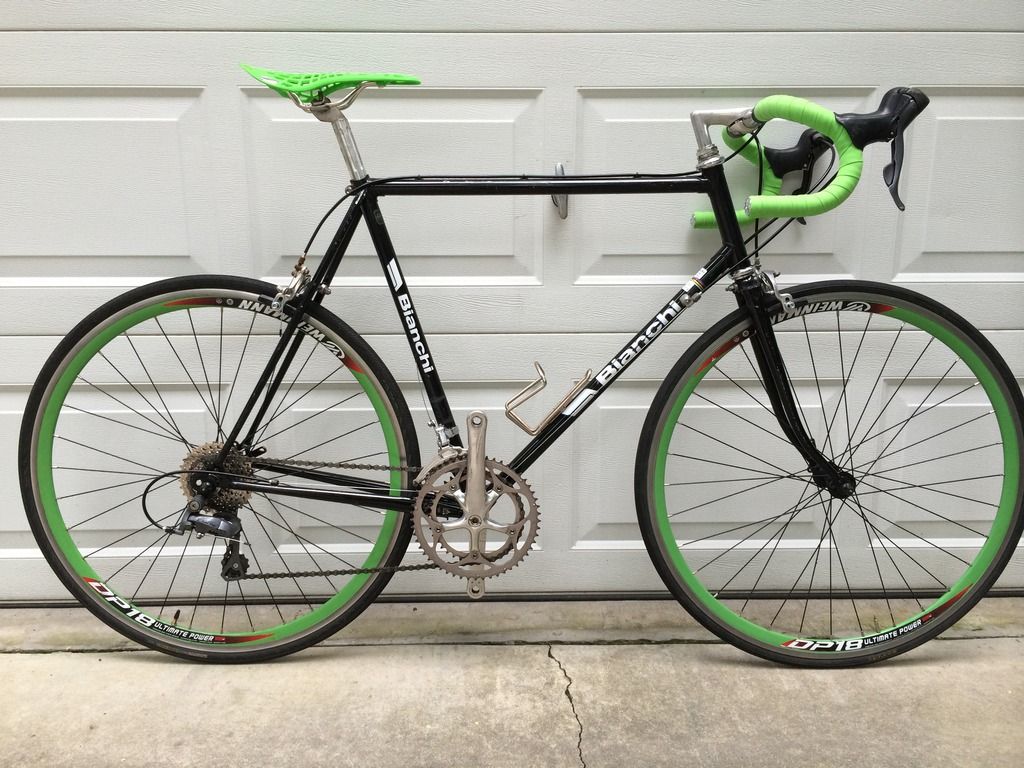
Seatpost, stem, bars, brakes and FD original to the frame. Upgraded to Claris brifters and RD. Wienmann DP18 rims.


Seatpost, stem, bars, brakes and FD original to the frame. Upgraded to Claris brifters and RD. Wienmann DP18 rims.
06-24-15 | 12:35 PM
#1944
Senior Member
Joined: Oct 2011
Posts: 659
Likes: 105
From: Long Island, NY
06-24-15 | 02:32 PM
#1945
Bianchi Goddess
Joined: Apr 2009
Posts: 28,888
Likes: 4,133
From: Shady Pines Retirement Fort Wayne, In
Bikes: Too many to list here check my signature.
I just saw this on craigs list. It is interesting to say the least. There is no such thing as '86/87 Colorado Springs model, so what is it?
__________________
�One morning you wake up, the girl is gone, the bikes are gone, all that's left behind is a pair of old tires and a tube of tubular glue, all squeezed out"
Sugar "Kane" Kowalczyk
�One morning you wake up, the girl is gone, the bikes are gone, all that's left behind is a pair of old tires and a tube of tubular glue, all squeezed out"
Sugar "Kane" Kowalczyk
06-24-15 | 02:49 PM
#1947
Senior Member
Joined: Apr 2014
Posts: 320
Likes: 12
From: Central Florida
Bikes: 2010 Schwinn Madison, 1994 Kona Lava Dome, 1991 Quattro Assi, 1990 Bottecchia Team ADR SL
Thank you!
I know, but it is the only thing marked on the bike so I went with it... here is the first thread about it: https://www.bikeforums.net/classic-vi...s-bianchi.html
If you can shed any light on it based on the additional pics in this thread please do let me know! It certainly was fun to build up tho!
If you can shed any light on it based on the additional pics in this thread please do let me know! It certainly was fun to build up tho!
06-24-15 | 06:38 PM
#1950
Bianchi Goddess
Joined: Apr 2009
Posts: 28,888
Likes: 4,133
From: Shady Pines Retirement Fort Wayne, In
Bikes: Too many to list here check my signature.